Changing FormAssembly and Informatica Connector Credentials
FormAssembly Connectors - Password Changes - Gemini Interface
- Navigate to FormAssembly.
- Choose the Forms list option.
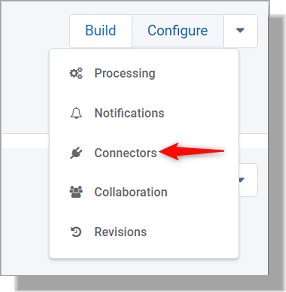
- Select a form you believe has our credentials (such as a template initially created during implementation). Click Configure and then select Connectors from the dropdown.
-
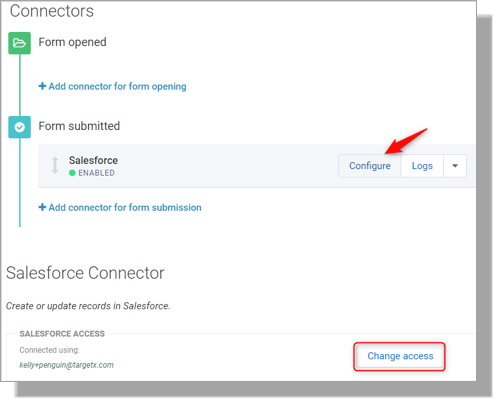
Click Configure next to your Salesforce connector and select Change Access on the next page.
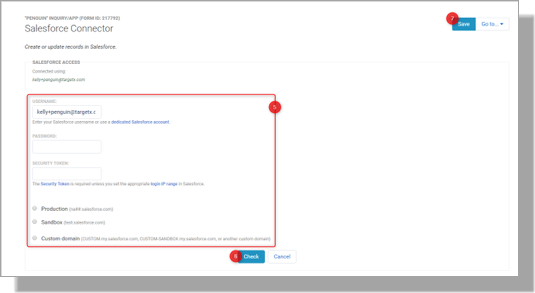
- Once on the Connector page, enter your Salesforce login credentials, including your Username, Password, and Security Token. Check the boxes if you connect to a Salesforce sandbox or if your CRM uses a custom domain. You will know if you use a custom domain if your URL for the CRM is formatted similar to https://targetx.my.salesforce.com.
- Click Check to confirm the new credentials work and select to update credentials on other forms if desired.
- Once done, click the Save button.
FormAssembly Connectors - Password Changes - Classic Interface
- Select FormAssembly from the App Picker in the top right corner.
- Choose the "Manage Forms" tab.
- Select a form you believe has our credentials (such as a template initially created during implementation). Click Edit and then Configure and then Connectors.
- Click "Configure" on the Salesforce connector.
- On the Connector page, under "Step 1 of 2 - Salesforce Access," click Change Access.
- Update with your username, password, and security token. If you don't know your security token, you can reset it following these steps. When done, click Check to confirm the new credentials work.
- Once confirmed, you'll see an option to update other connectors using that name. Click the link.
- Once done, scroll to the bottom of the page and click the Save button.
Informatica Cloud Connections - Password Changes
-
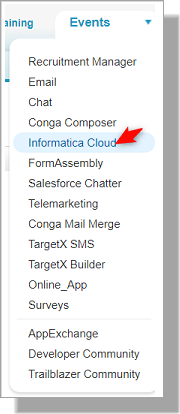
Select Informatica Cloud from the Application Picker in the top right of your page from within the CRM.
-
Log in through Single Sign On by clicking Single Sign-On:

- Click the Configure tab at the top and then choose Connections.
- Find your connection to Salesforce. It will have a type of "Salesforce," and the Service URL will include https://login.salesforce.com." If you have sandbox connections (https://test.salesforce.com), you will also want to update those.
- Click the pencil icon next to the connection to edit.
- Change the username, password, and security token to an admin user.
- Click Test to ensure the credentials are saved correctly.
- Click Ok to Save.