Local Statuses Best Practices
Why use Local Statuses?
Local Statuses allow you to track applicants through each stage of your admissions review cycle. You can create a granular workflow customized to your process that only you can see in WebAdMIT; applicants cannot see any Local Status created for your workflow. Local Statuses help you better understand where your applicants are in your admissions review process.
You also have the option to match Local Statuses to Decision Codes. Decision Codes are standard CAS-wide codes used for categorization and reporting of applicants. If you link a Local Status to a Decision Code, when you change an applicant’s Local Status, WebAdMIT automatically updates the Decision Code. Note that for programs that participate in ADEA AADSAS and match Local Statuses to Decision Codes, applicants can view final Decision Codes from the Check Status page of their application.
Review the Local Statuses page to learn more about using this feature.
Example of Local Statuses by Application Status
The Local Statuses below are segmented by Application Status: In Progress, Received/Complete, and Verified. These Local Statuses are strictly examples and are meant to be adapted to fit your own application review workflow.
In Progress
In Progress applicants are applicants who are interested in your program but have neither submitted the CAS application nor paid the application fee. This number helps you identify the amount of interest in your program.
Best Practice Example: track how you communicate with In Progress applicants through Local Statuses. Set up a Local Status for each in-progress communication you want to send. Then, use the List Manager to identify applicants who need to receive communication. To perform batch actions to the applicants in your list (i.e., apply an action to all applicants in the list), use List Actions to send your email and change their Local Status.
Received/Complete Applicants
Received or Complete applicants have submitted their CAS application to your program and paid your application fee; at this point, you can begin reviewing their application. Examples of reviews you might run include:
- Committee Review: if you use an admissions committee to review applications, you can pre-track your applicants for review using a Local Status.
- Single Person Review: if you use a single person to pre-screen applicants, you can use a Local Status to move them to the next phase.
- Faculty Review: if faculty members review applications as part of your admissions process, Local Statuses can help you organize your faculty review process.
Best Practice Examples:
If you use a Committee Review, pre-track your applicants using your admissions criteria as your Local Status. For example, use GPA and test scores in the Local Status name:
- Committee Review Needed (GPA 3.0-3.49, GRE 130-159)
- Committee Review Complete (GPA 3.0-3.49, GRE 130-159)
- Committee Review Needed (GPA 2.7-3.0, GRE 100-130)
- Committee Review Complete (GPA 2.7-3.0, GRE 100-130)
If you use a Single Person Review, treat Local Statuses like an Excel document, where each Local Status represents a different sheet to track applicants through your review phases. For example, if your workflow includes an interview component, then the Local Status examples below represent a new sheet in your Excel document. You can create Local Statuses to drill down each phase like you would using Excel tabs.
- Invite to Interview
- Interview Offered
- Interview Declined
- Interview Scheduled
- No response to Interview
- Interviewed (Needs Decision)
If you use a Faculty Review, create Local Statuses for each faculty member. This allows you to quickly access applications assigned to that person. Use the Clipboard to group applications that have been reviewed for a specific faculty member. Then, use List Actions to move the applications for that faculty member to a new Local Status in batch.
Additional Best Practices Examples:
Once a final decision is rendered on an application, such as Accepted, Denied, or Withdrawn, you can use Local Statuses to categorize the reasoning for the decision. Use the Export Manager and Report Manager to extract decision data from WebAdMIT and create detailed reports about your applicant pool.
Determine common reasons for rendering decisions and add those reasons at the end of the Local Status. Since Local Statuses can be queried and exported, this helps you segment your applicant pool at the end of a cycle.
Verified Applicants
For some CASs, an applicant’s final status is Complete. If your CAS uses verification, where an applicant’s coursework is checked against their official transcripts, then the applicant’s final status is Verified. While Verified applicants have completed the CAS application requirements, they may be missing requirements for your program.
Best Practice Example: use Local Statuses to segment Verified applicants as complete or incomplete, according to your program-specific requirements. You can do this by creating Local Statuses like "Verified - Incomplete" and "Verified - Ready for Review."
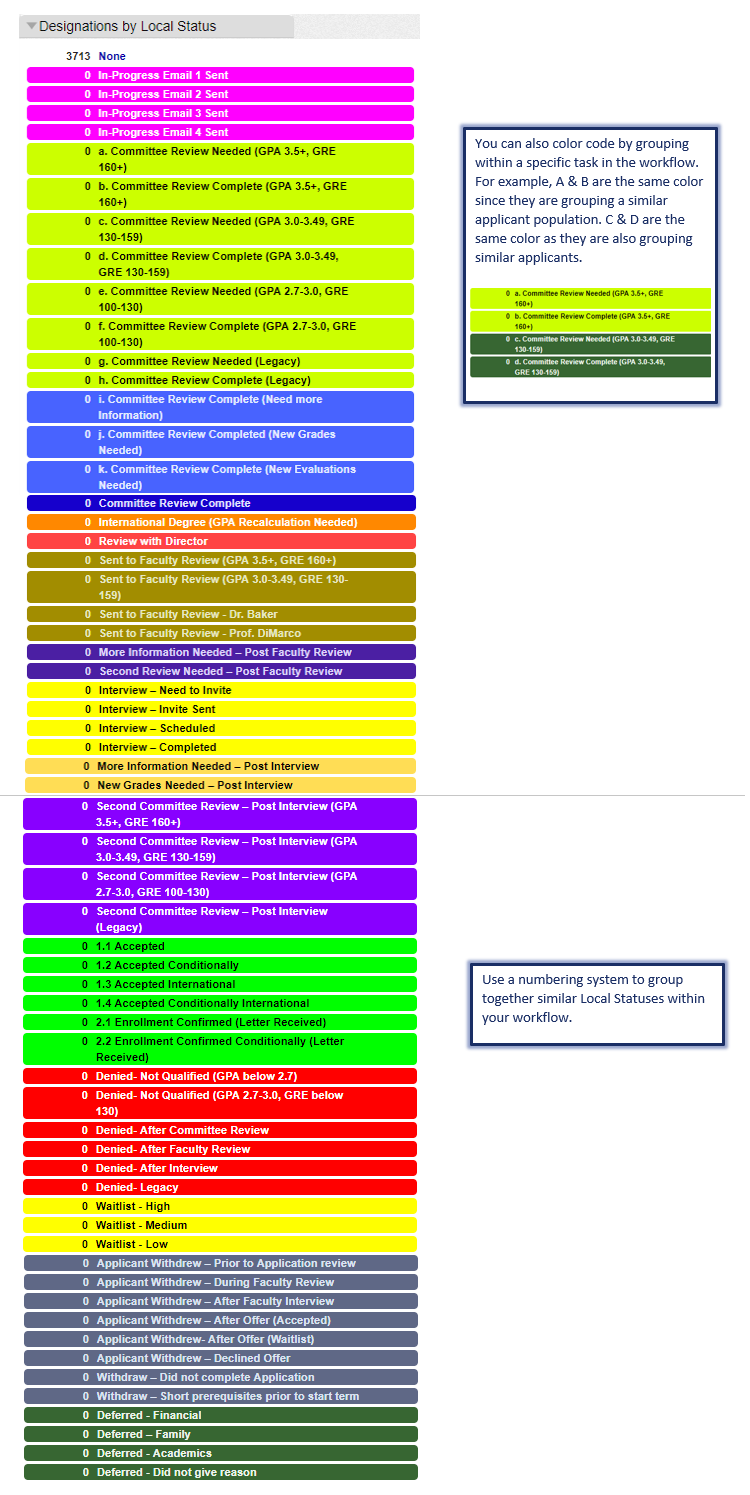
Example Local Statuses in WebAdMIT
The Local Status examples below are color-coded and numbered by various tasks, based on the corresponding workflow from above.