Sharing WebAdMIT Across Multiple Programs
Overview of WebAdMIT as a Shared Space
WebAdMIT allows institutions to customize admissions processes for each of their programs. Typically, these customizations are configured by individuals who are placed in a Work Group with the Configure Software permission set enabled (this includes the default WebAdMIT Administrators Work Group). When institutions have multiple WebAdMIT users with this permission set managing multiple programs, WebAdMIT becomes a "shared space," where these users who can configure the software have access to every program's settings and templates, including:
- Local Statuses
- List Manager
- Export Manager
- Report Manager
- Email Templates
- Assignments and Interviews
- Requirements
- Scoring Models
When customizing processes at the beginning of a cycle, these users may find it challenging to navigate WebAdMIT because all program settings and templates are visible. While this might seem worrisome at first, it rarely presents problems since users do not typically spend the majority of their time in the configuration areas of the software. Additionally, even though these users can view and access all program settings and templates in the configuration areas of the software, each user can only access the applicant pool for their enabled program(s) (i.e., they cannot view applicants to other programs).
Read on for a shared space example, as well as best practices you can apply at your institution.
Shared Space Example
Imagine Watertown University has three individuals who can configure the software managing four programs:
- Dani manages Programs A and B.
- Aimee manages Program C.
- Erik manages Program D.
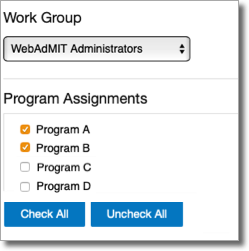
When working in WebAdMIT, Dani can only see applicants to programs A and B, Aimee to Program C, and Erik to Program D. This is because each of their user accounts specifies which programs they can access (i.e., the applicant data they can view). Here we see that Dani's Program Assignments include Program A and Program B, meaning she can only view data for applicants applying to Program A or Program B:
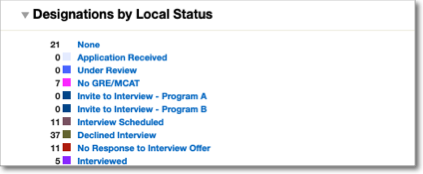
Dani logs in to WebAdMIT every day and views the Designations by Local Status channel on her dashboard for a quick snapshot of where her applicants are in the review process. Note that she only sees the Local Statuses associated with her programs:
Dani decides she wants to change one of the colors assigned to a Local Status. She navigates to the Management panel and clicks Local Status. To her surprise, the Local Status Manager page displays more Local Statuses than her dashboard; she now sees all Local Statuses for all programs (notice how Invite for Interview - Program C and Invite for Interview - Program D appear on this page but do not appear on her dashboard):

Dani isn't sure why she's seeing Local Statuses that don't apply to Programs A and B, but then she remembers it's because she is assigned to the WebAdMIT Administrator Work Group, which gives her the ability to configure all aspects of the software. So, even though Dani can only see applicant data for Programs A and B, she can see settings and templates for Programs A, B, C, and D:
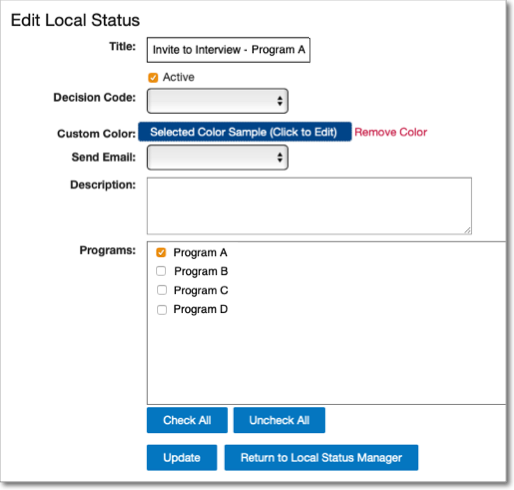
Dani also remembers that when she and her colleagues first created their Local Statuses, they had to select the Programs that each Local Status applied to (this is a standard step when configuring most WebAdMIT settings and templates). For example, when Dani created the Invite to Interview - Program A Local Status, she assigned it to Program A so she could use it with that applicant pool:
Best Practices for Working in a Shared Space
Remember that you will rarely access the configuration areas of WebAdMIT once you have updated your settings and templates for a new application cycle, meaning you will rarely see other program's settings and templates after you've completed your updates. In the example above, Dani wanted to make a change to a Local Status color. Typically, Local Statuses—as well as all other settings and templates—are created at the beginning of the cycle or are transferred from the previous cycle. This means Dani and her colleagues would only access the Local Status Manager page during the cycle if they need to add a new or update an existing Local Status.
When finding ways to work effectively in a shared space, consider the following best practices.
Communicate with Your Peers
It's important you communicate with the other users who can configure the software and find ways to optimize the shared experience. In some cases, you may need to create program-specific WebAdMIT best practices, and in other cases, institution-specific best practices that apply to all programs.
Use Naming Conventions
One way you can minimize any confusion is by creating certain naming conventions. In the example above, the Invite for Interview Local Status includes the program name. You may choose to do something similar with all your Local Statuses, or even use the color coding feature to group Local Statuses by program or by step in the review process (e.g., you might choose to make all acceptance Local Statuses for all programs green). Review the Local Statuses Best Practices guide for more ideas.
Prepare for the Transfer Settings Process
Review your settings and templates every year prior to initiating the Transfer Settings process. The Transfer Settings Process can be complex, so it's important you review this guide prior to initiating the process.
Review Work Groups
Periodically review your users and ensure they are in the right Work Groups and are assigned the correct programs. In some cases, you may have users who are no longer at the institution but may "own" certain items, like Exports. Note that ownership of these items transfers to the person conducting the Transfer Settings process.