Using the Clipboard
Getting Started with Searching Your Applicant Pool
Overview
The Clipboard allows you to store an ad hoc list of applicants for quick access. Clipboards are user-specific and you can add as many applicants as necessary.
Accessing the Clipboard
Using the Menu Bar, open the Applicants panel, then click Clipboard.

Adding Applicants to the Clipboard
There are several ways to add applicants to the clipboard. You can add applicants:
- Individually from the Applicant Details page.
- In batch from Search Actions.
- In batch from the Clipboard using the Add to Clipboard from CSV option, where available.
Adding Applicants Individually
Go to the Applicant Details page and click Add to Clipboard.

Adding Applicants in Batch via Search Actions
Using the Menu Bar, open the Applicants panel, then click Search. From Search Actions, click Add Checked Applicants to Clipboard.
Adding Applicants in Batch Using a CSV File
Where applicable, you can add applicants to the Clipboard in batch using a CSV file. If any CAS IDs were entered incorrectly or don't match any applicants that you have access to, a message appears indicating there were applicants that could not be added.
- Create the file containing the desired applicant IDs. The file must:
- Be saved in CSV format.
- Use one column, with applicant_id as the column header (this is not case-sensitive).
- List the CAS IDs in the cells below.
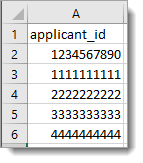
- Go to the Clipboard and click Add Applicants from .CSV to Clipboard in the Clipboard Actions menu.

Removing Applicants from the Clipboard
There are several ways to remove applicants from the clipboard. You can remove:
- Applicants individually from the Applicant Details page.
- Select applicants in batch via Clipboard Actions.
- All applicants simultaneously via Clipboard Actions.
Removing Applicants Individually
From your Clipboard, navigate to the Applicant Details page of the applicant you want to remove, then click Remove from Clipboard.

Removing Select Applicants in Batch via Clipboard Actions
Using the Menu Bar, open the Applicants panel, then click Clipboard. Be sure that only the checkboxes for the applicants you want to remove are selected. Then, from Clipboard Actions, click Remove Checked Applicants.
Removing All Applicants via Clipboard Actions
Using the Menu Bar, open the Applicants panel, then click Clipboard. From Clipboard Actions, click Empty Clipboard.
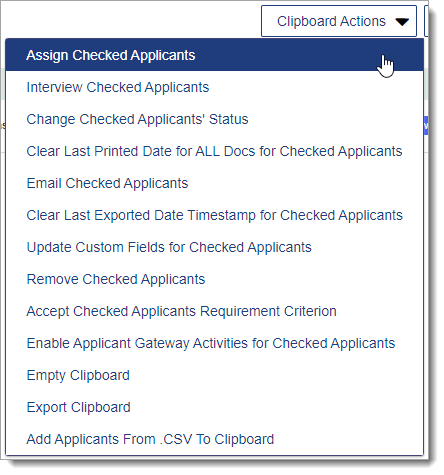
Applying Clipboard Actions to Selected Applicants
Use the checkboxes in the first column of your search results to select multiple applicants and apply an action. The options you see are limited to your Work Group permissions.
- Assign Checked Applicants: assign the selected applicants to a specific admission user (this function only appears if Assignments are configured).
- Interview Checked Applicants: create an Interview for the selected applicants (this function only appears if Interviews are configured).
- Change Checked Applicants' Status: change the Local Status for the selected applicants (this function only appears if Local Statuses are configured).
- Clear Last Printed Date for ALL Docs for Checked Applicants: remove the Document Last Printed date recorded in WebAdMIT for the selected applicants.
- Email Checked Applicants: send an email to the selected applicants.
- Clear Last Exported Date Timestamp for Checked Applicants: remove the Last Exported date recorded in WebAdMIT for the selected applicants.
- Update Custom Fields for Checked Applicants: update the custom fields that have been defined for selected applicants (this function only appears if Custom Fields are configured).
- Remove Checked Applicants: remove the checked applicants from the Clipboard.
- Accept Checked Applicants Requirement Criterion: select a requirement and update the response to that requirement for the selected applicants (this function only appears if Requirements are configured).
- Enable Applicant Gateway Activities for Checked Applicants: activate the pre-configured Applicant Gateway activities for selected applicants (only available for select CASs; this function only appears if Applicant Gateway activities are configured).
- Empty Clipboard: remove all applicants from the Clipboard.
- Export Clipboard: export the Clipboard to .csv, .xls, or .txt formats.
- Add Applicants From .CSV To Clipboard: add applicants in batch via a CSV file.
Warning: enabling Applicant Gateway Activities and Assigning/Interviewing Checked Applicants are advanced functions that can’t be undone in batch. Confirm that your search results and selections are accurate before performing the change.