Creating Reports via the Report Manager
Video Overview
Overview
Gaining Access to This Feature
Creating Reports
- Using the Menu Bar, open the Reports & Exports panel, then click Report Manager.
- Click New Report.
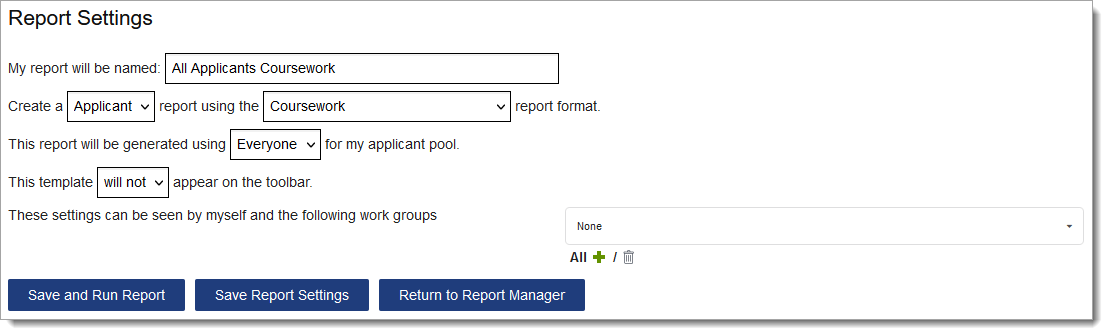
- Enter a name for your report.
- Select the report type and format. Review the Report Types section for report definitions.
- Applicant reports focus on data about your applicant pool.
- User reports focus on your program’s Admissions Users.
- Select an existing list to run the report against, if applicable.
- Indicate if the report should appear in the Menu Bar under the Reports & Exports panel; this option provides you with quick access to run the report.
- Select who can view the template (e.g., just yourself, specific Work Groups, or all Work Groups). Institution Managers who are in the WebAdMIT Administrators Work Group can view and delete any reports created within their organization.
- Click Save and Run Report to run and save the report, Save Report Settings to save the customized report for future use, or Return to Report Manager to discard the report.
Note: an Office 2007 security feature may prevent you from opening an export or report in .xls format. Adjust your export type to .csv to avoid this issue.
Also note that reports may appear differently for users with limited permissions. The data available in a report is determined by the fields a user has access to in their Work Group.
Downloading a Report from Recent Files
Once you run a report, you'll automatically be sent to the Recent Files page. You can also retrieve exports, reports, and PDF templates run within the past seven days from this page. Be aware that the files you can view on the Recent Files page depend on your Work Group permissions. If you do not have access to specific applicant data, then you will not see reports including that data.
To download a report:
- Using the Menu Bar, open the Reports & Exports panel, then click Recent Files.
- Click the file link in the Download column. Once you download your report file, you can use your system's software to sort, reorder, and filter the data.

Managing Reports
To manage existing reports, click Report Manager from the Menu Bar. You can view and perform the following actions for reports that you created or that other users created and shared with you.
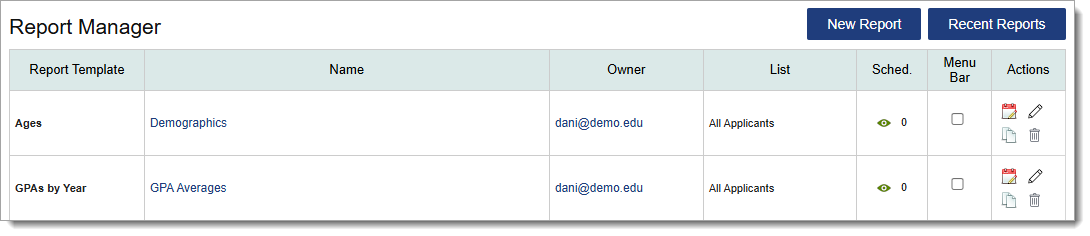
Running Reports
Click the report name to run it.
Pinning Reports to the Menu Bar
Click the checkbox to pin a report in the Menu Bar under the My Exports and Reports subpanel in the Reports & Exports panel; this option provides you with quick access to run the report.
Scheduling Reports
Use the calendar icon to schedule a file transfer for a report. You can also click the eye icon to review existing file transfer logs.
Editing Reports
Use the pencil icon to edit a report. Note that only report owners can make edits. If you'd like to edit or see the settings of a report that you are not the owner of, you can create a copy of it instead.
Copying Existing Reports
Use the duplicate icon to copy an existing report.
Deleting Reports
Use the trash icon to delete a report. Note that only report owners and Institution Managers who are in the WebAdMIT Administrators Work Group can delete reports.
Report Types
WebAdMIT for AMCAS provides you with a suite of predefined reports that you can run against any existing applicant list. Reports may include:
Applicant Reports
- Applicants by Application Status: Includes applicant AAMC ID, last name, first name, number of designations they submitted their AMCAS application to, the organization and program(s) they applied to at your institution, application status, and the decision code which displays the AMCAS Admission Action Code you assigned.
- Competency Matches: Displays the competencies for the program, along with applicant matches to each one.
- Coursework: Includes applicant AAMC ID, name, course number, course name, transcript grade semester hours, AMCAS grade, college code, college name, year, term, status, academic status, classification, course type, and lab indicator.
- Designations by Application Status: Includes organization name, program name(s), the number of applicants who are in the verified application status, and the total number of applicants for each program and each status.
- Designations by Decision Code: Includes school name, program name(s), and the number and percentage of applicants who are in each AMCAS Admission Action Codes (as specified by your program). It also includes the total number of applicants for each program and each AMCAS Admission Action Code.
- Folder Labels – Avery 5160: Includes applicant AAMC ID and name, with last name listed before first name.
- Local Status History: includes applicant AAMC ID, name, designation, designation WebAdMIT label, Local Status, Local Status changed date, Local Status changed by, Decision Code, Decision Code changed date, and Decision Code changed by.
- Local Status Summary: Includes program’s Local Statuses and number and percentage of applicants for AMCAS and your applicant pool.
- Mailing Labels – Avery 5160: Includes applicant name, street address, city, state, zip code, and country.
- Prerequisite Courses: Displays the prerequisites for the program, along with applicant matches to each one.
- Schools Attended With Degrees: You can choose “All Schools Attended With Degrees” or “Primary Schools Attended With Degrees.” The Primary Undergraduate Institution is derived by AMCAS and delivered to WebAdMIT. This report includes applicant AAMC ID, name, school attended, start date, end date, degree type, and degree date. Note only completed degrees are included in the report and not future degrees.
- Scoring Details: Includes applicant AAMC ID, name, country, scorable fields, scores for each field, converted values for each field, overall score, and ranking.
User Reports
- Admissions Users: Lists institutions, user names, email addresses, phone numbers, primary user indicator, active/deactivated account, programs they have access to, user roles/work groups, date the account was created, last update and login, and login count
- Interviewer Ability: Lists user names, interview template name, interview date and time, and availability.
- Programs List: Includes institution name, programs, program identifiers, and program labels for the entire institution.