Working with Application Exports
Creating Exports in Outcomes allows you to extract applicant data from the software in PDF, Spreadsheet, or JSON formats.
Generating Exports
You can produce export files based on a set schedule, or generate them on-demand when you need them.
On-Demand Exports
If your institution has already configured at least one export template, you can use these templates to generate an on-demand export file. To do this:
- Go to the Applications Grid.
- Filter to isolate your desired applicants, and select them using the checkboxes on the left. Use the checkbox at the top of the grid to select all the displayed applications, or use individual checkboxes to select applications one-by-one.
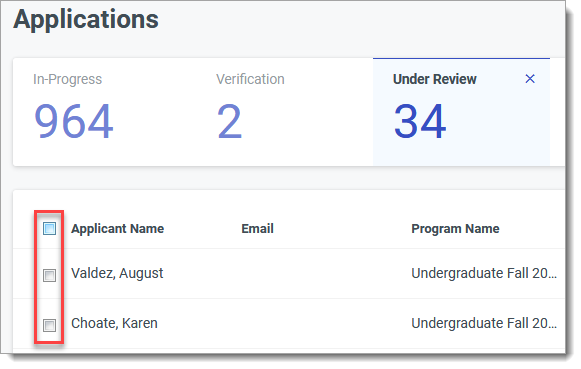
The filtered applicants are paginated, so using the Select All checkbox only selects the displayed applicants. To select the rest of the applicants that match your filters, click Select all X applicants.
- Click the Export option.

- Decide whether to generate the file(s) in the default PDF format, default JSON format, or one of your previously configured spreadsheet formats. Click Download to produce the file.

- Wait for the file to finish generating and click the link to download it immediately, or close the Processing Request window and go to the Activity page to download it later. Note that the processing time is impacted by the size of the data extraction, the number of applications included, the number of fields requiring transformations, and the number of other queued export jobs.
Scheduling Exports
When configuring an export, you can use the Schedule Export section to establish a schedule that dictates when the export gets automatically generated, how it is packaged, and where it gets delivered. To do this:
- Go to the Import/Export section of the Settings page and click Exports. Begin configuring a new export template by clicking Create Export, or editing one of your existing export templates.
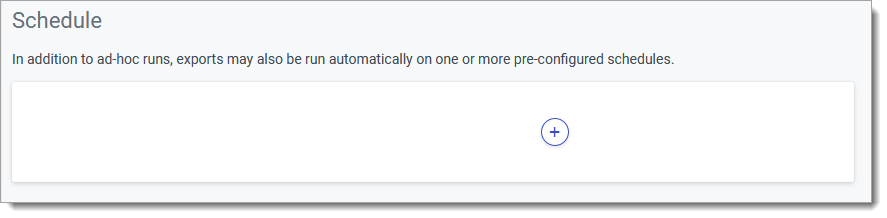
- In the Schedule area, click the plus sign to configure a schedule, establishing when the export will automatically be generated.
- On the Schedule Export page, set the time and frequency of the export. If you want to exclude applications that have previously been exported via this schedule, select Only Once in the Export Frequency area. Set the Segment of applications to be included in the export, or leave the default option to export all applicants. In the Packaging area, determine if you’d like to bundle the exports in a .zip file. If you choose to do this, you can turn on customizable file names and batching. If you enable batching, enter a number to set the maximum number of files you’d like to include in each .zip batch file. Next, set how you want the files delivered:
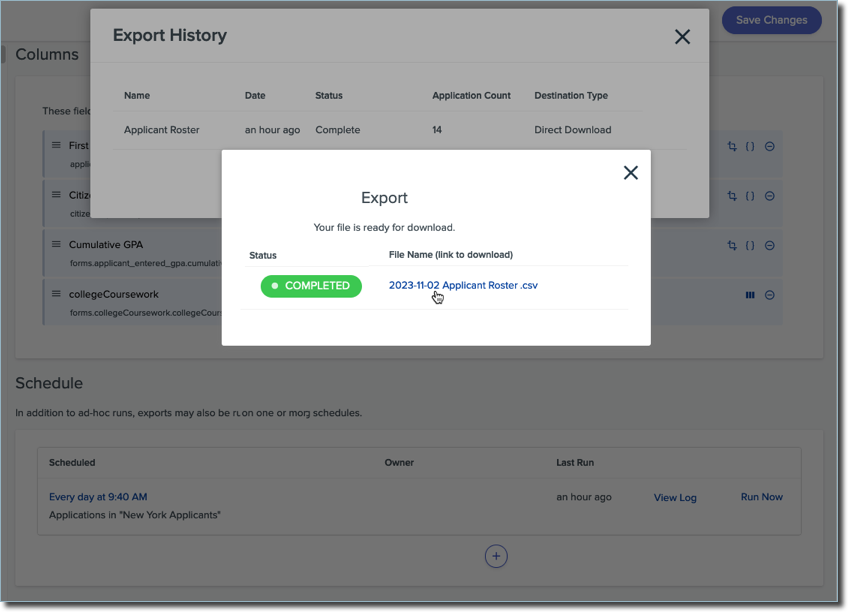
- The default option here is Direct Download. This means your download will run in the background and be available to download after it has completed. To access these downloads, return to the export and click View Log. Then, find the version you want from the Export History and click Direct Download. From here, you can download the file that was generated at the specified scheduled time.
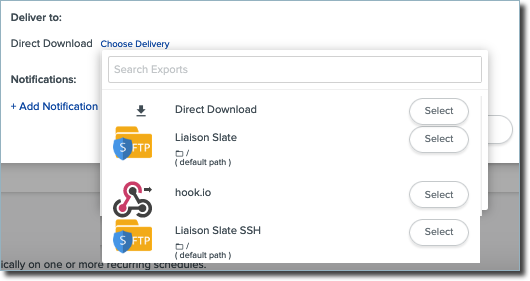
- Alternatively, you can have the file delivered to any destination that you've configured in the Export Destinations area. Click Select next to the delivery method of your choice.
- The default option here is Direct Download. This means your download will run in the background and be available to download after it has completed. To access these downloads, return to the export and click View Log. Then, find the version you want from the Export History and click Direct Download. From here, you can download the file that was generated at the specified scheduled time.
- If desired, enable notifications by clicking Add Notification, and entering the email address you'd like to use. This sends an email to the email addresses of your choice to advise that the export has successfully been generated.
- When finished, click Add to add your schedule settings.

- Save your changes. Your export is now scheduled.
Reviewing Past Scheduled Exports
Once exports are scheduled and begin running, you can review a log of the executed exports. To do so:
- Return to the Export Schedule and click View Log.

- You can review the history from the log. Click on any instance of the export to re-download that version. Note that the Role you are in impacts which exports you have access to download.

Configuring Export Templates
To generate customized export files, you’ll first need to configure export templates. To create an export template:
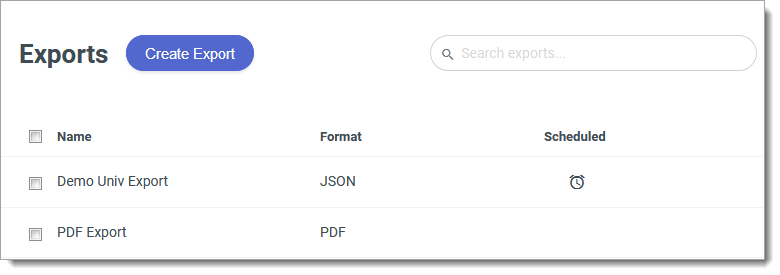
- Go to the Import/Export section of the Settings menu and click Exports.
- Review the existing exports, or click Create Export to begin creating a new export file.
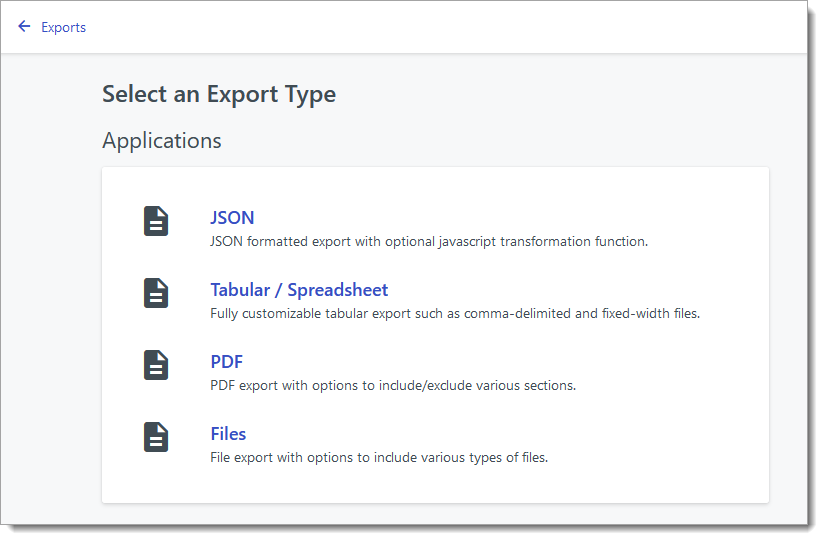
- Choose an export type. Available export types are:
- JSON: Short for JavaScript Object Notation, this is a lightweight, data-interchange format using human-readable text. It is commonly used for transmitting data in web-applications.
- Tabular/Spreadsheet:This format offers files in .csv, .tsv, or .txt file types.
- PDF: Short for Portable Document Format, this file format produces an image including text or graphics.
- Files: This option allows you to select attachments, portfolios, or other documents to extract from the software.
- Continue configuring the export using the instructions below, based on which export type you’ve selected.
Configuring JSON Exports
To configure a JSON export:
- After clicking Create Export on the Exports page, select JSON.
- Name the export file.
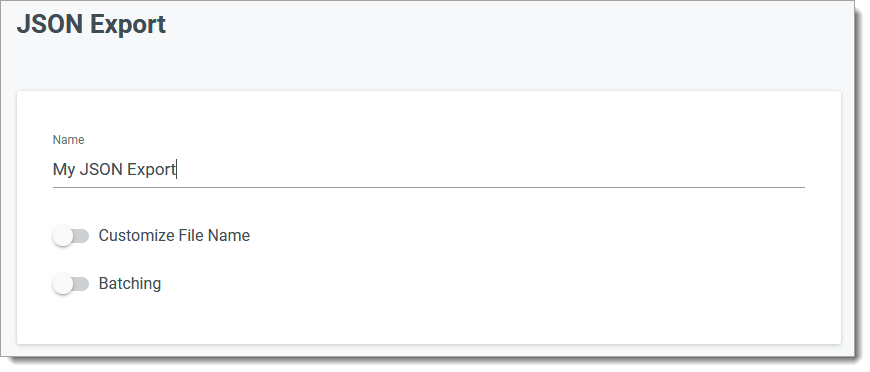
- If desired, you can enable the Customize File Name option, allowing you to create a file name template with variable text. For example, you can include date as a variable in the file name so that it displays the date the export was generated. Note that this is an advanced feature that requires knowledge of the database field names.

The variable text options available here include many contact-related properties and any application-related properties with Data types of Number, String, or Date. Encrypted fields are excluded. Variables should be surrounded by double curly brackets. These variable fields are populated with the appropriate value when the export file is created. To see a full list of the available variables, click ⓘ. - If desired, you can enable the Batching option, causing the software to group your desired number of records together in the same .zip file.
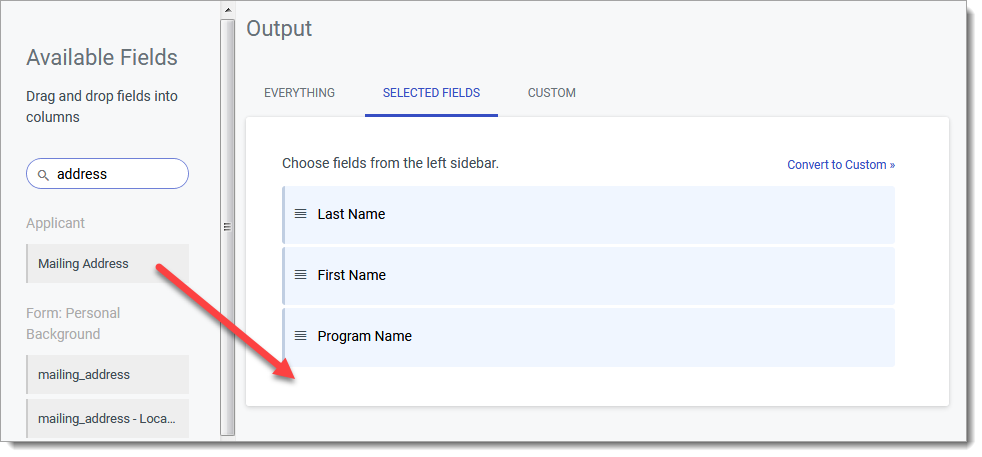
- In the Output area, select what you’d like to include in the file. Setting this option to Everything creates an export with all available fields included. Setting this to Selected Fields allows you to click to select fields on the left to include in the export. You can also drag them into the desired order. Setting the Output option to Custom allows you to enter JavaScript code to transform your desired data.
- If you've created Translation Tables, you can click Choose a table to apply one of your tables. This allows you to convert the data output from this field into your preferred format.

- In the Schedule area, if desired, click the plus sign to configure a schedule.
- When you’re done configuring the export, click Create Export.
Configuring Tabular / Spreadsheet Exports
To configure a tabular or spreadsheet export:
- After clicking Create Export on the Exports page, select Tabular / Spreadsheet.
- Name the export file, and select from the Comma Delimited, Tab Delimited, Fixed Width, or Custom Delimited style types. Use the Custom Delimited option if you'd like to establish your own delimiter, aside from the other options. For example, you can set a pipe as a delimiter by selecting Custom Delimited and entering | as the Custom Delimiter.

- If you'd like to make this export available to other users, toggle the Shared option on. While this allows users with appropriate permissions to see and run this export, the data you include in it may still be restricted based on what their Role allows.
- If desired, you can enable the Customize File Name option, allowing you to create a file name template with variable text. For example, you can include date as a variable in the file name so that it displays the date the export was generated. Note that this is an advanced feature requiring knowledge of database field names. The variable text options available here include many contact-related properties and any application-related properties with Data types of Number, String, or Date. Encrypted fields are excluded. Variables should be surrounded by double curly brackets. These variable fields are populated with the appropriate value when the export file is created. To see a full list of the available variables, click ⓘ.
- If desired, you can enable the Batching option, causing the software to group your desired number of records together in the same .zip file.
- In the Columns area, you can add fields to include in your export. To add fields, find them on the Available Fields panel and click to add them. You can also drag and drop them into your desired order.
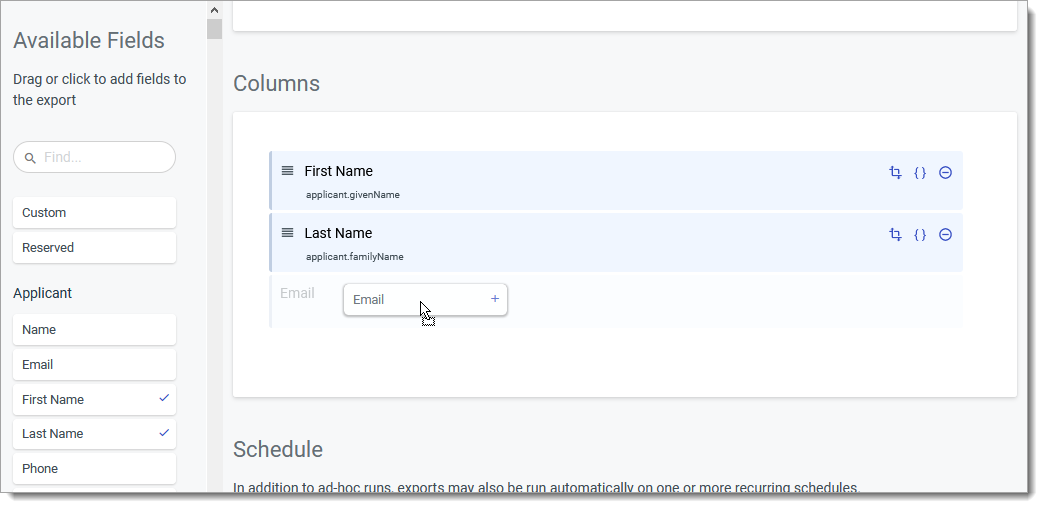
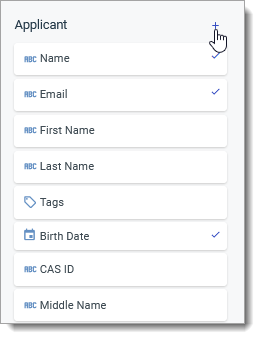
- Click the plus sign near any section to add all of its fields. Selected fields appear with a checkmark.
- By default, the column headers that will appear in your export are the field names that appear in the Columns window. You can edit these headers by clicking on their name and entering your own values to use. For example, in the screenshot below, Birth Date will be the name of the fourth column by default. To adjust this, click into the Birth Date field and type in an alternate name, e.g., DOB.
- If you add a date field, you can click Format Date to select which format you'd like dates to be exported in.

- If you've created Translation Tables, you can click the Translation Table icon to apply one of your tables. This allows you to convert the data output from this field into your preferred format.
- Some fields have a Pivot Table option. This is the case when the field includes multiple data points. When adding a field like this, a Pivot window appears. Configure the pivot table as desired to include it.
- Where necessary, you can use the field expression icon to configure the export further.

- You may also drop a Calculated field into the Columns area. This allows you to use JavaScript expressions to customize the data that gets exported by that field.

- In the Schedule area, if desired, click the plus sign to configure a schedule.
- When you’re done configuring the export, click Create Export.
Including Pivot Tables in Your Spreadsheet Export
Some fields listed in the Available Fields menu contain multiple data points nested within them. For example, the Colleges Attended field may include data points such as College Name, College Address, Degree Obtained, etc. When you add a field like this, a Pivot window appears. This allows you to select which of the available columns you'd like to include. To do this:
- Drag the desired columns from the left to the right.
- Order them as desired.
- Select the number of rows you'd like to include and whether you want the first or the last data points based on your sort. Then select how you want the data to be sorted. For instance, as seen in the example below, if you're working with Colleges Attended and you select 3, first, and degree_date, the three first colleges the applicant attended (based on the date their degree was awarded) will be included, along with their corresponding data. The remaining colleges are excluded.

- Check the Resulting Column Headers section to review how your column headers will appear in the resulting export.
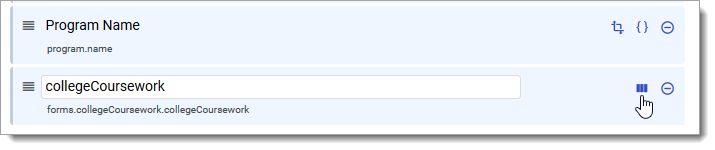
- If you'd like to customize these column headers, click into the default column names and type in your own. For example, in the screenshot above, the first column associated with the Colleges Attended field is named college - Name by default. If necessary, click into this name and type in an alternate name.
- Click Update to save your changes.
- Where applicable, to ensure that your alternate column names are used in your export, upon returning to the main Columns window, delete the default column name for the pivot table field and leave it blank. For example, in the screenshot below, if you edited the College Coursework headings, delete collegeCoursework from the field name, leaving it unnamed.
- To make changes to the selected fields once you've dismissed this window, click the Pivot Table icon on the corresponding field.
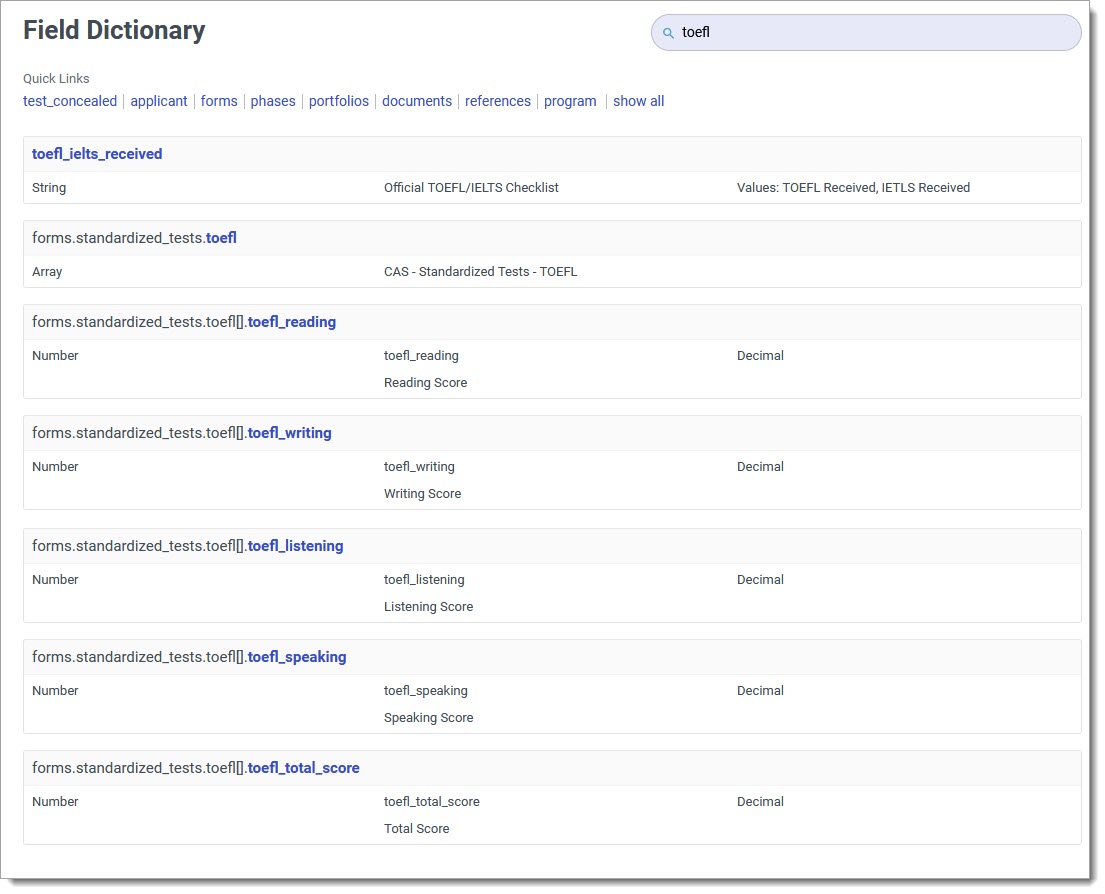
Working with the Field Dictionary
To see a list of fields that are available in Outcomes, you can review the Field Dictionary. This serves as a data dictionary, giving you access to information about each field (e.g., field key, field type, and possible values). This is useful for understanding what will be included in your exports.
To access this dictionary:
- Navigate to the Settings menu and click Field Dictionary in the Import/Export section.

- From the Field Dictionary, click one of the Quick Links or use the Search bar to locate your desired field.
- The Field Dictionary provides information regarding each field, including its field name or key (e.g., forms.standardized_tests.toefl[].toefl_total_score). The Field Dictionary also shows the data contained within the field, and the format the data appears in (e.g., String, Number, or Array). Review the information for the fields you want to use.
Configuring PDF Exports
To configure a PDF export:
- After clicking Create Export on the Exports page, select PDF.
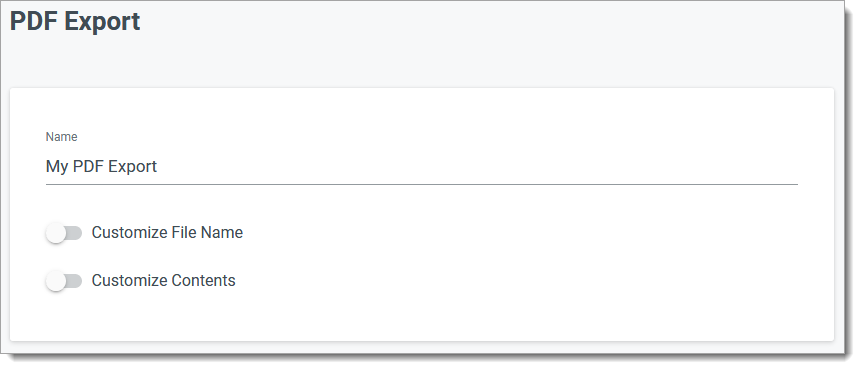
- Name the export file.
- If desired, you can enable the Customize File Name option, allowing you to create a file name template with variable text. For example, you can include applicant.fullName as a variable in the file name so that each PDF file displays the name of the associated applicant. The variable text options available here include many contact-related properties and any application-related properties with Data types of Number, String, or Date. Encrypted fields are excluded. Variables should be surrounded by double curly brackets. These variable fields are populated with the appropriate value when the export file is created. To see a full list of the available variables, click ⓘ.
- Enable the Customize Contents option to establish which sections of the PDF you'd like to include.

Review the chart below to understand what is included in each of the available PDF components. Some data is sourced directly from Outcomes, while other information, where applicable, comes from the Centralized Application Service (CAS).
Component
What's Included from Outcomes
What's Included from CAS
Customization
Cover Page
Manually selected data fields, labels and formatting defined within the PDF Designer
N/A All manually constructed in PDF Designer
Summary Page
Contents of the Summary section on the Application View page
N/A Contents defined in Application View – Summary; Style defined in PDF Designer
Attachments
All files manually attached to the application by users in Outcomes, not those submitted by the applicant. Supported file types are rendered inline (e.g. .pdf, .doc, .png, etc.)
N/A Style & Exclusions defined in PDF Designer
Evaluations
All Review Forms completed on the application, including the Reviewer Name, field responses, and Datestamp
N/A Style & Exclusions are defined in PDF Designer
Comments
Comments made on the application in Outcomes, including the User Name, Comment Text, and Datestamp
N/A Style & Exclusions defined in PDF Designer
Forms
All sections (forms) and fields (properties) in the application, excluding Document and Portfolio fields
All fields on the CAS application Style & Exclusions defined in PDF Designer, by field type
Portfolios
Any content in Portfolio Forms from the application. Where applicable, this may include transcripts, the CAS Application PDF, and other attachments. Supported file types will be rendered inline (.pdf, .doc, .png, etc.)
The CAS application PDF and all uploads made by the applicant on the CAS application Style & Exclusions defined in PDF Designer
Collaboration Modules
Where applicable, all collected Collaborator Feedback forms on the application through Collaborator Portals
N/A Style & Exclusions defined in PDF Designer
References
All collected Reference Forms on the application through the Reference Portal
All recommendation details entered on the CAS application or completed in the Liaison Letters portal Style & Exclusions defined in PDF Designer
Documents
Any content in Document fields from the Application. Supported file types will be rendered inline (.pdf, .doc, .png, etc.)
Style & Exclusions defined in PDF Designer
- In the Schedule area, if desired, click the plus sign to configure a schedule.
- When you’re done configuring the export, click Create Export.
Configuring File Exports
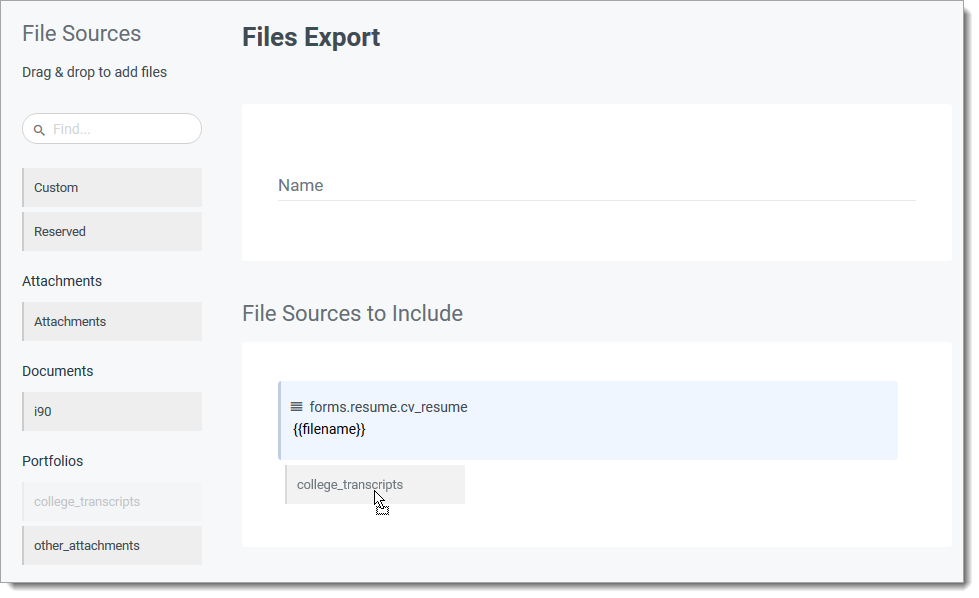
To create a file export:
- After clicking Create Export on the Exports page, select Files.
- Name the export file and begin choosing which file sources to include.
- To select a source, click and drag it from the left side and drop it on the right.
- If desired, you can add a manifest to your export. The manifest file is a customizable catalog of all documents exported that can include all relevant applicant data associated with each document exported. This type of manifest is often used by automated document import processes to link documents with existing applicant records and to distinguish the type(s) of documents in the export operation. To add a manifest:
- Click the Add Manifest option.

- Name the manifest file. This will be the name of the manifest stored in the document zip file or exported with individual documents. The name should not use variables that will change with each export operation, as external import processes typically need to identify this file.
- Select the column style for your manifest.
- If desired, adjust the maximum number of applications for each manifest. If the number of documents in an export exceeds the limit listed here, the software generates multiple files.
- Select what data you'd like to include in the manifest by dragging fields from the left to the right. It's a good idea to include fields like the Applicant ID, Name, Email, File Name, File Type, etc. - these can help describe each file and link it to its corresponding applicant.

- Click Done Editing when finished with the manifest file.
- Click the Add Manifest option.
- In the Schedule area, if desired, click the plus sign to configure a schedule.
- When finished, click Create Export.
Reviewing Export History
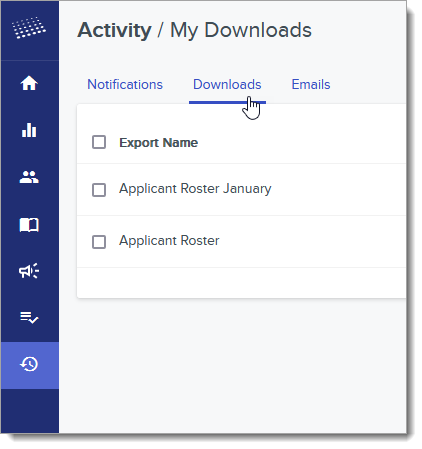
Outcomes keeps a record of all exports you've completed in the software. To review the history:
- Click Activity on the Menu Bar.
- Click Downloads.
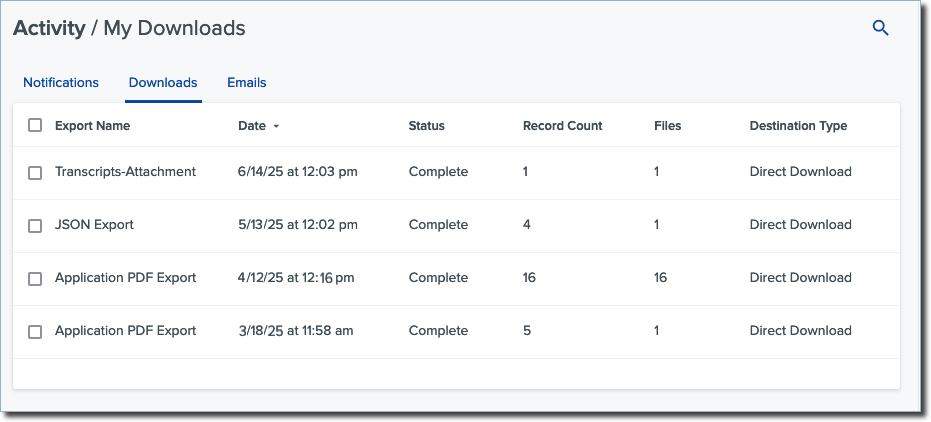
- Here, you'll see logs of your exports over the past 90 days.
To download another copy of an export, click its name. Note that this reproduces the export file as it was when it was exported, so any updates in the data since that time will not be reflected in the file.
Customizing Exports with JavaScript
One of Outcomes' most powerful export tools is the ability to manipulate output formatting and content using JavaScript. JavaScript is a popular programming language that allows you to build and control interactive content on a website. In the case of Outcomes, JavaScript can be used to customize your exports, allowing you to implement the exact formatting you need.
By default, when data elements like "Name" or "Email Address" are included in a JSON, Tabular, or Document export, the values of exported properties are copied from the Outcomes database to the export file without any changes. For most uses this is fine, but, for example, if you're importing data into another system, you may need your fields to be formatted in a specific way.
To edit an export field expression:
- Click the {} icon that appears when the mouse hovers over a field selected for your export.
- Add your desired string function.

- To test your new function, click Try It.
- Use the Find an applicant record field to search for an applicant to test with.

- Click on the desired applicant's name to run the test. On the right, the Output area indicates how your expression will affect the data in the impacted field.to kee
- Click Update to keep your changes.
JavaScript Expression Example
Perhaps you are working with an enterprise solution or Student Information System that cannot import any email addresses containing uppercase characters. Since Outcomes allows capital letters in email addresses, you'll need to add a function that converts all characters to lowercase.
- The default expression when adding the email address to an export might be: applicant.emailAddress
- To convert the email address to lower case, we add the JavaScript toLowerCase() function to the string, making it: applicant.emailAddress.toLowerCase()
- This converts an email address value of TestEmail@me.com to testemail@me.com in the export file

Common String Manipulation Functions
| Function | Description | Sample Expression |
|---|---|---|
| toLowerCase() | Converts all characters in the string to lower case. | applicant.email.toLowerCase() |
| toUpperCase() | Converts all characters in the string to upper case. | applicant.email.toUpperCase() |
| trim() | Removes leading and trailing white space from a string. | applicant.email.trim() |
| replace() | Searches a string for a specified value, or a regular expression, and returns a new string where the specified values are replaced. |
Replace “.com” anywhere in the string with “.edu”: app.email.replace(“.com”,”.edu”) |
| slice() |
Extracts a section of a string using character position and returns with string. The first argument sets the starting point for the extraction and the second indicates how many characters to return. |
This expression returns the first 5 characters of a string: applicant.name.slice(0,5) |
| contains() | Searches a string for another string and returns true if found, false if not found. See the section below on Conditional Output for more information about how to return values based on logical tests. |
This expression returns true if the string ‘demouniversity.edu’ appears in the email address property: applicant.email.contains(‘demouniversity.edu’) |
The table above is just a sample of the dozens of string manipulation functions supported by JavaScript. Documentation for other useful JavaScript data manipulation functions can be found online.
Working with Conditional Output
You may wish to export data based on some sort of logic. A simple example of this is: If something is true, return one value, otherwise, return some other value. In this case, there are only two possible values, but with JavaScript you can make this conditional logic as complex as needed and involve as many of the applicant data model properties as needed.
Here are three ways you can use JavaScript to conditionally alter the values of exported fields.
- Ternary
The “ternary” operator offers a quick way to return one value if one condition is true and a different value if false. The structure of this expression is:(logical test in parenthesis) ? {value to return if true} : {value to return if false}
Here’s a sample that will return “Student or Faculty” only if the string “bu.edu” appears in an email address. Otherwise, “Non Academic” will be returned:(app.email.contains(“bu.edu”)) ? “Student or Faculty” : “Non Academic”
- If else
An If else conditional is similar to the ternary operator in that it offers a way to return one value if a condition is true and a different value if false. Sometimes it makes the logic easier to read if broken out over multiple lines, which is supported in the property expression editor. The structure looks like this:{ if (condition) { return a value ; } else { return a different value ; } } Example using logic from above: { if (app.email.contains(“bu.edu”)) { return “Student or Faculty” ; } else { return “Non Academic”; } } - Switch
The switch conditional allows an expression to return values based on multiple cases, so well beyond true and false like if/else and the ternary operator. Here’s the structure of a switch statement using an example of returning values based on the country code:{ switch (applicant.address.countrycode) { case “US”: return “United States”; case “CA”: return “Canada”; default: return “Not US or Canada”; } }
Dealing with Null Values
In JavaScript, a Null is a special value that indicates the property has no value. For a string, this is different than an empty value in quotes. Numeric, string, and date type properties can all have null values. It is important to understand this because there are cases where unexpected results or errors can occur if a custom JavaScript expression tries to operate on a null where an actual value was expected.
For example, if the property applicant.email were null, this expression would cause an error: applicant.email.toLowerCase()
To guard against this, it’s helpful to know null values are interpreted as “false” in conditional expressions. So, using the ternary operator, this expression will avoid null type errors from occurring in export output: (applicant.email) ? applicant.email.toLowerCase() : “No email found”
Creating Translation Tables
When working with JSON or Tabular Exports, you may wish to convert data from some of your selected fields into a different format. You can create Translation Tables to accomplish this.
A Translation Table is a table of information that is used to convert data from one form to another. This is useful if you are importing your Outcomes data into another system that has specific format requirements. For example, if you're exporting Countries, and you need the names of the countries to appear in a format that is compatible with your destination software, you can create a Translation Table that converts each country name into the acceptable format.
To create a Translation Table:
- Navigate to the Settings menu and click Translation Tables in the Import/Export section.

- From the Translation Tables page, you can review your existing Translation Tables and click on them to make edits. To create a new Translation Table, click the plus sign.
- Name the table and select your Input and Output types. The Input Type is based on the type of data you expect to appear in the field you're selecting. Use the Output Type to indicate what type of data you want in the resulting file.

- If desired, select a category. Indicate what you'd like to output as the default value in the Default Output area.
- Click + Add New Row to begin adding your translations. Use the Input field to enter the data you'd like to be converted to another format. Use the Output field to indicate what the data should be converted to.

- Continue adding rows until you've added all your desired translations.
- Some input types give you the option to configure the translation as a regular expression. A regular expression (or regex) is an advanced option that allows you to use JavaScript code to identify patterns to match character combinations in your translation. In most cases, you won't need to enable this.

- Click Save Changes to save your work and return to the Translation Tables page.
Once you've added Translation Tables, you can work with them in several areas. The options available to you may include applying these tables in Custom Properties, emails, your web portals, or JSON or Tabular Exports by clicking Choose a table on your included fields.

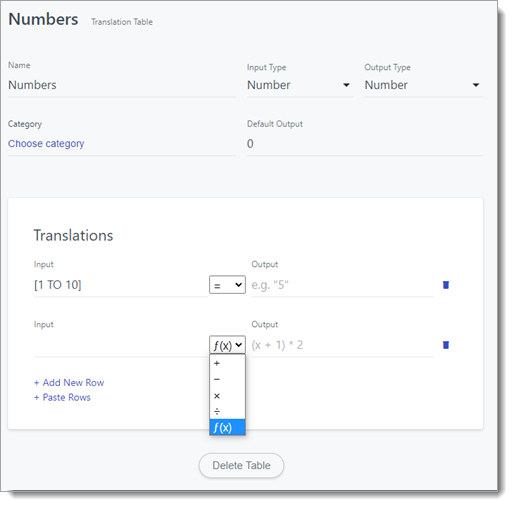
Using Number Ranges in Translation Tables
If you're using a range of numbers in your translation, choose Number as your Input Type. You can also perform math operations on the field that you've applied the translation table to. To do this, also choose Number as your Output Type, and select the appropriate operator. This can be useful if you're using Translation Tables to build an applicant score.
Basic math operators (i.e., * , / , ^ , + , and - ) are allowed. For more advanced calculations, select f(X) as your operator, and add your formula to the Output column. The resulting value will take the value found in the field and perform the calculation you've included.
For example, if you type x * 0.8 in the Output column, and the value found in the field is 4.9, the operation performed is 4.9 * 0.8, and the resulting value is 3.92.