Creating Custom Text Translations for Exports
When importing data from Outcomes into another system, there may be values that are not accepted in their existing form. For example, you may need to convert values in the suffix field from "Senior" or "Junior" to "Sr" or "Jr." Many of these types of conversions can be done using the translation table feature in Outcomes. However, if your translations need to account for the possibility that the field you are converting may be empty, you can use a JavaScript expression to build your own custom translations. This article will guide you in adding this JavaScript and modifying it to meet your needs.
To complete this configuration, you'll need to:
- Identify the field you want to convert in your export.
- Create a Custom Property with a JavaScript expression that will accomplish the conversion.
- Update the code, adding the values you want to convert to and from.
Setting Up the Export
To complete this configuration, you'll need to add a Calculated Field to a Tabular/Spreadsheet Export. While configuring the export, drag the Calculated field option from Available Fields and place it in the Columns window.

Then, add a JavaScript Expression by clicking the function icon and dropping the code listed below into the Expression field.
![]()
Then, update the code to indicate what field you need to convert and what the conversion should be.
JavaScript Code
While following the steps above, use the following code in your JavaScript Expression. Use the view source icon at the top right to copy the code snippet.
{
  let fieldPath = forms.your_field?.name?.here ? forms.your_field.name.here : '';
  fieldPath = fieldPath.replace(/\./g,'').toUpperCase();

    switch(fieldPath) {
        case('OPTION1'): return 'CONVERSION1';
        case('OPTION2'): return 'CONVERSION2';
        case('OPTION3'): return 'CONVERSION3';
    }

  return null;
}
Modify the Code
Once you've added this code to your JavaScript expression, you'll need to modify it by replacing the variables and adding the values to be converted.
Replacing the Variables
The code above includes the following variable: forms.your_field?.name?.here
To replace the variable, you'll need to:
- Determine what field you want to use for this conversion.
- Find the related field key.
- Modify the field key by adding ? after each section. This helps prevent errors if any related properties are null or undefined.
- Add the modified field key into your code snippet in place of the variable.
Where necessary, use the Field Dictionary to find the field key. For example, if you intend to convert values found in the Suffix field, search the Field Dictionary to find the Suffix field key.
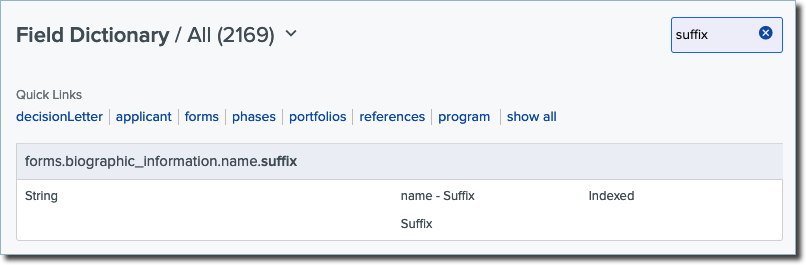
In this case, the field key is forms.biographic_information.name.suffix. You'll use this to replace the variable in the code.
To help prevent errors, add ? to each section of the field key. In the case of the suffix field, the appropriate variable would be forms?.biographic_information?.name?.suffix.
Next, modify the code snippet further by adding your desired conversion values.
Adding the Conversion Values
The next step is to indicate what values you convert. To do so, you'll take the existing switch statement and add your own values. In the example of converting suffix values, you may want to take any value of "JUNIOR" and convert it to "Jr." To arrange this in the code, you'll replace case('OPTION1'): return 'CONVERSION1'; with case('JUNIOR'): return 'Jr';. To convert values of "SENIOR" to "Sr", you can replace case('OPTION2'): return 'CONVERSION2'; with case('SENIOR'): return 'Sr';.
Continue adding your values as needed. In the example above, the final code may look like this:
{
  let fieldPath = forms?.biographic_information?.name?.suffix ? forms.biographic_information.name.suffix : '';
  fieldPath = fieldPath.replace(/\./g,'').toUpperCase();

    switch(fieldPath) {
        case('II'): return 'II';
        case('III'): return 'III';
        case('IV'): return 'IV';
        case('JUNIOR'): return 'Jr';
        case('JR'): return 'Jr';
        case('SENIOR'): return 'Sr';
        case('SR'): return 'Sr';
    }

  return null;
}
After adjusting the code as necessary, click Update. Next, make any other needed changes to your export and click Save Changes to finalize it.
Testing the Code
While building the export, click the Try It button to confirm that your adjustments are working.

Search for a record to complete your tests with. Confirm that the appropriate value appears in the Output window.