Managing Events for Your Outcomes-Based Portals
If your institution holds events that applicants, recruits, or other associates are invited to attend, you can manage those experiences using the Events feature in Outcomes. With this tool, you can schedule your events, track registration, communicate with registrants, and check registrants in. Before setting up events, be sure to review and configure your Student Portal, within which your events will be displayed.
Navigating the Events Page
Review the legend below to learn to navigate the Events Page.

- Use the filters at the top of the page to isolate events from the current month, day, the next seven days, or next 30 days.
- Use the search button to search for events by their name.
- Use the plus sign to create a new event.
- Use the list button to view your events in list view, as seen in the screenshot.
- Use the icons button to view your events as icons. This view displays an icon for each event, rather than a detailed list.
- In the Events Grid, the column headings help to identify details of each event. Click an event to access its details. Use the checkboxes to perform batch actions (i.e., to Copy or Delete events).
- Use the navigation options to view other events in your list.
- The calendar defaults to the current month, and can be used to isolate specific dates. Click on the opening date of your date range, then click on the closing date. The grid reloads, presenting you with the events within your specified timeframe. The calendar also uses a dot to indicate the dates that have existing events.
- Use the filters to isolate events by Event Type, Event Status, or Tags that you have added to them.
- Click the add tag button to include a Tag in your filters.
- Click Clear to remove the filters you've added.
Managing Event Types
Before you begin creating Events, you'll need to create Event Types. This is where you'll establish the types of events you'd like to manage in Outcomes. This may include open houses, campus tours, or other events your institution invites people to.
To create an Event Type:
- Navigate to the Calendar section of the Settings Menu and click Event Types.
- From this page, you can review and edit your existing Event Types. Click the plus sign at the top right to create a new Event Type.
- Type the name of your Event Type, e.g., Campus Tour.

To edit an existing Event Type, click its name. From the menu that appears, you can rename the Event Type and click Update.
Creating an Event
You can create an Event in Outcomes to keep track of any occasions you'd like to manage in the software. There are four steps in creating Events:
- Details: here, you establish what type of Event you're creating, along with any relevant details.
- Schedule: here, you configure when the Event will occur.
- Audience: here, you configure who will be invited to register for the Event.
- Finish: here, you can review the settings you've configured and save or publish your Event.
To create a new Event, navigate to the Calendar view and click the plus sign to open the New Event page.

Configuring Event Details
From the Details tab, you can complete the GENERAL INFO section to provide details about your event.
- Start by providing an Event Name. If you'd like the name to appear differently for visitors to your Student Portal, enter the public name in the Event Name (Public View) area.

- Select an Event Type. You can manage your Event Types from the Event Types page in the Calendar section of the Settings menu.
- If you'd like, complete the Website (External URL) field. This appears in the Event Details area on the Student Portal.
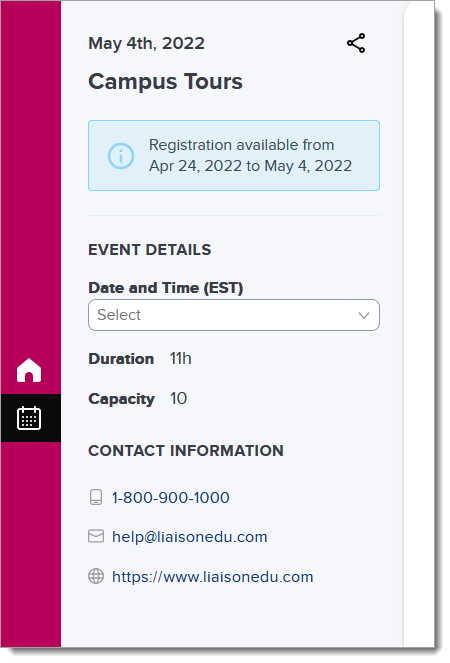
- If desired, you can also add a Location Name and address. The information you enter here appears in the Events panel in the Student Portal.

- Add more information under Brief Description and Additional Details. This information appears in the About the event area when visitors to your Student Portal click on an Event.

- Click Event Banner Image or Event Thumbnail Image to add the respective images.

The Thumbnail image appears in the Events panel in the Student Portal.

The Event Banner image appears in the About the event area when visitors to your Student Portal click on an Event.
- You can also add Tags to help categorize your Events further. These will be visible to your audience.

- When ready, click SCHEDULE to configure the schedule for this event.
Configuring Event Schedule
On the Schedule page, set the dates, times, and frequency for your event.
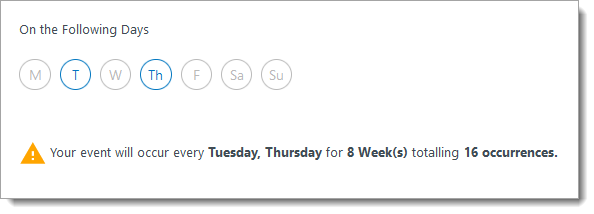
- If the same event occurs every day (including weekends) within its start and end date, choose Daily from the Frequency dropdown. If it occurs every week on the same day, choose Weekly. If your event occurs only once, or if it occurs on a schedule other than every day or week at the same time, choose Specific Dates. If there's a possibility the event will occur on more than one date, it's best to configure it with multiple dates and adjust if needed, rather than configure it as a single event.

- While scheduling dates and times, remember that your selections indicate that the event will occur each day and each time that you include. So, if your event runs at different times on different days (e.g., tours on Monday and Wednesday at 1 PM, and Tuesday and Thursday at 3 PM), you'll need to schedule separate events to account for the different times.
- Click AUDIENCE to advance to the next page.
Configuring Event Audience
On the Audience Details page, you'll establish who you are inviting and what form they'll need to complete to register.
- Select an Inquiry Form. The options that appear here are the forms you've already built in the Contacts section of the Settings menu. The form you select serves as the registration form for the event.
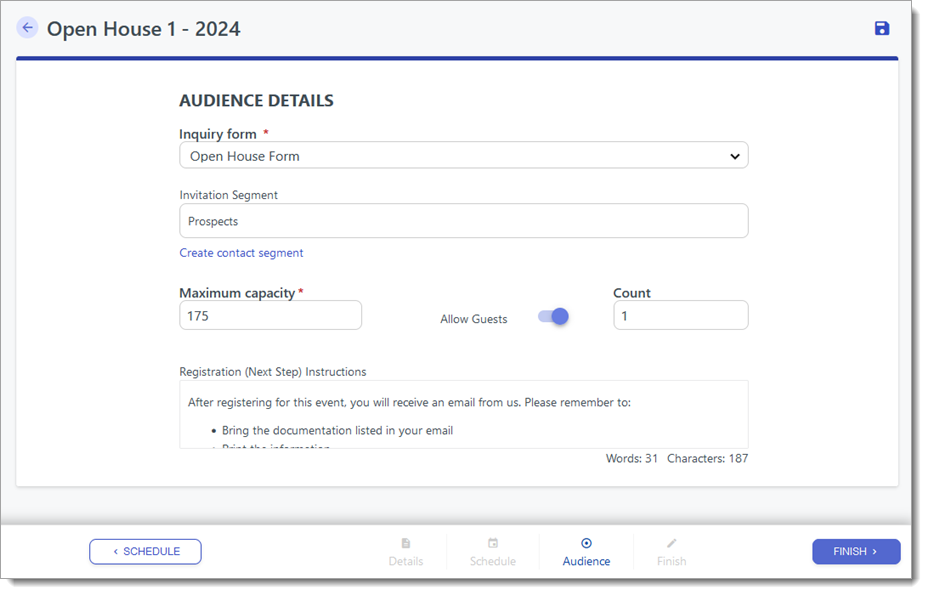
- Set the Contact Segment you'd like to invite, or click Create contact segment to build a new Segment to use for this event.
- Use the Maximum Capacity field to determine how many visitors (registrants plus guests) you'd like to allow.
- Set the Allow Guests toggle. If registrants are allowed to bring guests, enter the maximum number of guests allowed in the Count field. If enabled, guests count towards the capacity limits you've established in the previous step.
- Add other guidance for your registrants in the Registration Instructions field. These instructions only appear to registrants after they've completed the registration.
- Click FINISH to save your work and review the event's settings.
Publishing Events
On the Event Summary page, review your settings and configure your publishing options.
- If you want to save the event without publishing it, click the Save icon at the top of the page.

- Under Publishing Options, you can set your registration window. To select specific dates where this event is open for registration, choose Fixed Date Range. If, instead, you want to allow registration based on a set number of days before or after an event, select Sliding Date Range.
- If you want to give registrants the ability to check themselves in for this event, set Self-Checkin to on.
- If you want to prevent registrants from signing up for more than one occurrence of an event in this series, set Enable Limited Registration to on.
- If you want this event to be hidden from anyone except those who have a direct link, set Private Event to on.
- If you've enabled Events in your Student Portal modules settings, all public events are listed in the Student Portal. If you set the Featured Event toggle to on in your event settings, the event is featured at the top of the Events list in the Student Portal. If multiple events are featured, the next upcoming event (by date) is displayed.
- If you're ready to publish the event and open it for registrations, click PUBLISH.

Managing Events
Once you've created events, you can review them from the Events Calendar. Use the checkboxes at the right to multi-select events to copy or delete. Click an event to see more information.

After opening an event, you can review its details, including event dates, registrants, and total attendees.
Navigating the Event Details Page
Review the legend below to learn how to navigate the Event Details page. Review Managing Events for more information.

- Click the Add Registrant icon to manually add registrants.
- Click the Email icon to send communications related to this event, including invitations, reminders, and follow-ups.
- Click the Share icon to get an event link and QR code that you can use in your event promotion.
- Click the Edit pencil to change any of the event's settings.
- Review the registration information for an overview of the event's registrants.
- Use this slider to switch from the registrants view to the communications view, which shows all communications related to this event.
- Review more details related to the selected occurrence of this event.
- Review the registrant grid to see who has registered for the event. Use the checkboxes to complete an action on several registrants at once (e.g., add or remove a check-in or registration).
- Click the arrow to review a registration, check a registrant in, or unregister them.
Editing Events
Several settings can be edited after you've created an event.
Editing an Event Series
To edit an event's entire series, from the Event Details Page, click Edit Series at the top left. This allows you to adjust the event's status, date/time, frequency, and limited registration.

Editing an Event Occurrence
To edit one or more occurrences of an event, from the Event Details Page, click the edit pencil at the top right.

Each event property can be edited by clicking the arrow at the end of the row. Once a change is made, up to three options are available to choose how many of the occurrences are affected by the change:
- This Event Occurrence: select this option to apply the change only to the selected occurrence. In the example above, the change would impact only the September 26th, 3:00 PM event.
- This and Future Event Occurrences: select this option to apply the change to the selected occurrence and all occurrences that follow it. In the example above, the change would impact the September 26th event, September 27th event, etc.
- All Event Occurrences in Series: select this option to apply the change to the selected occurrence and all other occurrences before and after it.
Depending on the value selected, you may only be able to edit the selected occurrence.
Also, depending on whether your event has already been published or if it has registrants, several settings may no longer be editable. These include limited registration, making the event private, and making the event featured.
Keeping Track of Event Registration Changes
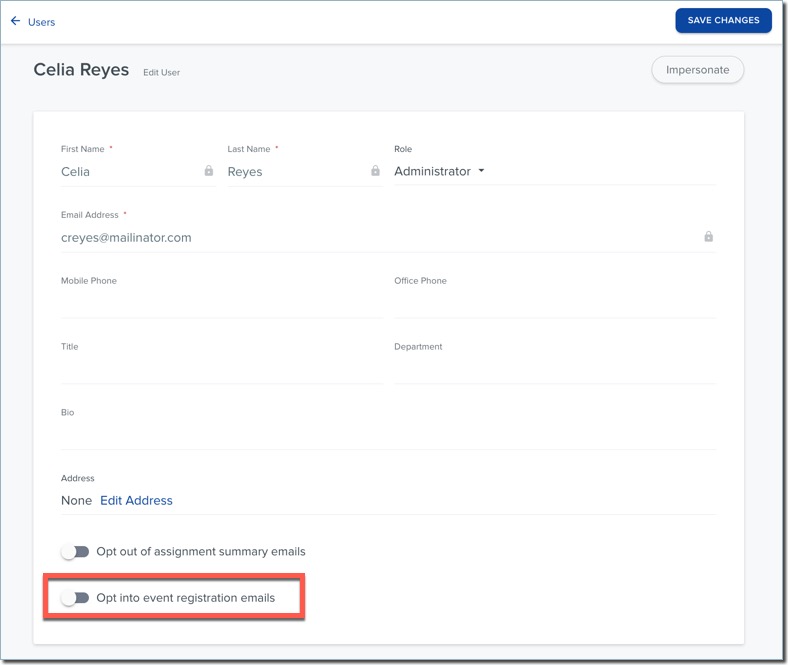
To track event activity, you can enable event registration emails for yourself or other users at your institution.
Users with this option enabled receive a daily email that summarizes registration changes that occurred in the last 24 hours. The email includes information about anyone who registered, canceled their registration, or checked in to an event that occurs today, tomorrow, or in the next 30 days. Notifications are sent daily around 6:00 AM EST, even if there are no event changes.
To enable this notification for users, navigate to the Users section of the Settings Menu, select the desired user, and toggle on the Opt into event registration emails setting. The user account must be activated on the Outcomes portal to receive the email.