
Managing Contact Data
Managing Contact Properties
In Outcomes, Contact Properties are customized fields you can create to capture information about your contacts. Contact Properties can be added while creating or editing Contact Types. By default, Contact Properties can be reviewed directly on each contact record and can be included in exports and filters.
Creating Contact Properties
Each Contact Type has its own Contact Properties, or fields that contain data relevant to that type of contact. For example, a Contact Type of Advisor may include properties for the advisor's email address, phone number, and school affiliation. After creating your Contact Type, you can edit its properties. To do so:
- From the Contact Types page, click the Contact Type you want to work with.
- Review its Contact Properties section.
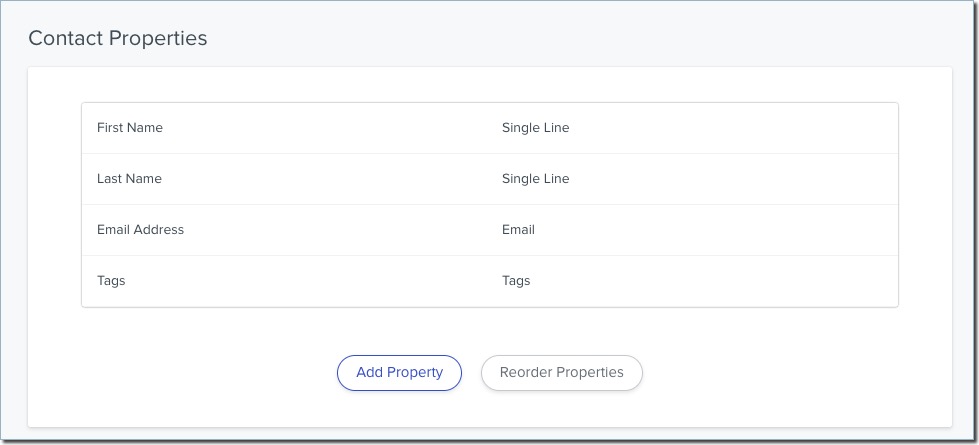
- Use the Add Property button to add data points to display for each Contact (e.g., Address, Phone Number, ID, Recruitment Stage, etc). To learn more about how each property type can be used, review Contact Property Usage and Availability.
- When configuring your property, use the Identifier Mode setting to control whether this field should be used to match imported records to existing contacts.
- Click Add to add your new field, and click Save Changes when you're done editing this Contact Type.
Once these properties are created, you can view them or change their value from each contact record by clicking All Properties.

Working with Contact Identifiers
When you create or edit a Contact Property, the Identifier Mode option controls whether that field is used to match imported data to existing contacts or to create new contacts if no match is found. This setting is only used when contacts are imported from files or external data sources.

There are three Identifier mode options:
- Not an Identifier: This is the default and recommended setting for most fields. Use this for data like the contact's name, address, phone number, high school, and similar attributes. These fields should never be used as identifiers because they can change or be shared by multiple people.
- Identifies a contact across sources/integrations of the same type: Use this only for specific, advanced use cases when directed by the Liaison services team. With this option, the field can match contacts only within imports of the same integration type.
- Identifies a contact across all sources/integrations of all types: Use this for fields that truly and uniquely identify a person across all of your systems. As a best practice, you should have no more than three such identifiers on a contact. By default, the first field used for this is the contact's email address. This functions as a unique identifier at the Outcomes level. If you are a CAS-connected organization, another field with this setting should be the CAS ID, which uniquely identifies the CAS account delivered during implementation. You may also consider applying this setting to an SIS ID or another institutional identifier that uniquely identifies a person at your institution.
To avoid duplicate or incorrect records, limit the number of identifier fields and configure them only on fields that are guaranteed to be unique and stable over time. Fragmenting identifiers across many fields can lead to duplicate contacts, while applying identifiers too broadly can cause unrelated records to be merged together.
Working with Contact Funnels
One of the property types available to you when creating Contact Properties is Funnel. Funnels are a way of tracking your contacts as their relationship changes with your institution. For example, a contact may start off as a prospective student, then become an applicant, then become a matriculant, and eventually become an alumnus. As a contact progresses through these stages, you can use the Funnel property type to capture this information.
To create a funnel:
- From the Settings Menu, click Contact Types in the Contacts section.
- From the options on the Contact Types page, select your Applicant contact type.
- Click Add Property.
- Select the Funnel property type.
- Name the funnel (e.g., Recruitment Stage), and add your list of funnel stages.

- Click Add to keep the property.
Working with Funnel Properties
Once you've created a funnel property type, you can work with it in several ways:
- You can access the funnel information to review or change it from each contact record. To do so, navigate to the record and select the All Properties option. Click the property to change its value.

- You can edit funnel properties in batch from the Contacts Grid by selecting the desired contacts, clicking Update Data, and selecting the property you'd like to edit.
- You can track your funnel properties as touchpoints, making it easier to understand and segment contacts based on their movement through the enrollment funnel. To make this work, first enable the Track as touchpoint option in your funnel's settings. Then, changes to that property are recorded in Contact Activity and can be used when building segments. You can identify contacts who moved into a specific funnel stage during a selected timeframe, even if they have since moved to another stage.
Contact Property Usage and Availability
The table below shows which custom Contact Property types can be used as Contact Grid headers, in batch updates, and in reports. The types listed below are those found when creating a Contact Property from the Contact Types page or when adding questions while configuring Inquiry Forms.
|
Data Type |
Can Be Added to Contact Grid |
Can Be Updated in Batch |
Can Be Used in Reports as a Data Point |
Can Be Used in Reports as a Filter |
|---|---|---|---|---|
| Address | Yes | No | No | Yes |
| Concealed | No | No | No | No |
| Contact Relationship | Yes | No | No | Yes |
| Country | No | No | Yes | Yes |
| Date | Yes | Yes | Yes | Yes |
| Date (Calculated) | Yes | No | Yes | Yes |
| Dropdown | Yes | Yes | Yes | Yes |
| Email 2 | Yes | No | No | No |
| Funnel | Yes | Yes | Yes | Yes |
| Multi Line | Yes | No | No | Yes |
| Multi-select | Yes | No | Yes | Yes |
| Number | Yes | Yes | Yes | Yes |
| Number (Calculated) | Yes | No | Yes | Yes |
| Phone | Yes | No | No | Yes |
| Postal Code | No | No | Yes | Yes |
| Single Line | Yes | No | No | No |
| Single Line (Calculated) | Yes | No | No | Yes |
| Social | Yes | No | No | Yes |
| Tags | Yes | No | Yes | Yes |
| Test Score | No | No | No | Yes |
| URL | No | No | No | Yes |
| User Relationship | Yes | No | No | Yes |
| Yes/No | Yes | Yes | Yes | Yes |
| Yes/No Calculated | Yes | No | Yes | Yes |
Managing Contact Data Attachments
When you configure Contact Types in Outcomes, you can establish Contact Properties to capture relevant information about each applicable contact. Where enabled, Global Administrators can add an Attachment property type. The Attachment property type allows you to upload JSON files that combine many data points into a single view attached to a contact.
For example, the Student contact type may contain several contact properties related to each student's volunteer service, like the name, location, and date of their volunteer work. You can configure a "Volunteer Service" data attachment that contains all of this information, allowing you to import JSON files for each applicant and automatically populate these values.
In summary, the process requires that you:
- Determine what data you want to upload to contacts via data attachments.
- Create or obtain a JSON file with a sample of this data.
- Use the JSON file to configure a new contact property with the property type of Attachment for the applicable contact type.
- Test adding attachments to contacts.
Once your data attachments are configured, Global Administrators can add JSON files either individually from each contact record or in batch. Contact Alex Arpaia for assistance implementing the Contact Data Attachments feature.
Adding Data Attachments
To upload data attachments, you'll first need to tell Outcomes about the files that you'll upload. This involves providing a sample of JSON you intend to upload for each applicable contact, defining every data point you wish to display in your attachment, and then specifying which parts of the data should be mapped to fields or used in searches. It's important to ensure that all elements of your data model that you are mapping to the JSON sample are properly defined, as any undefined elements will not be imported correctly.
To begin configuring your data attachments:
- Navigate to the Settings menu and click Contact Types under Contacts.
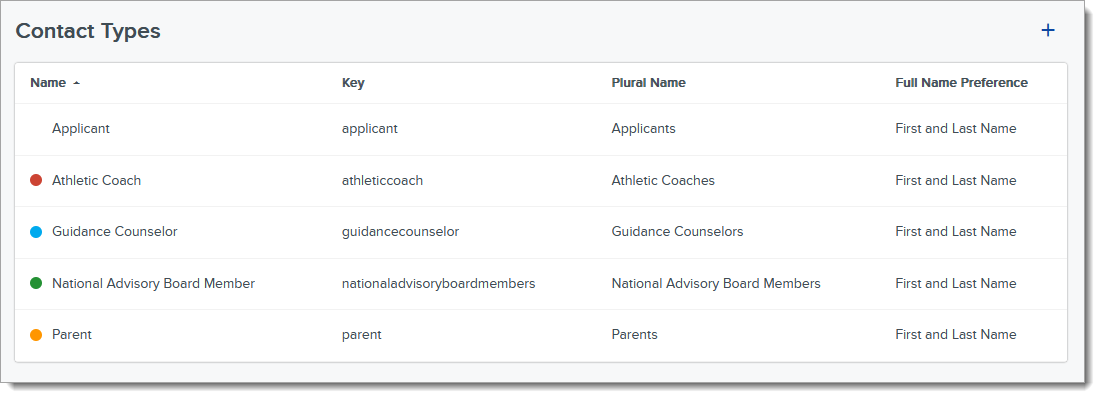
- Add a new Contact Type or edit an existing type.
- In the Contact Type settings, under Contact Properties, click Add Property.
- From the Add Property page, select Attachment from the Property Type dropdown. This is telling Outcomes that you want to use JSON attachments to append contact data.

- If you'd like to prevent users from editing the JSON sample, enable the Read only toggle. If the attachment property is set to read only, users are also unable to edit search criteria.
- Click Configure Field. This opens a wizard allowing you to configure Outcomes to intake the relevant data from your JSON uploads or data imports, as described below. After configuring the property, click Add to save it.
Configuring the Attachment Property
When you add an attachment property type to your contacts, you'll need to configure Outcomes to handle the attachments that you'll upload or import. This step requires that you provide JSON to serve as a sample of the file structure you'll be using for this property type. To configure your attachment property:
- As described above, click Configure on the Add Property window. This opens a four-step wizard where you'll map the relevant fields and configure how Outcomes should work with your data attachments.
- The first step in the wizard is JSON SAMPLE. Here you can either paste the JSON code or upload a sample JSON file. Remember to make sure all elements of your data model are defined in the JSON. Click Continue to advance.

- After adding the JSON, Outcomes analyses your sample file and determines what properties it contains. The MAPPING step allows you to map these properties from the sample file into specific contact properties in your environment. This is not required to create searchable fields (as seen in the SEARCH step) but should be done for properties that you want to persist in the contact profile. The Available Data menu on the left contains fields discovered in your sample file. Locate the fields you'd like to map and drag them to the Mapped Properties section. Typically, the properties you'll map here are fields that will be static. For example, in the screenshot above, the JSON contains a list of community outreach programs the contact has participated in. In this example, you may decide to map the title and description fields during the mapping step.

- From the Mapped Property column, click Select a Property to determine which contact property you'd like to populate using the data found in the JSON file. These can be previously existing contact properties, or you can add new properties by clicking Create New Property.
- Any field that is not mapped will still appear in your contact records, but will not be available in queries and exports. Click Continue to advance to the SEARCH step.
- From the SEARCH step, you'll map the fields you want to make available in searches and segments. On the left side of the Search Collections grid, select the data collection containing the fields you want to use. Then click SELECT CRITERIA. While completing this step, note the following:
- The fields you mapped during the previous step are already made available in searches and segments, so this step is not required if you’ve already mapped all properties in your data model.
- Unlike the mapping step, defining data as search criteria during this step will not bring this data to a contact's profile.

- After clicking SELECT CRITERIA, a window appears allowing you to add the fields you want to be searchable. Find the fields you want to add under Available Fields and drag them to the Search Criteria pane. From there, you can change the name, field type, and order of the selected criteria. After making your selections, click Save.

- After mapping your search fields, click Continue to advance to the HTML TEMPLATE step.
- The final step of the wizard allows you to add HTML content to establish how the data in your attachment will appear within contact records. For this step, you'll add an HTML template. This step is not a requirement to search data. When you configure an HTML template to display your data, it will be added as a new page under the Information tab in a contact profile page, as seen in Working with Data Attachments.
- Click Show Preview to see how the data will be displayed. Click Done to return to the Edit Property page.
- Once your configurations are finalized, click Add to add the new property.
Working with Data Attachments
Once you've configured Outcomes to accept data attachments for your contacts, Global Administrators can upload JSON files to individual contacts or configure your data sources to import the attachments.
As a Global Administrator, navigate to the desired contact and click the 3-dots menu on the Information pane.

Here, you'll find the new attachment property you created. Click the property. To upload a new JSON file, click UPLOAD on the bottom right. After adding your JSON file, the data will populate into the contact, and will display as configured in the HTML Template step.
Note that local administrators (who are not Global Administrators) can configure data sources for imports, but cannot append individual JSON files to contact records.
If you've configured your data for automated import, it will automatically begin appearing on the associated contact records according to your import schedule.
Contact Alex Arpaia for assistance with data imports.