Navigating Contacts
Overview
The Contacts area is where you can collect and view the data and activities of any people or organizations with whom your institution engages. From the Settings menu, you can add as many contact types as needed. Contacts may include recruits, applicants, students, and others.
Navigating the Contact Grid
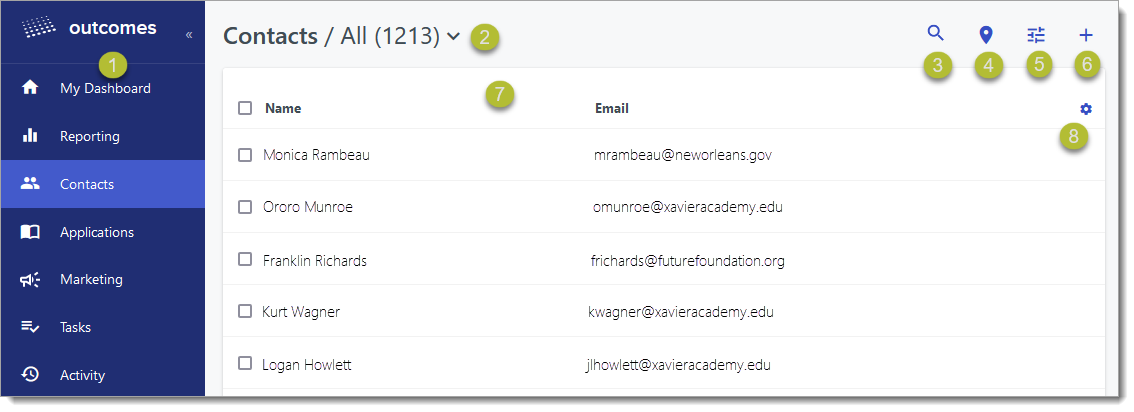
- Navigation Menu: use this menu to switch to different sections of the application. Click << to collapse the menu for a larger working area.
- Contact Type and Segment Selector: use this drop-down to filter the list by Contact Type or Segment.
- Search Button: use this to search for contacts using their name, email address, phone number, city, zip code, or other contact information.
- List View / Map View Toggle: use these buttons to toggle between viewing contacts in a list or a spatial map.
- Filters: use this button to filter your contact list. For example, you can filter by address to isolate all contacts from a specific city. Continue to add filters as needed, and save the filter as a Segment for later reuse.
- Add Contact Button: click this button to add an individual contact or to add contacts in batch using a CSV, JSON, or XML file.
- Contact List: click the desired column header to sort by that column. Use the checkboxes to select contacts to perform an action on. Click the checkbox at the top of the grid to select all the checkboxes.
- Edit Grid Button: click this icon to edit the columns included in the contact list grid.
Viewing and Filtering Contacts
Click any contact to review their Contact Information page.
When using filters to isolate contacts that meet the criteria of your choice, keep in mind that the contains filter only accepts whole words. For example, the querying for contacts from a State that contains "Texas" will work, but "Tex" will not.
Applying Batch Actions to Selected Contacts
In Outcomes, you can save time by performing actions on multiple contacts simultaneously. To perform a batch action:
- Go to the Contacts View and select your desired filters.
- Click the checkbox at the top of the list of Contacts to select all contact records on the page, or select individual contacts one at a time.
- If the list of contacts extends past the first page, you’re presented with an option to select the entire batch. Click Select all… to include all contacts.
- From the bottom of the list, select which batch action you’d like to perform. The actions available here are dependent on your permissions in the software.

Available batch actions may include:
- Email: this action allows you to send a standard email to the selected contacts.
- Marketing: this action allows you to send a marketing message to the selected contacts.
- Comment: this action allows you to add a comment to the selected contact records.
- Update Data: this action allows you to apply a change to a field for all the selected contacts at once.
- Add Tag: this action allows you to add or remove tags from the selected contacts.
- Export: this action allows you to generate export files for the selected contacts.
- Delete: this action allows you to delete the selected contacts.
- Merge: this action allows you to combine two contact records.