Designing Workflows
In Outcomes, you can design workflows using the Workflow Automation feature. Workflows are sequences of actions that should occur at different stages throughout the application cycle. Workflow Automation allows you to build rules to launch desired actions when specific conditions are met. Workflows can be set to begin when a specified action has occurred, or they can be launched manually.
Choosing Between Workflows and Automations
Workflows differ from Automation Rules in that workflows are run once, whenever your desired conditions are met. The scheduled updates that occur through Automation Rules can be configured to occur at a specific time and with the desired frequency. With that in mind:
- Use Workflows when you need actions to occur in near real time as soon as a trigger event happens (e.g., a phase change, tag addition, or decision change), and when those actions should happen only once per application.
- Use Automation Rules when you need a repeating process that runs on a schedule, and when you do not need real‑time execution of actions (e.g., nightly reminders or periodic stage moves).
|
Tool |
Timing |
Frequency Per Record |
Impact of Updating the Configuration |
Record Type |
|---|---|---|---|---|
| Workflows | Triggered when specific events or conditions occur in near real time. | Each record can enter a given workflow only once. | Records follow the version of the workflow that was current at the time they entered the workflow. | Contacts or Applications |
| Automation Rules | Run on a schedule, targeted records are evaluated at the time of each run. | A record can meet criteria multple times, and run through the automation each time. | Records follow the version of the automation rule that is current at the time of the scheduled run. | Applications |
How Workflows Work
You can design workflows to do many different things related to your applications or contacts. For example:
- Change the phase on a specific set of applications
- Send an email to a group of applicants who've met some milestone
- Update internal fields on applications to indicate new information
- Update a contact property
- Add or remove application or contact tags
Consider building a workflow when:
- You need actions to run immediately or within seconds of a trigger (e.g., phase changes, decision changes, tags being added).
- You have complex branching logic (if/then paths) based on application data, where different groups should receive different actions (tags, emails, phase changes, etc.).
- You need to guarantee that a specific set of actions happens once per application, even if the trigger condition is met multiple times over its lifecycle.
If you need repeating actions (e.g., nightly reminders until a fee is paid) or periodic sweeps over a population, use Automation Rules instead of workflows.
When configuring workflows, remember:
- Each workflow run is tied to a specific application or contact record. For that record, a given workflow can be triggered once and only once by its configured trigger(s).
- If an application later meets the trigger conditions again (e.g., moves into the specified phase a second time), the same workflow will not re‑run for that application.

Building a Workflow
To begin creating your workflow:
- Navigate to the Settings Menu and click Workflows in the Application Review section. For workflows related to your contacts, click Contact Workflows in the Contacts section.

- Here you can review your existing workflows. Click the plus sign at the top right to begin working on a new workflow. As a best practice, don't activate a workflow until all triggers, decision branches, actions, and waits are configured and tested. If you mark a workflow Active while it’s partially built, it can activate on live applications and take unintended actions.
- Name the workflow, leave the Active toggle off, and click Add Trigger to begin configuring it.

- Select the type of trigger to add. Note that you can configure multiple triggers for a single workflow (e.g., several phases or different tags). The workflow will start the first time an application meets the trigger conditions. After it has run once for that application, it will not run again for that application, even if the application later meets another trigger condition in the same workflow.
- Click the plus sign to add a step.

- Choose what type of step should take place at this point in the workflow.

- Next, indicate the specific step that should occur. Choose Decision if your step is dependent on some other conditions.

This creates a Yes/No path, allowing you to insert your desired steps in either branch. Click the plus sign on either side to add your step.
- If you're adding an Action, select from the displayed list.

- Continue adding steps as desired. See Designing Efficient Workflows for more information.

- Use the Wait step to add a delay. Time-based wait steps are useful to provide yourself a buffer in case you need to stop the next action from occurring. For example, if your next step is to send an acceptance letter, you might add a delay of one or more days to allow yourself an opportunity to catch any inadvertent acceptances. As a best practice, it's usually best to avoid configuring wait steps that wait until a condition is met. If a condition never becomes true, applications may remain waiting indefinitely causing performance issues as the conditions are reevaluated regularly. For example, a workflow that enrolls all started applications and then waits until "Program = Nursing" will leave all non-Nursing applications stuck indefinitely in a wait step. Instead, consider one of the other wait step options:
- Wait for a specific amount of time (e.g., minutes, hours, or days).
- Wait until a specified date/time.
- To remove a step, hover over it and click the X.

- When you're done adding steps, click Save Changes at the top right.
Designing Efficient Workflows
When multiple actions should occur from the same trigger (e.g., when an application is started or moves into a specific phase), it is usually better to build one workflow with several decision branches that trigger, rather than many separate workflows that all share the same trigger. This reduces the number of workflows that need to evaluate the same application, improving performance and reducing the chance of conflicting updates.
For example, if you have different actions that need to occur based on an applicant's state of residence, you can create one workflow that branches off based on the state instead of having a different "application started" workflow for each state. This reduces the number of workflows that need to evaluate and the same application at the same moment, which in turn reduces system load and the risk of performance issues.
Running Workflows
After you enable a workflow, it runs automatically when your trigger occurs.
Newly enabled workflows do not run retroactively, so they will not impact applications that previously met the trigger criteria. For any earlier records, you can optionally run the workflow manually on individual applications if needed.
By default, each contact or application will only enter a given workflow once, even if it later meets another trigger in the same workflow.
Manually Running Workflows
To run workflows manually:
- Navigate to the desired application.
- From the Information Pane, click the three-dots menu and select Workflows.

- Select which workflow you'd like to run on this applicant.
- Once the workflow has started running, it appears in the Workflows area along with its status.
Understanding Which Version of Your Workflow Will Run
Workflows are versioned at the time a record enters them. The configuration that was in place when an application or contact first met the trigger is the configuration that will run for that record. Any later edits to the workflow are applied only to records that enter the workflow after those changes and will not change processing for records that were already in the workflow.
Things to remember about workflow versions:
- The workflow version is fixed for a record at the moment it enters the workflow.
- Later edits apply only to records that enter after those edits.
- Deactivating the workflow does not change the steps for records already in progress.
Reviewing Workflows
If you've started running workflows, you can review them to determine which actions have taken place on each application, and to ensure that they have run as expected. You can do this from any application. To do so:
- Navigate to the desired application.
- Open the information pane, and review the Workflows area.
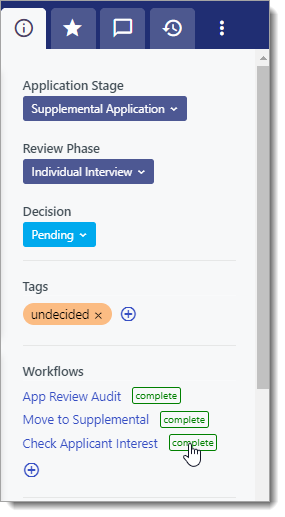
- To see what actions have taken place, click a workflow.
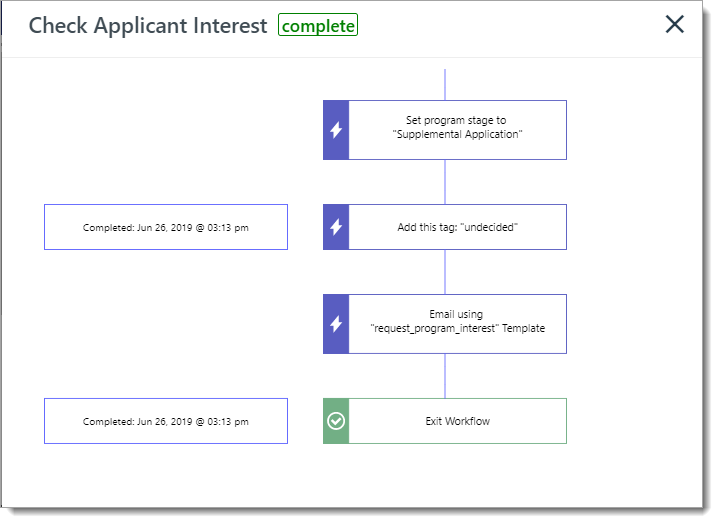
- From here, you review each step. Hover over a step to see when it was completed. If a workflow appears to be stuck in a wait step, check whether it is a time‑based wait (that will eventually complete) or a wait‑until‑condition step whose condition may never be met.
Sample Workflow
In the following example, the program has created a Workflow to handle accepted applicants.

- Decision set to Accepted. When an Outcomes user changes an applicant's decision to Accepted, the workflow is initiated.
- Wait for Two Days. This Wait step is present to provide a buffer before the next actions are kicked off. Without this, if an Outcomes user were to accidentally set an applicant's decision to Accepted, the next steps would occur immediately. Depending on the circumstances, the wait step can be set for a number of minutes, hours, or days.
- Set Program Stage to Acceptance. In Outcomes, Program Stages allow you to establish what actions can occur on an application, and what applicants can interact with during different periods of the application process. Our example stage has been configured to provide the following items:
- A welcome message for applicants on the Application Portal, using the Content item.
- An acceptance letter, using the Documents item.
- A fee collection, through the Submit item.

- Email using Accept Template. This step sends an email to the applicant. In this case, the software sends an email informing the applicant they've been accepted.
- Exit Workflow. This step ends the workflow.
- Active Toggle. Use this toggle to turn the workflow on or off. With the workflow turned off, setting a decision to Accepted won't initiate the following actions. While the workflow is disabled, it can still be manually launched as described above.