
Managing Your Outcomes-Based Reference Portal
For applications generated in Outcomes, the software offers a Reference Portal, allowing you to design an experience for recommenders to submit the references (i.e., letters of recommendation or letters of evaluation) requested by applicants. You can use this portal to collect recommendations for applicants to programs whose applications are created and managed in Liaison Outcomes.
Applicants request recommendations from within their application, and recommenders use a unique link to complete and submit the associated form.

Note that since the Reference Portal is designed for applications generated in Outcomes, so if your program uses a CAS-integrated application, you'll collect recommendations through the CAS Configuration Portal instead.
Getting Started
Before configuring recommendations, confirm that your program uses an application created in Outcomes. In an Outcomes-generated application, you configure the application, questions, documents, and reference requests directly in Outcomes.
Understanding the Process
Configuring the Reference Portal
You can configure your Reference Portal by navigating to the Portals section of the Settings Menu. The portal provides the landing page and styling that recommenders see after opening their unique recommendation link. Review the details below to configure a new portal or to copy from your existing Inquiry Portal.
Copying from the Inquiry Portal
If you have already configured an Inquiry Portal, you can reuse its branding and styling. To do so:
- From the Settings Menu, navigate to your Inquiry Portal configuration in the Portals section.
- Copy the applicable Header HTML, Footer HTML, CSS, and Global Override settings from the Inquiry Portal.
- Paste the content into the corresponding fields for the Recommender Portal.
- Review the header content and remove navigation links that are not useful to recommenders.
- Save your changes.
Do not copy Home HTML or Confirmation HTML from the Inquiry Portal. Those options are not available for the Recommender Portal.
Configuring a New Portal
If you haven't already configured an Inquiry Portal, you can configure your Reference Portal from scratch. To do so:
- From your Reference Portal settings page in the Settings Menu, click the edit pencil to begin configuring your portal.
- From here, you can review and update your configuration:
- Domain: the web address visitors use to access your Reference Portal.
- Browser Title: the text that appears at the top of the browser when a user navigates to your Reference Portal.
- Favicon URL: the web address of your favicon. A favicon is an icon associated with your institution that displays to your portal's users in different areas, e.g., near their browser's address bar, or as the icon when your portal is bookmarked.
- Support Email Address: the email address users are directed to when they need assistance.
- Use the HTML area to modify your portal's appearance. For example, you may decide to add your institution's logo, brand colors, contact details, or URL links.

There are several sections you can configure, including:- Header
- Footer
- Header/Footer CSS
- Global CSS Override
- Click PREVIEW to see what the portal looks like with your current configurations.
- When you're done making edits, click SAVE CHANGES.
Creating Recommender Forms
You can create recommender forms to be sent to recommenders, requesting their evaluation of an applicant. If needed, consider creating different forms to collect different types of recommendations (e.g., academic, professional, or personal). You can create separate forms and different reference steps for each type.
To create a recommender form:
- Click Reference Forms in the App Setup section of the Settings Menu.
- Click the plus sign.
- Name the form and enter a key to associate with it. Click Create Form.

- Recommender forms are divided into different sections. Enter a name in the Section Title.
- Enter an introduction with instructions or information for recommenders.
- To begin adding questions, click Add Question.
- On the Edit Question page, enter your question.
- Enter additional guidance in the Help Text field.
- Choose your desired Question Type.
Question Types are as follows:
- Text: allows recommenders to type in a text response. Selecting this option also requires setting the Max Length for a response. Use this option for questions requiring a short response.
- Paragraph Text: allows recommenders to type a paragraph-length reply.
- Multiple Choice: presents recommenders with multiple options to select from. When selecting this Question Type, enter each option individually in the Answer Option area, or add several answer options at once by clicking Paste Options and pasting the desired options in the text box. Each option must be separated by line breaks. Check the Allow Write In option to allow recommender to write in their own response.
- Drop Down: works the same as the Multiple Choice option, except answer options are presented to recommenders in a drop-down menu.
- Checkboxes: works the same as the Multiple Choice and Drop Down options, except multiple answer options can be selected.
- File Attachment: requests that recommenders upload a file in response to the question.
- Date: allows recommenders to enter a date in response to the question.
- CEEB Code Lookup: allows recommenders to respond with a school name.
- Email Address: allows recommenders to respond with an email address.
- Phone Number: allows recommenders to respond with a phone number.
- Web URL: allows recommenders to respond with a URL.
- Number: allows recommenders to enter a numeric response.
- Scale: allows recommenders to rate one criterion on a numeric scale. Select a range of up to 10 points and label the endpoints or individual scale values. For example, ask recommenders to rate an applicant’s likelihood of success from 1 to 5.
- Scale Group: allows recommenders to rate multiple criteria using the same numeric scale. For example, ask recommenders to rate an applicant’s communication, leadership, and professionalism from Poor to Excellent.
- Table: allows recommenders to complete a table in response to a question. For example, entering their contact information.
- Address: allows recommenders to respond with an address.
- Name: allows recommenders to respond with a name.
- Check the Required checkbox to make this a required question.
- If desired, enter a Javascript condition to modify the question.
- After completing your question, click Add.
- Continue adding questions as desired.
- Click Add Section to add a new section of questions.
- Click Add Calculated Field to add a field to be used in calculating applicant data. Calculated fields are used to combine and transform data fields from anywhere on the applicant record. They appear when reviewing applications, but are not displayed to applicants. After completing your question, click Add.
- When you’re done configuring the recommender form, click Save Changes.
Best Practices in Configuring Recommender Forms
When configuring your forms, consider these suggestions:
- Use clear section titles and instructions to explain what recommenders should provide.
- Use descriptive question labels and keys so form responses are easier to identify when reviewing applications or creating segments.
- You won't need to ask for the recommender’s name or email address on the form since this is collected when the applicant sends the request.
- Preview forms with rating scales to ensure lengthy labels remain readable.
Adding a Reference Step
From the Checklist area of the Edit Program page, you can add Reference requests for your applicants as a Program Step. For References to be available here, you'll need to first configure your Reference Portal. To add a Reference request:
- From the Checklist area of the Edit Program page, click Add Item.
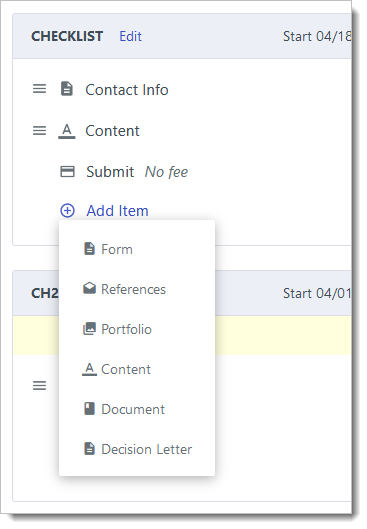
- Click References. If your Reference Portal has been configured, you're guided through adding references for the applicants to this program.
- Enter a name and key for the reference step.
- Click Choose Form to select the form that should be sent to recommenders.
- Set the minimum and maximum number of reference requests an applicant can make. The maximum controls how many recommendation requests an applicant can send. The minimum controls how many completed references are required. For example, you can allow applicants to request five references while requiring only two.
- Add instructions for applicants, if needed.
- Click Add and then save your changes.
Understanding the External Processes
Once you've configured your references, applicants and recommenders can work with them.
The Applicant Experience
Applicants submit recommendation requests from the reference step in their application. To make a request, an applicant enters the recommender’s name and email address and can include a personal message.

Once the reference is requested, applicants can review recommendation information, including the recommender’s identifying information and whether the reference is pending or complete:
- A reference is pending after an applicant sends the request and before the recommender submits the form.
- A reference is complete after the recommender submits it.
Regarding the actions available for applicants, note the following:
- Before a recommender submits the form, applicants can delete an outstanding request or send a reminder to the recommender.
- After the recommender submits the form, the applicant can no longer edit or delete that request.
The Recommender Experience
After an applicant sends a request, the recommender receives a system-generated email containing a unique link. The link is specific to that recommender and request, allowing the recommender to open and submit the appropriate form.
The Recommender Portal displays the form using the branding and styling configured in portal settings. The recommender can complete required questions, provide ratings or comments, and upload files when the form includes a File Attachment question.
After submitting the form, the recommender sees a submitted status and can print the completed recommendation.
Working with Recommendations
After you've configured references and applicants have begun requesting them, you can work with them in several ways, including:
- Reviewing recommendation statuses.
- Resending Recommendation links.
- Creating segments based on recommendation status and other related data.
If configured to do so for your program in Outcomes, recommendation information appears in a panel within the application.

Use this information to monitor outstanding requests and confirm that applicants have met the recommendation requirements for a program.
Resending a Recommendation Link
If a recommender cannot find the system email or their organization blocks it, you can manually share the unique reference link. To do so:
- Open the applicant’s application record.
- Locate the applicable reference request.
- Click the link icon to copy the reference link.
- Send the link to the recommender via email.
Because the link is unique to the recommender and request, share it only with the intended recommender.
Creating Segments Based on Recommendation Status
From the Applications Grid, you can create segments to find applicants based on reference activity.

For example, you can create segments for:
- Applicants with at least one completed recommendation.
- Applicants with one or more pending recommendation requests.
- Applicants with no completed recommendation for a required reference step.
- Applicants who have completed an academic reference but not a professional reference.
You can use a pending-reference segment to send applicants a reminder to follow up with their recommender. Exclude applicants who already have the required completed recommendation so they do not receive unnecessary communications.