Managing Application Decisions and Decision Letters
Where applicable, Outcomes allows you to create Decisions that can be placed on applicants. With this feature, you can indicate and track the decisions you've made on each application. Decisions are separate from Phases, but you may decide to create Decisions that correspond with your Phases. Once you've built your Decisions, you can apply them on applications.
Creating Decisions
To create a Decision:
- Go to Decisions under Application Review in the Settings menu.
- Click the pencil on the right. From here, you can manage your existing Decisions, or create a new Decision.
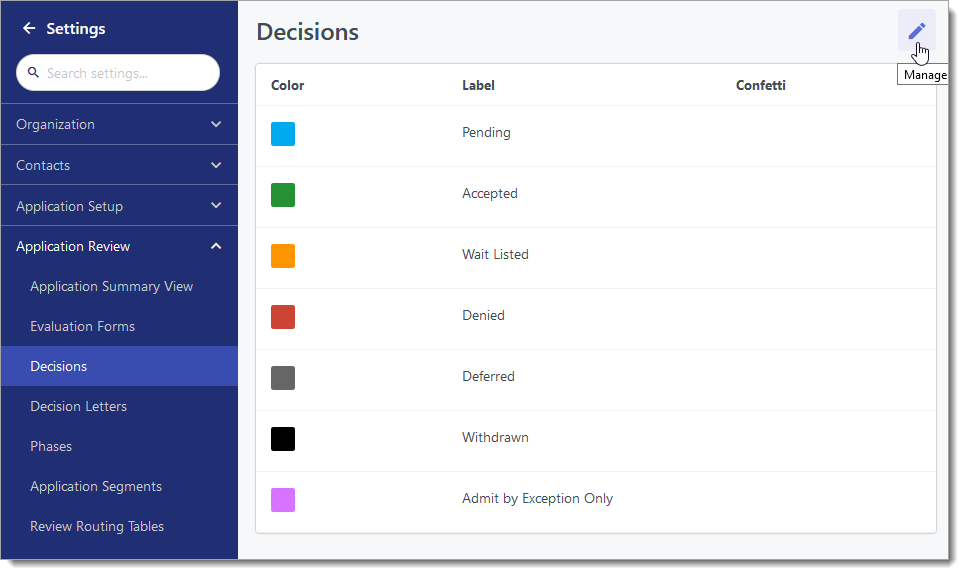
- Click Add Option to add a new Decision.

- Enter a name for your Decision in the Code field and select a color to associate with this Decision.

- Use the Confetti toggle to determine if you'd like animated confetti to appear when this Decision is revealed to applicants on the Applicant Portal.
- Click Save Changes at the top right to lock in the new Decision.
Creating Decision Letters
Once Decisions have been created, you can create Decision Letters and associate them with the applicable Decisions. Decision Letters can be saved as PDF files and sent to applicants, or where applicable, can be released to applicants through your Applicant Portal.
To create a Decision Letter:
- Go to Decision Letters under Application Review in the Settings menu.
- From the Decision Letter Template Sets page, you can manage your existing Decision Letter Templates or create new ones. Decision Letter Templates are organized in sets. If you have different programs or departments that require different branding or different styles of letters, you can separate them into different sets of templates.
- To add a new Decision Letter to an existing set, click the template set of your choice. To create a new Decision Letter Template Set, click the plus sign at the top right.

- Where applicable, name your Decision Letter Template Set, and configure your desired margins.
- If you're adding a new template to an existing set, click Add New Template.
- Indicate which Decision Codes this Decision Letter Template should be associated with.

- Fill in the contents of your letter. Use the formatting tools to adjust the appearance of your letter.

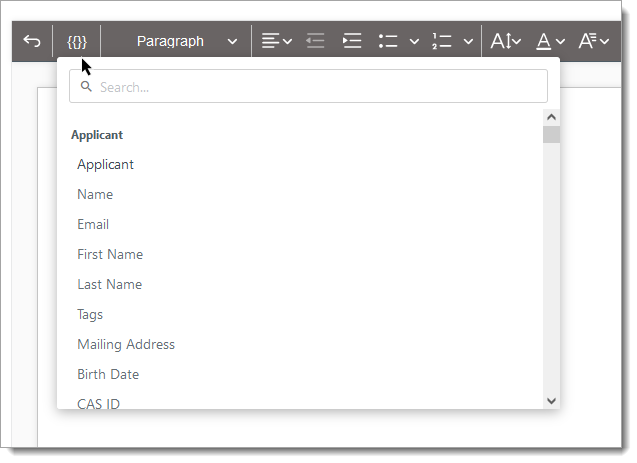
- You can include merge fields, or fields containing variable text, in your decision letter. To add a merge field, click the icon and select which variable text you'd like to insert. For example, select Last Name to insert a field that populates with the applicant's last name when the letter is generated. The data produced by these fields are sourced from the application or any application properties you've created. For additional guidance with selecting the appropriate merge fields, consult the Field Dictionary.
- To add an image, click the More Options (three dots) icon and then click the Image icon to browse for an image to upload to your letter. If your image exists online, click the dropdown arrow and insert the URL of the image. The option to insert images can be useful for adding your institution's logo, or a signee's signature.

- When you're done customizing your letter, click Save Changes.
- If you have any Decisions with no matching Decision Letter Template, a prompt appears to notify you of this. Click OK to ignore the notice and proceed.

- Once they've been created here, you can work with Decision Letters in other areas of the software, including applying them to the applicants of your choice.