TargetX Address Doctor Quick Start Guide
TargetX highly recommends using the Batch Processing Configuration to get a good handle on the number of transactions you will use. However, you can use any combination of the above configurations based on your business needs.
Before creating your first batch process, you must ensure that DaaS is configured.
The Address Doctor can be configured in three ways:
Address Doctor - Batch Processing (TargetX Recommended)
The Informatica Address Verification Batch Processing configuration allows you to run a scheduled process to verify the addresses in your CRM. This configuration will give you the most control over when the addresses in your CRM are verified. Follow the steps below to configure the Address Doctor Batch Processing:
- Navigate to the Cloud Customer 360 application.
- On the Cloud Customer 360 tab, go to the Setup section.
- In the Jobs section, change the dropdown list to Data as a Service.
- In the Schedules section, click the Add Template button.
- You will now be redirected to the Job Template Configuration page.
- Fill out the following information:
- Description →, please be as descriptive as possible regarding the purpose of the scheduled process.
- Schedule → choose the appropriate interval. For example, choose ‘Every Day’.
- If asked, choose the time. For example, 7am.
- Object → choose the appropriate CRM object. In our case, we will choose Contact.
- Check off all options in the next section:
- Verify Phone Numbers
- Verify Emails
- Verify Addresses
- In the Exclude section to the right, add the number of days you would like to exclude addresses for.
- For example, you can set the Exclude Addresses verified within the last field to the number 30. This will ensure to exclude any Contact records that have been verified and not changed, within the last 30 days.
- Column Filter → this section allows you to apply further restrictions on which records you want to evaluate.
- For example, you may only want to verify addresses for Students with a Stage = Applicant. This filter may greatly reduce the number of transactions used.
- Currently, all of these filters use the ‘AND’ operator.
Note: For the IN, NOT IN, INCLUDES, and EXCLUDES operators, you can enter multiple values separated by commas. For the other operators, do not enter values within single quotes. If you enter values within single quotes, the single quotes are treated as part of value.
Your Job Template should look like the following:

- Click Save at the top of the page.
- You will now see you batch process job in the Jobs → Schedules section.
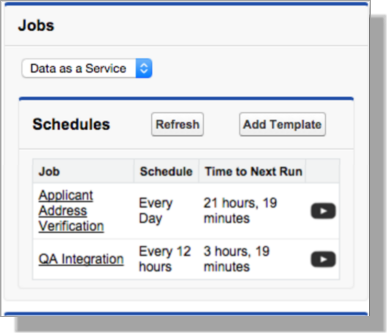
- Your job is now scheduled.
Note: If your Salesforce page is NOT maximized, the Run button may not display. Please maximize your window to view all the necessary fields.
Address Doctor - Manual' Click to Verify'
The ‘Click to Verify’ configuration option provides your users with the ability to verify an address in real-time. The major difference between this option and the ‘Save to Verify’ option is that this option forces the user to click a button to verify the data.
Follow the steps below to implement this option in your CRM:
- Navigate to the Cloud Customer 360 application.
- On the Cloud Customer 360 tab, go to the Setup section.
- Select the Run the Setup Wizard button.
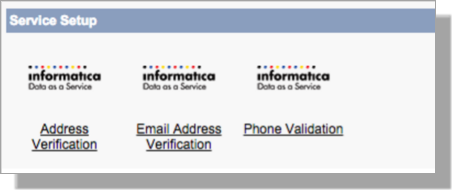
- In the Service Setup section, select Address Verification.

The Service: Informatica Address Verification page appears.
- In the Advanced Settings section, check off the Click to Verify at the Point of Entry option.
- Click Save.
- Click Next.
- The Service: Informatica Email Address Verification page appears.
- In the Advanced Settings section, check off the Click to Verify at the Point of Entry option.
- Click Save.
- Click Next.
- The Service: Informatica Phone Verification page appears.
- In the Advanced Settings section, check off the Click to Verify at the Point of Entry option.
- Click Save.
- Click Done.
Address Doctor - Automated 'Save to Verify'
The ‘Save to Verify’ configuration option will verify the address once the record is saved. This option is considered real-time address verification.
Follow the steps below to implement this option in your CRM:
- Navigate to the Cloud Customer 360 application.
- On the Cloud Customer 360 tab, go to the Setup section.
- Select the Run the Setup Wizard button.
- In the Service Setup section, select Address Verification.

- In the Advanced Settings section, check off the Save to Verify at the Point of Entry option.
- Click Save.
- Click Next.
- The Service: Informatica Email Address Verification page appears.
- In the Advanced Settings section, check off the Save to Verify at the Point of Entry option.
- Click Save.
- Click Next.
- The Service: Informatica Phone Verification page appears.
- In the Advanced Settings section, check off the Save to Verify at the Point of Entry option.
- Click Save.
- Click Done.
Configuring Data as a Service (DaaS)
The DaaS batch job runs based on the schedule that you configure in the template.
The DaaS batch job will then verify Contact details based on the following:
- DaaS Mapping
- Configure the Address Doctor Service Settings
- Configure the Email Address Doctor Service Settings
- Phone Number Validation Service Settings
Before you run the DaaS batch job, you must configure the following:
Configuring the Address Doctor Service Settings
The DaaS job uses the address verification service settings to verify postal addresses.
- Navigate to the Cloud Customer 360 application.
- On the Cloud Customer 360 tab, go to the Setup section.
- Select the Run the Setup Wizard button.
- In the Service Setup section, select Address Verification.
- In the Service Information section, click the Enabled checkbox to activate the Informatica Address Verification service.
- In the Informatica Address Verification Configuration section, you can configure the following subsections:
- Authentication - Enter your authentication credentials to access the address verification service.
- Advanced Settings - Select one or more of the following options for the point of entry verification:
Suggest at the Point of Entry → suggests the address values when entering the address. You must enter at least two address fields to retrieve the suggestions.
For example, if you enter the United States as the Billing Country and start entering values for Billing Street, you get suggestions for addresses in the United States.
Click to Verify at the Point of Entry → verifies the complete address you enter when you click the Click to Verify button.
Save to Verify at the Point of Entry → verifies the address when you click Save on the Account Edit page or the record details page.
You can also add or remove optional parameters such as Default Country, Minimum Characters for suggestions to appear, and Time Delay for Suggestions to appear (milliseconds).
Note: The default value for Default Country is the United States. For example, if you do not enter any country as the Billing Country on the record creation page, the United States is taken as the value for the Billing Country.
-
Service Parameters
Optional: Add or remove the Use Transaction Pool service parameter.
You can include the Use Transaction Pool parameter to specify the transaction pool that Informatica DaaS must use for a call.
For more information about the service parameters, see Informatica AddressDoctor Cloud User Guide.
-
Validation Parameters
Add or remove validation parameters to specify which values to validate. By default, CC360 uses the default values of the parameters.
Note: If your organization has state and country picklists enabled, you must add the Country Type validation parameter and set ISO2 as the value.
For more information about the validation parameters, see Informatica AddressDoctor Cloud User Guide.
-
Enrichment Parameters
Optional: Add or remove the enrichment parameters to receive additional information for an address.
For more information about the enrichment parameters, see Informatica AddressDoctor Cloud User Guide.
-
Select Save.
-
Select Test Connection to verify your connection is correct.
Note: The Test Connection button is enabled only after you save the settings.
-
Select Next.

Configure the Email Address Doctor Service Settings
The DaaS batch job uses the email address verification service settings to verify email addresses:
If you click the Next button in the Address Doctor Service Settings, skip to step 4.
- On the Cloud Customer 360 tab, go to the Jobs section.
- Click Run the Setup Wizard.
- In the Service Setup section, click Email Verification. The Service: Informatica Email Verification page appears.
- In the Service Information section, click the Enabled checkbox to activate Informatica Email Verification service.
- In the Informatica Email Verification Configuration section, configure the following subsections:
- Authentication - enter the authentication credentials to access the email verification service.
- Advanced Settings - select one or more of the following options for the point of entry verification:
- Click to Verify at the Point of Entry → verifies the email address at the point of entry.
- Save to Verify at the Point of Entry → verifies the email address when you save a record.
- Additional Parameters
- Optional: Enter a value for Timeout (seconds). Timeout is the total number of seconds that the service runs to verify the email address. The verification request fails after the specified time period. Default is 90 seconds. You can also add or remove optional parameters, such as Optional Source ID.
- Select Save.
- To test the connection with the Email Address Verification service, click Test Connection.
Note: The Test Connection button is enabled only after you save the settings.
-
Click Next.

Configure the Phone Number Validation Service Settings
The DaaS job uses the phone validation service settings to validate the phone numbers.
If you clicked the Next button in the Address Verification Service Settings, skip to step 4.
- On the Cloud Customer 360 tab, go to the Jobs section.
- Click Run the Setup Wizard.
- In the Service Setup section, click Phone Number Validation. The Service: Informatica Phone Number Validation page appears.
- In the Service Information section, activate Informatica Phone Verification service.
- Enter your Id and Password information.
- In the Informatica Phone Number Validation Configuration section, configure the following subsections:
- Authentication - Enter the authentication credentials to access the phone number validation service.
- Advanced Settings - select one or more of the following options for the point of entry verification:
- Click to Verify at the Point of Entry → verifies the phone number at the point of entry.
- Save to Verify at the Point of Entry → verifies the phone number when you save.
- You can also add optional parameters, such as Default Country Code. The default country code is +1.
- Note: If you do not add the country code when you enter a phone number, the phone number validation service adds the default country code to the phone number.
- Select Save.
- To test the connection with the Phone Number Validation service, click Test Connection.
Note: The Test Connection button is enabled only after you save the settings.
- Click Done.

Configure the Contact object for DaaS (Click to Verify Option Only)
Prior to mapping the request and response fields in the DaaS mapping, you should make sure that your Salesforce objects are configured properly. The instructions below are specific to the Contact object. However, these instructions are applicable to the Account object as well.
Overriding the Contact New Button
If you have applied any of the Point of Entry settings in the Address Verification configuration, and you will also want to use the CC360 New Contact page. This allows the user to interact with DaaS, as they are creating the new record.
Follow the steps below to override the New button on the Contact object:
- Click Setup.
- Navigate to Customize > Contact.
- Select the Buttons, Actions, Links link.
- Select Edit next to the New button:
- Label = New
- Name = New Contact
- In the Override Properties section, update the following Override With setting:
- Click the radio button next to Visualforce Page.
- Choose Contact Scout from the list.
- Click Save.

Note: You can test this configuration by clicking on the Contacts tab, and clicking the New button.
Adding Fields to the New Contact Layout
After overriding the New button on the Contact, you should add fields to the layout that are needed when a user creates a new Contact. Think of this as your “Inquiry Card”. If a user was to create a new Contact record, what do they typically enter and/or what information is readily available? This will not affect the full Contact record, only the new Contact screen.
CC360 uses a visualforce page, called Contact Scout, to present the fields to the user. The Contact Scout page can be configured using a field set. If you would like to add fields to the Contact Scout (New Contact) page, you will need to add the fields to the Contact Search Fields field set.
Follow the steps below to update the Contact Search Fields field set:
- Click Setup.
- Expand Customize > Contact.
- Click the Field Sets link.
- Click Edit next to Contact Search Fields.
- Add the fields you would like in the Field Set section.
Note: By customizing the Field Set, you will override the current default layout. Make sure to add First Name and Last Name in the Field Set
- Click Save.

Adding the DaaS Editor to the Contact Layout
The DaaS Editor is a visualforce page component that allows you to edit and verify Contact records directly.
Follow the steps below to add the DaaS Editor to the Contact layout:
- Click Setup.
- Expand Customize > Contact.
- Click the Page Layouts link.
- Click Edit next to the appropriate layout. For example, Student Layout.
- Select Visualforce Pages.
- Drag the DaaS Editor onto the layout.
Note: You may remove the standard Mailing Address, Email, and/or Phone fields from the page layout since you use the DaaS Editor fields.
Configure the DaaS Mapping
You will need to create a Data as a Service (DaaS) mapping to create a mapping between the fields of the Salesforce objects and the address, email address, and phone number verification services. You can also customize the default mappings based on your organization. For example, you can map a country field of Salesforce to the country field of Address Verification service.
If you have state and country picklists enabled in your organization, you must customize the default DaaS mappings to update the state and country fields of the Salesforce objects in the request and response mappings.
Customizing the Default DaaS Mapping (TargetX Recommended)
You can customize the DaaS mappings based on the organization's requirement. If you have state and country picklists enabled in the organization, you must customize the default DaaS mappings to update the state and country Salesforce object fields in the request and response mappings.
Prior to customizing the default DaaS Mapping for Mailing Address, Email, and Phone Contact mappings, you should create the following custom text fields on the Contact object:
- Process Status
- Mailability Score
- Result Percentage
- Domain Part
- Mobile Provider
These fields will be used in the Response Mapping, providing information back from the respective verification services.
Follow the steps below to customize the default Mailing Address, Email, and Phone Contact mappings:
- On the Cloud Customer 360 tab.
- Click Run the Setup Wizard.
- In the Service Mapping section, click Mapping. The DaaS Mapping page appears.
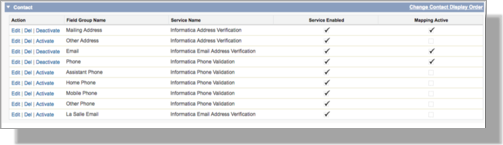
- In the Contact section, click Edit to the left of Mailing Address.
- Take the defaults in the Request Mapping.
- In the Response Mapping, add the following Service Field → Salesforce Object Field mappings:
- Process Status → Process Status
- Mailability Score → Mailability Score
- Result Percentage → Result Percentage
Note: If you have state and country picklists enabled in your organization, perform the following task:
In the Request Mapping and Response Mapping sections, change the Mailing State/Province Salesforce object field to Mailing State/Province Code and the Mailing Country Salesforce object field to Mailing Country Code.
-
Click Save.
-
Click the Activate link for the Mailing Address mapping.

-
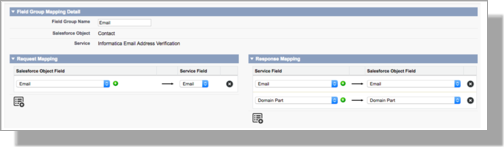
In the Contact section, click Edit to the left of Email.
- Take the defaults in the Request Mapping.
- In the Response Mapping, add the following Service Field → Salesforce Object Field mapping:
- Domain Part → Domain Part
-
Click Save.
-
Click the Activate link for the Email mapping.
-
In the Contact section, click Edit to the left of Phone.
- Take the defaults in the Request Mapping.
- In the Response Mapping, add the following Service Field → Salesforce Object Field mapping:
- Carrier Name → Mobile Provider
-
Click Save.
-
Click the Activate link for the Phone mapping.

- Your default mappings are now customized and ready for batch processing (see below).
Creating a DaaS Mapping
If you do not want to use the default mappings, you can create a new mapping. Our recommendation is to begin with the default mappings, and create new mappings if you need to expand to other fields. If you would like to start using the default mappings, go to the next section, called Customizing the Default DaaS Mapping.
- On the Cloud Customer 360 tab.
- Click Run the Setup Wizard.
- In the Service Mapping section, click Mapping. The DaaS Mapping page appears.

- Click New Mapping.
- In the Field Group Mapping Detail section, perform the following tasks:
- Enter a name for the Mapping.
- Select a Salesforce object whose fields you want to map to the service fields.
- Select the service for which you want to map the fields of the Salesforce objects.
- In the Request Mapping section, select a Salesforce object field, and map the field to a service field. You can map more than one Salesforce object field to a service field.
- In the Response Mapping section, select a service field, and map the field to a Salesforce object field. You can map more than one service field to a Salesforce object field.
Note: You can configure a response mapping from a service field to a Salesforce object field that indicates the status of the verification.
- Click Save. The Mapping is created and listed under the appropriate objects for which you created the Mapping on the DaaS Mapping page.
- Activate the mappings. You can edit or delete the mappings. You can also change the display order of the mappings.
- Click Done.
Appendix A - Process Status Codes
A recommended custom field referenced in the documentation is called ‘Process Status.’ Process Status is a quick status code to create groupings based on whether the address had valid input, was corrected, or was deemed incorrect by the Address Verification process.
Below is a list of codes and explanations for the Process Status field.
|
Code |
Description |
|---|---|
|
V4 |
Verified - Input data correct - All elements required for mailing have been checked, and input matched perfectly. |
|
V3 |
Verified - Input data correct on input but some or all elements were standardized, or input contains outdated names or exonyms |
|
V2 |
Verified - Input data validated to the best of the available reference data (some elements required for mailing may not have been checked, recommended to inspect Element Result Status) |
|
N2 |
Validation Error - No validation performed because required reference database is not available |
|
N1 |
Validation Error - No validation performed because country was not recognized or is fundamentally unsupported |
|
I4 |
Data could not be corrected - Single result would be available in Interactive mode (for example, one result is found but too poor for a C status.) |
|
I3 |
Data could not be corrected - Multiple results would be available in Interactive mode (for example, house number is wrong, several house numbers would be generated in Interactive mode) |
|
I2 |
Data could not be corrected - Only partial suggestions would be available in Interactive mode |
|
I1 |
Data could not be corrected - No suggestions would be available in Interactive mode |
|
C4 |
Corrected - All elements required for mailing have been checked, some elements changed to match reference data (recommended to inspect Element Result Status) |
|
C3 |
Corrected - Input data corrected to the best of the available reference data (some elements not required for mailing may not have been checked, recommended to inspect Element Result Status) |
|
C2 |
Corrected - Input data corrected to the best of the available reference data (some elements required for mailing may not have been checked, recommended to inspect Element Result Status) |