Configuring Application Reviews
TargetX Implementation configures Application Reviews. In this article, you will discover an overview of the different elements at your disposal for managing your Application Reviews effectively and gaining a thorough understanding of the various aspects involved.
Basic Configuration Editor
The Basic Configuration Editor defines bookmarks, scorecards, documents that will be displayed as part of the review, and the order in which the information will be presented to Reviewers.
To create a new Application Review Type:
- Navigate to Application Review Types.
- Click New and enter an Application Review Type Name and Save the record.
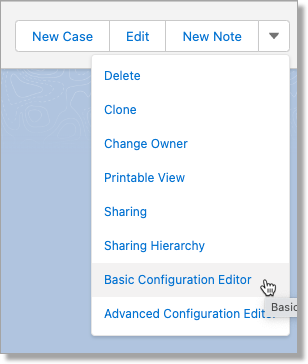
- Click on the new record and select the Basic Configuration Editor option:
The Basic Configuration Editor contains three tabs: Doc Definition, Bookmarks, and Scorecard.
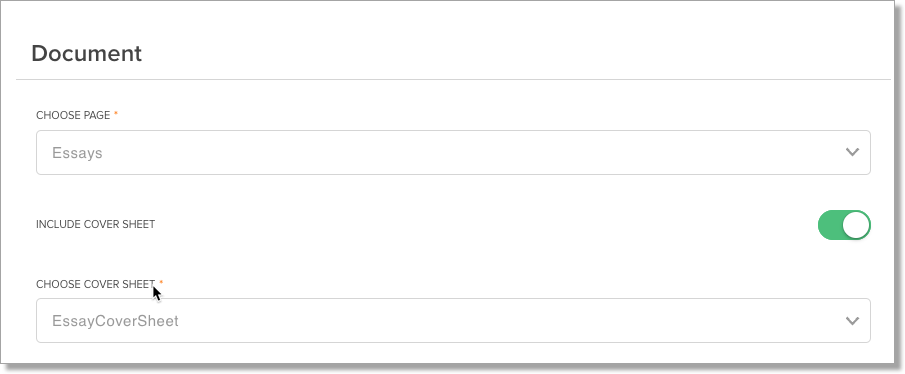
Doc Definition
The Doc Definition tab defines which documents will appear to the reviewer and the order in which they appear. Doc Definition defines which object’s attachments and Visualforce pages will make up the merged application PDF presented to reviewers.
- Enter the Name of the Application Review Type and a Description.
- Use the toggle to indicate if Application Cache should be enabled.
- When turned on, the application PDF will be cached in Salesforce and retrieved for significantly faster load times when the reader is loaded. For more information on caching, please see Application PDF Caching.
- Click Add Document to select Standard Objects, Custom Objects, or Visualforce Pages from the list.
- Objects that can be chosen include Contact and Application, as well as the following child objects of Application and Contact:
- Enrollment History
- Essay
- Extracurricular
- Recommendation
- Custom objects with a lookup to Application or Contact can be added.
- Objects that can be chosen include Contact and Application, as well as the following child objects of Application and Contact:
The options are organized as follows: Standard Objects, Custom Objects (Application), Custom Objects (Contact), and Visualforce Pages.
Choosing Application Attachments allows you to include attachments as well as Application Snapshots. You have the option to include the Application Snapshot PDF with the attachments and/or to display the Application Snapshot PDF as the FIRST attachment:
Including the Application Snapshot in Application Reviews
- Navigate to Application Review Types tab.
- Create new, or select to Edit, a record.
- Select Basic Configuration Editor.
- In the 'PDF Document' section, select Add Document.
- In the Choose Page picklist, select 'Application Attachments'.
- Choose which PDF to display:
- Include Application Snapshot PDF: Will include the Snapshot PDF version that excludes attachments.
- Display Snapshot with Attachments: Will include the Snapshot PDF version that includes attachments.
Note: you can only have one PDF display in the Application Review. If both options are toggled on (i.e. set to true), the PDF with attachments will be displayed.
- If desired, you can display the Application Snapshot PDF as the first application attachment, overriding your sort settings. If not enabled, the PDF will display according to your sort settings.
- Select a Sort.
- Choose the Order.
- Confirm your changes.
- Save.
Choosing an Object means all attachments on records from that object will be displayed for a given applicant during the review. For child objects, display order and filter options will appear.
For Visualforce pages, select the appropriate Visualforce page from the Choose Page list. An option to choose a static resource CSS file to be applied to the Visualforce page will appear. Choose only valid Visualforce page and CSS options to prevent an error.
You can also order Child Record Attachments or Filter Attachments.
Note: be sure to only select VALID Page and Custom CSS entries or you may experience an error when you try to view your configuration.
Once you’ve selected pages, you can choose to Sort Attachments By Create Date, Content Type, Last Modified Date or Name. Use the Choose Order list to choose either Ascending or Descending
Bookmarks
Bookmarks allow a reviewer to quickly navigate to a section of the merged applicant PDF. Bookmarks are configured using a unique search term consistently displayed on the bookmarked page.
Bookmarks allow a reviewer to quickly navigate to a section of the merged applicant PDF. Bookmarks are configured using a unique search term that is consistently displayed on the page being bookmarked.
- Click on the Apps menu and search for Application Review Types.
- Click Application Review Types:

- Select the All list view to locate the Application Review Type you want to configure.
- Click the Basic Configuration Editor link/button.
- Click the Bookmarks tab:
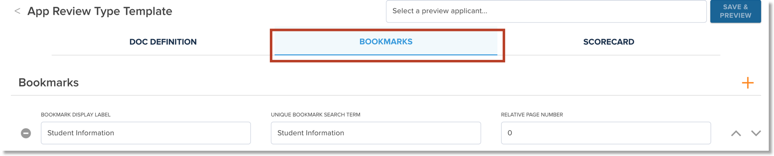
- Click the + to add a bookmark.
- Enter the Bookmark Display Label. This is the label that will appear to the user during a review.
- Enter the Unique Bookmark Search Term.
Note: a Unique Bookmark Search Term is the value you expect to appear ONLY on the page you want to bookmark. The Bookmark Search Term must be unique; otherwise, the bookmark might return a different page to the user. Please note that Bookmark values are case-sensitive.
- Enter the Relative Page Number. You MUST enter a Relative Page Number for your configuration to work correctly. The Relative Page Number specifies where the user is sent when they select a bookmark. 0 will take them directly to the bookmarked page, -1 will take them to the page BEFORE the bookmark, and 1 will take them to the page AFTER, etc.
- Click Save to save your changes.
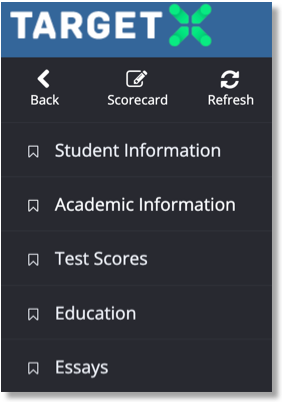
- Your bookmarks will display in the Reader when a Reviewer reads the Application.
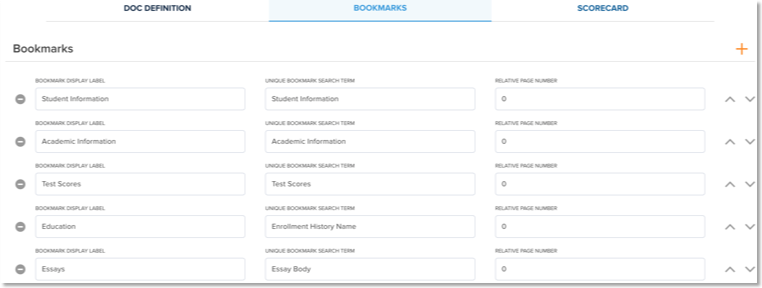
Sample Configuration:
Sample Bookmarks display:
Updating Fields Displayed
You can update the fields that display in a given section by updating the relevant Field Sets. In the example below, you can add/edit fields to an Essay section:
- Go to Setup.
- Search for the Custom Object for which you want to add data to the section. For example, Essay (TargetX_SRMb_Essay_c).
- Navigate to Field Sets.
- Click Edit for the fieldset being referenced in your Application Review Type. For example, Essay may be referencing 'EsssayCoverSheet':
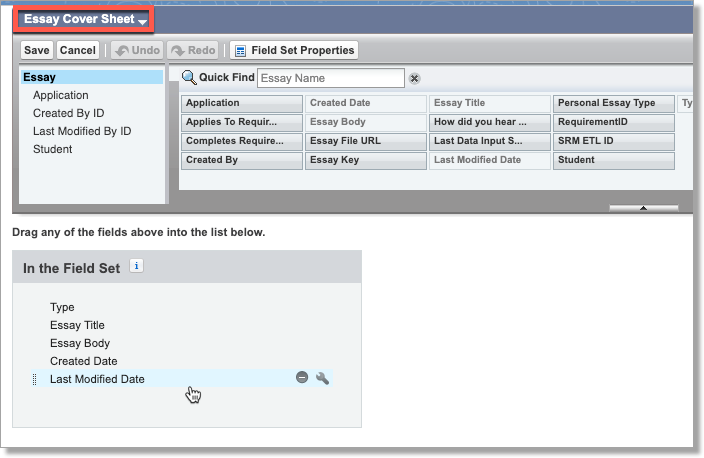
- Add or remove any fields as needed.
- Save your changes.
Scorecard
The Scorecard tab is where a user configures which fields will be used by reviewers to collect assessment data. A Score tab is a scoring section which contains one or more assessment fields (i.e., custom fields on the Application Review object for capturing assessment data).
The field label is displayed to the reviewer for a given field. Fields marked as required must have a value before a reviewer can submit their review.
The field type determines how the field will be displayed: Text Box = text box; Picklist (displayed) = picklist with options displayed; Picklist (Dropdown) = picklist with options in a drop down menu; and Picklist (Multiselect) = multiselect picklist with options in a dropdown menu.
For any field of type Picklist, the user must enter the options to be displayed within the picklist. Option # is the value that will be saved in the field; Option Description is a description that will appear to the reviewer for that picklist option. It is recommended that you always add a Description.
If you have selected to use either the Picklist (Dropdown) or Picklist (Multiselect), you MUST enter a Description. If you prefer no Description display, simply enter a <space> in the Description field.
Notes:
- If you preview your Scorecard and find that it is not displaying as expected, verify that you have entered an Option Description for each Option #.
- If you enter an Option # and Option Description as the SAME, only ONE will display to the user.
- If Option # and Option Description are different, both will display to the user.
- Use Score Tabs to combine similar assessment fields.
- An “Academic Record” score tab can include multiple academic assessment fields.
Scorecards can have Conditional Visibility by selecting the toggle. This allows Administrators to add a field to the scorecard that is only relevant based on the value entered in a previous question. For example, you can use Conditional Visibility to display a Scholarship field for Applicants that the reviewer has chosen to Admit. You would set the Scholarship field to be conditionally visible based on Decision = Admit.
Option Groups provide additional flexibility when configuring scorecards. Option groups allow Administrators to define a picklist for a field that changes based on the value entered in another field. For example, if you have a Scholarship field available and want to limit the picklist values based on the Applicant’s Program, you would use an Option Group to specify which picklist values should display for each Program.
The Basic Configuration Editor lets you preview the configuration by clicking the Save & Preview button on the top right. You can search for any existing Application Review of the Application Review Type you are editing.
Note: use the Back arrow at the TOP of the window to return to the configuration window.
Advanced Configuration Editor
The Advanced Configuration Editor performs the same tasks as the ‘Basic Configuration Editor’ except that it is code-based. This is useful for troubleshooting or more advanced use cases.
Creating a New Application Review
- Navigate to the Application Review tab.
- Select the New Application Review button.
- Select an Application or enter an Application Number.
- Select an Application Review Type.
- Enter any other information desired and Save.
- The Application Review will be assigned to you and your User will be assigned as the Owner.
Creating a new Application Review Type
- Click Application Review Types.
- Click New.
- Enter a Name for the Application Review Type.
- Save the record.
- Optional but recommended: Create an Application Review for this Application Review Type to preview your configuration within the basic editor.
- Click “New Application Review” at the bottom of the screen.
- Choose an Application.
- Return to the Application Review Type by clicking the Application Review Type Name.
- Click the Basic Configuration Editor button.
- Define the documents to be displayed to the reviewer.
- Configure the Bookmarks: Configuring Bookmarks.
- Configure the Scorecard: Configuring Scorecards.
Defining Application Document(s)
The Doc Definition tab is where a user defines which documents will appear to the reviewer and the order in which they will appear.
- Navigate to the Application Review Type you want to configure.
- Navigate to the Basic Configuration Editor.
- Select the Doc Definition tab.
- Click Add Document.
- From the Choose Page list, select the appropriate object or Visualforce page.
- For child objects, optionally indicate any fields to Order or Filter the attachments on that object.
- For Visualforce pages, optionally indicate a CSS file for styling.
- Confirm your changes.
- Click Save to save your changes.
Including the Application Snapshot in Application Reviews
- Navigate to Application Review Types tab.
- Create new, or select to Edit, a record.
- Select Basic Configuration Editor.
- In the 'PDF Document' section, select Add Document.
- In the Choose Page picklist, select 'Application Attachments'.
- Choose which PDF to display:
- Include Application Snapshot PDF: Will include the Snapshot PDF version that excludes attachments.
- Display Snapshot with Attachments: Will include the Snapshot PDF version that includes attachments.
Note: you can only have one PDF display in the Application Review. If both options are toggled on (i.e. set to true), the PDF with attachments will be displayed.
- If desired, you can display the Application Snapshot PDF as the first application attachment, overriding your sort settings. If not enabled, the PDF will display according to your sort settings.
- Select a Sort.
- Choose the Order.
- Confirm your changes.
- Save.