Configuring Scorecards
For each group of Scores, you’ll need to define the following for each Scoring section. Some examples of different Scoring sections might be ‘Academic Score’, ‘Standardized Testing’ or ‘Cultural Fit’. Please note: to view the Scorecard section in the Reader, you need at least one Bookmark configured.
- Navigate to the Application Review Type you want to configure.
- Navigate to the Basic Configuration Editor.
- Select the Scorecard tab.
- Click the + to add a row.
- Click Add New Field.
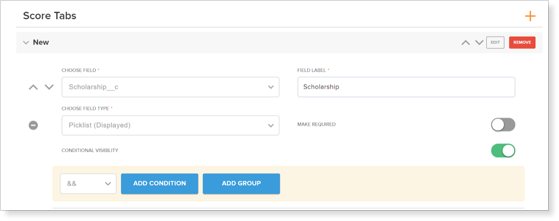
- Select the field that will store the score values in the Choose Field list.
Note: the field to be selected MUST exist on the Application Review object.
- Enter a Field Label for the score.
- Choose the Field Type; available options are Textbox, Picklist (displayed), Picklist (dropdown) and Picklist (multiselect).
- Indicate if the field should be required.
- If you wish to make the Score conditionally visible, select the Conditional Visibility toggle. You can use Conditional Visibility to configure certain fields to appear or disappear, depending on what data is entered.
- Select Add Condition.
- Select the Object from the list of available values (e.g. Application).
- Select the Field from the list of available values (e.g. College).
- Select the Operator.
- Define the Options that will display for the scores. Click + to add a new Option:
- Option # will be the value for the score (e.g., 1, 2, 3).
- Option Description will be the description of the score value (e.g., ‘Excellent Academics’)
- Repeat for each group of scores or Scoring sections you want to define, selecting + for each new option.
- Save your changes.
Configuring Conditional Visibility on Scorecards
Conditional Visibility allows Administrators to add a field to the scorecard to be visible based on the value in another field. For example, you can use Conditional Visibility to display a Scholarship field for Applicants that the reviewer has chosen to Admit. You would set the Scholarship field to be conditionally visible based on Decision = Admit. The following steps will guide you through this example:
- Create Custom Text Fields; for this example, we’ll first need to create two fields on the Application Review object called:
- Scholarship
- Decision
- Add the fields to the Application Review Layout.
- Navigate to Application Review Types and select the Application Review Type you wish to update.
- Select the Basic Configuration Editor button.
- Select the Scorecard tab.
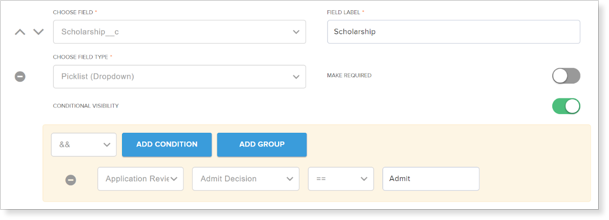
- Select Add New Field and select the field you created for Decision. Select the Field Type and any associated Options.
- Select Add New Field and select the field you created for Scholarship. Select the Field Type and any associated Options.
- Select the Conditional Visibility toggle to ON.
- Select Add Condition.
- Select the Application Review object, the Field you added earlier, an Operator of = and enter the Value which will cause the Scholarship field to display. In our example, we will enter Admit:
- Save your changes.
- With these changes, when the Reviewer selects an Admit Decision of Admit, the Scholarship picklist will display and will be hidden if a different Admit Decision is selected.
Configuring Option Groups on Scorecards
Option groups allow Administrators to define a picklist for a field that changes based on the value entered in another field. For example, if you have a Scholarship field available and want to limit the picklist values based on the Applicant’s Program, you would use an Option Group to specify which picklist values should display for each Program.
- Create Custom Text Field; for this example, we’ll first need to create a new Scholarship field on the Application Review object.
- Add the field to the Application Review Layout.
- Navigate to Application Review Types and select the Application Review Type you wish to update.
- Select the Basic Configuration Editor button.
- Select the Scorecard tab.
- Select Add New Field and select the field you created for Scholarship. Select the Field Type and any associated Options.
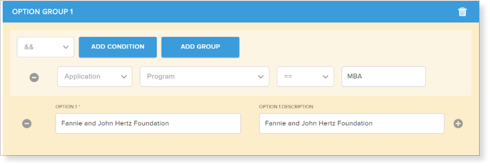
- Select Add Option Group; In this example, we will configure Program = MBA to display one specific option and Program = Undergrad to display two different options.
- Select Add Condition. This will be the Condition that must be met for the picklist options to display. Select: Application, Program, =, MBA
- Enter Option 1 and Option 1 Description. This should be the picklist option you want to display when Program = MBA.
- Select Add Option Group.
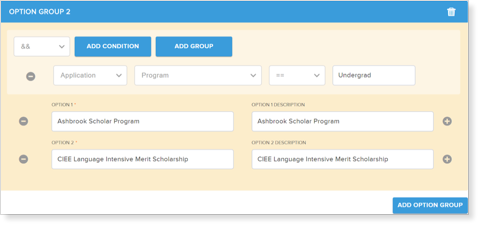
- Add the Condition for the next option; in this example, we’ll select: Application, Program, =, Undergrad.
- Enter Option 1 and Option 1 Description. Add another line for Option 2 and Option 2 Description.
- Save your changes.