Using Merge fields
Note: this article covers the legacy TargetX Email tool. For details on the different versions of TargetX Email tools, see Understanding the TargetX Email Tools.
Overview
Merge fields are placeholders in templates that dynamically insert data from a source for personalization. Key benefits include:
- Personalization: inserts recipient-specific information.
- Efficiency: uses a single template for multiple documents or emails.
- Consistency: maintains format and structure across varied content.
- Accuracy: reduces errors by pulling data from a trusted source.
Merge fields enable personalized, efficient, and consistent communications and documents.
Creating Merge Fields in HTML Email
- Create an HTML Email template as described in Creating an HTML Email.
- On the Email Template Builder edit page, select a Section to add a Merge field.
- Select the Content tab.
- Place the cursor at the location in the document where you want to insert the merge field.
- Choose the Add Merge Field link.
- Choose the Merge Object from the pick list. If your account has custom objects, they will appear in this list.
- Select the Merge Field you would like merged into your template.
- Click Add. This will insert the merge field at the cursor position.
Note: you can add merge fields to the Email Subject by selecting the Template tab and selecting the Add Merge Field link next to the Email Subject.
Inserting Event-Related Merge Fields
Emails triggered by the Events system
Email templates sent by the Events system (i.e. selected on the Organization Event record when creating an event) can include merge fields from the Organization Event Object.
The standard fields often used for triggered event emails include:
- {!TargetX_Eventsb__OrgEvent__c.Name}
- {!TargetX_Eventsb__OrgEvent__c.TargetX_Eventsb__Description__c}
- {!TargetX_Eventsb__OrgEvent__c.TargetX_Eventsb__Start_Time_TZ_Adjusted__c}
- {!TargetX_Eventsb__OrgEvent__c.TargetX_Eventsb__End_Time_TZ_Adjusted__c}
- {!TargetX_Eventsb__OrgEvent__c.TargetX_Eventsb__Map_URL__c}
- {!TargetX_Eventsb__OrgEvent__c.TargetX_Eventsb__More_Information_URL__c}
Emails sent via TargetX Broadcast Email
Broadcast Email content can only include merge fields from objects that are directly related to the Contact (i.e., objects in a master-detail relationship to the Contact). In Events, the Organization Event object is not directly related to the Contact, but the Contact Schedule Item is.
To send Event-related emails through the Broadcast Email tool, the Event related data you'd like to merge in must first be moved to the Contact Schedule Item. You can create a formula field on the Contact Schedule Item that pulls the data directly from the Org Event to the CSI. The Contact Schedule Item formula field can then be used in the Email as a merge field. Note: To include Contact Schedule Item merge fields, you must query on Reports, not students.
Below is an example of the steps to create a formula field on the Contact Schedule Item object to pull over the "Event Name" for use in Email merges.
- Navigate to Setup and select Object Manager. Click the Contact Schedule Item object.
- Click New under Custom Fields & Relationships.
- Select Formula as the Data Type.
- Name your field and select your “Output Type”, in this case, Text for the name.
- In the Formula Editor, click the Insert Field button.
- In the pop-up window, scroll down in the second column until you see “Organization Event >” and select that option to expand the fields in the third column:
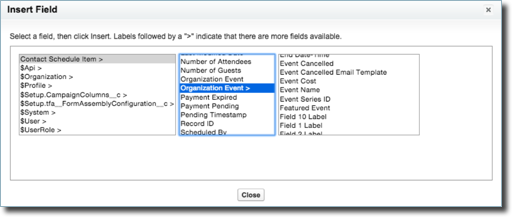
- Click Event Name from the third column and then click Insert.
- Click Next to continue to step 4 in the new field wizard.
- Select field level visibility and click Next.
- Select page layout visibility and click Save.
Note: objects with multiple lookups to Contact are not supported at this time.
Using merge fields to display Dates in emails
Date fields that are merged into Email Templates will appear in the correct format for your locale:
- If your org locale is the US, the date string should be transformed from yyyy-mm-dd to m/d/yy (e.g., 2/7/20 for February 7, 2020)
- If your org locale is EU/UK, the date string should be transformed from yyyy-mm-dd to dd/mm/yyyy (e.g., 07/02/2020)
The appropriate format is reflected in the preview, in test emails, and in the email sent. Note: all dates/times are localized in the time zone of the org. Org locale and org time zone are distinct settings that can be modified on the “Company Information” page in Setup.
Examples:
| Org Locale | Date Format | Date/Time Format |
|---|---|---|
| en_US English (United States) | m/d/yy | m/d/yy h:mm [AM/PM] (12 h clock) |
| en_UK English (United Kingdom) | dd/mm/yyyy | dd/mm/yyyy, hh:mm (24 h clock) |
| es_ES Spanish (Spain) | dd/mm/yyyy | dd/mm/yyyy, hh:mm (24 h clock) |
| ja_JP Japanese (Japan) | yyyy/mm/dd | yyyy/mm/dd h:mm (24 h clock) |