Checking-In Students
Checking-in a Student with TargetX Engage
For Walk-In requests, students can enter their information using the Student Check-In view:
- Navigate to the appropriate room using the Check-In URL or the Remote Login URL if you are using a Site.
- In the new window, enter a Student ID (or whatever field configured for Student Sign-In fields) and SMS Number for the student to receive SMS messages related to the meeting. If your sign-in field is set to Phone Number, the user can select Use Same Number for the SMS Number field. Notifications will be sent on multiple occasions:
- When the student successfully signs up for a meeting
- When the student is 20th in line
- When the student is 10th in line
- When the student is 5th in line
- When the student is ‘Next’ on the waiting list
- When the advisor selects the student to meet
- Select Continue.
- Select a Reason for your visit, an Advisor, and any other information relevant to the request.
The list of advisors will display only those advisors who are currently available. If a particular advisor is not on the list, they are not available, and you should select another advisor or the ‘First Available’ option. This can be disabled in Room Settings using the Advisor Requests setting.
- Select Check-In.
- You will see a Confirmation message on the page, and the student will be sent an SMS confirmation message.
For Email or Phone requests, you can check-in a student using these steps:
- Navigate to Advisor Center.
- Click the
for the room you want to perform check-ins.
- Select the Add Student icon in the top right:
- Enter the Student ID, SMS Number, Country Code, Reason for Visit, and advisor along with any additional information.
- Click Add Student.
- Refresh the window to view the waiting list for the selected room.
Checking in a Group of Students
From the main Engage meeting page, select 'Pick Up' for each student you want to add to the Group. The bottom of the student list will include a button with the count of students to be added. When you’ve selected all your students, click the Add to Session (#) button:

Locating a room’s Check-In URL
If you are using Engage to handle walk-in appointments
For example, a room named ‘Admissions Office’ (Friendly Room Name) will have the following URLs:
- Remote Login = <Your Engage Site URL>/AdmissionsOffice/signin?offsite=1
- Login = <Your Salesforce URL>/AdmissionsOffice/signin
- Kiosk = <Your Salesforce URL>/AdmissionsOffice/kiosk
- Navigate to the Advisor Center.
- Click the
for the room where you want to check in a student.
- Click or copy the link under the In-Office Login URL.
If you are using Engage to handle online appointments 
- Navigate to the Advisor Center.
- Click
- Click or copy the link under the Remote Login URL.
Viewing a student’s check-in information
- Navigate to the Advisor Center.
- Click on the
for the room where you want to view information.
- Locate the line with the student where you want to view check-in information and click the ellipses:
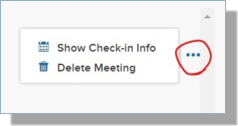
- Click Show Check-in Info.
- You’ll be able to view the student’s check-in information, and you can add a Front Desk Note if you want to share additional/updated information with the Advisor.