Configuring Engage Settings
Engage Settings
Engage Settings are available as a Tab (select Engage Settings from the App Picker) and include the following settings:
|
Setting |
Description |
|---|---|
| SMS Endpoint |
Defines the location for the SMS provider. If no endpoint is specified, the system will default to US PROD. Enter one of the following:
|
| SMS API Key | Defines the AWS API key for the selected endpoint. This key is provided by TargetX. |
| Enable SMS for Sandbox |
Allows Engage to be configured in a sandbox without SMS.
|
| Preferred Name Field | Allows you to indicate the Contact field to display the Preferred Name for a Student in the Engage interface. For example Preferred_Name__c |
Adding an Image or Poster to an Engage Meeting Room
- Navigate to the Engage.
- Click the
for the room where you want to set the poster image.
- Click the
on the Room Settings icon (
).
- In the Poster URL, enter a URL for the image you want to display.
- Click Update.
Recommended Image Sizes:
- 468 x 471
- 118 kb
Building the Public URL for Logo or Poster images
Logo and Poster images for Engage Meeting rooms use a public URL referencing a Static Resource. Follow these steps to build your Public URL:
Step 1: Create Static Resource for images
Once you create a Static Resource for your Logo and Poster images, you must copy the URL.
- Navigate to Setup and search for Static Resources. Click the link for Static Resources.
- Click New or click an existing Static Resource.
- Enter the following:
- Name – enter a name that does not include spaces, such as My_Logo.
- File – navigate to the location of the file you wish to use.
- Cache Control = Public
- Save the image.
- Click the View file link.
- Copy the URL.
Step 2: Copy the Link to your Site
- Navigate to Setup and search for Sites.
- Copy the Site URL for the Site you selected in the Public URL section.
Step 3: Create the Poster/Logo URL
- Combine the Site Link from Step 2 and the Static Resource link from Step 1 (beginning with /resource).
Examples:
- Link to Static Resource: https://myorg.force.com/resource/1652377062000/My_Logo?
- Link to Site: https://mysite/engage
- Poster/Logo URL: https://mysite/engage/resource/1652377062000/My_Logo?
Configuring Administrators to use Engage
Engage Administrators create and activate Engage Rooms and manage Engage Room features like Quick Text, Room Settings, Hours of Operations, etc.
Assign Permissions for Admins
Step 1: for Admins to have access to Engage features, they must be assigned to the TX Engage Admin permission set. This Permission set is delivered when you install the Engage package.
- Navigate to Setup and search for Permission Sets.
- Click the Permission Set Name for TX Engage Admin (managed).
- Click Manage Assignments.
- Click Add Assignments.
- Select the appropriate users.
- Click Assign.
Step 2: Admins must also be assigned the TX Engage Administrator permission set, which is generated using the Permission Scanner:

- Navigate to the Permission Scanner tab.
- Select the Product/Feature = Engage Admin and Version = the version of Engage you have installed.
- Select the checkbox for Use @Future to generate a Permission Set if you want to have the process run in the background.
- Click the Generate Permission Set button.
Note: if you previously modified a Permission Set, generating a NEW permission set will overwrite any changes.
- The ‘Result’ section will display the new Permission Set Name. Note: If you selected Use @Future to generate Permission Set, the Result section will indicate where you can view the results of the Apex Job.
- You can now assign this Permission Set to a User.
Configuring Advisors to use Engage
Engage Advisors can use Engage for meetings, including accessing rooms, creating Quick Text, adding, and picking up students.
Assign Permissions for Advisors
Step 1: For Advisors to display as available in Engage, they must be assigned to the TX Engage Advisor permission set. This Permission set is delivered when you install the Engage package.
- Navigate to Setup and search for Permission Sets.
- Click the Permission Set Name for TX Engage Advisor (managed).
- Click Manage Assignments.
- Click Add Assignments.
- Select the appropriate users.
- Click Assign.
Step 2: Advisors must also be assigned the Engage Advisor permission set, which is generated using the Permission Scanner:

- Navigate to the Permission Scanner tab.
- Select the Product/Feature = Engage Advisor and Version = the version of Engage you have installed.
- Select the checkbox for Use @Future to generate a Permission Set if you want to have the process run in the background.
- Click the Generate Permission Set button.
Note: if you previously modified a Permission Set, generating a NEW permission set will overwrite any changes.
- The ‘Result’ section will display the new Permission Set Name. Note: If you selected Use @Future to generate Permission Set, the Result section will indicate where you can view the results of the Apex Job.
- You can now assign this Permission Set to a User.
Configuring Organization-wide Defaults and Sharing settings
- Navigate to Setup and search for Sharing Settings.
- In Manage sharing settings for, select Activity.
Note: users need Read/Edit access to the Contact object. If your Org-Wide Default for Contact is something other than Public Read/Write, you can set this permission using the Salesforce sharing model.
-
In the Organization-Wide Defaults section, confirm that the Activity object has the following:
- Default Internal Access = Controlled by Parent
- External Internal Access = Controlled by Parent
-
In the Object sections add the necessary Engage Sharing Rules for the Engage Site Guest User:
Enabling audio notifications for Engage staff
The Enable Audio Notifications setting will alert staff when a student joins their advising queue for a room where they have the browser tab open and are marked as Available.
- Navigate to Setup and search for Custom Settings.
- Click Manage next to Engage Settings.
- Click the Default record, then Edit.
- Check the Enable Audio Notifications checkbox.
Configuring Engage Room Settings
Engage Room Settings are defined from the Engage Advisor Center:
- Navigate to the Engage tab.
- Click the arrow for the room to configure.
- Click the gear icon to open the Room Settings page.
|
Setting |
Description |
|---|---|
| Activate Room | Determines if the room is available to users. Inactive rooms will be displayed on a separate tab for internal users; students will see a message that the room is unavailable. |
| Room Name | The Name of the room that will be displayed to users. |
| Location | Indicates the room's location, such as Remote or Main Campus. |
| Check-In Page Header | Custom header for the Check-In Page. |
| Meeting Reason Page Header | Custom header for the Meeting Reason Page. |
|
Room Details |
Allows you to enter rich text to display in an overlay on top of the defined Poster Image. |
| Friendly Name | This is used to build the Login URL and Kiosk URL. This will default after the Room Name is entered. Only letters, numbers, underscores, and dashes are permitted in the Friendly Name. |
| Site URL |
This is used if you are using Engage with a Site. Enter the Site URL for your Engage Site, such as https://<DOMAIN NAME>/<PATH>. Example: https://targetxuniversity.force.com/engage |
| Room Type | Indicates the type of room, such as Registrar's Office or Admissions. The Reason options will default based on this selection. |
| Poster URL | Allows you to enter the URL for an image to display on the Check-in and Kiosk windows for the room. |
| Allow Multiple Check-Ins | Allow students to check in multiple times. |
| Advisors | This setting allows you to select the Advisors for the room. Add Advisors by clicking the + next to the Advisor in the Available Advisors list. |
| Allow requests for advisors checked into this room | Indicates whether you want students to be able to select a specific advisor when checking in. |
| Reasons for Visit | Displays to students checking into a room. |
| Hours of Operation | Indicates the hours the room is Open and Closed. Students cannot check in outside of the Hours of Operation. If no Hours of Operation are added, the room will be considered 'always open.' |
| Student Sign-In fields | Allows you to configure which field is used for the Student Sign-In window by selecting Student Id, Email, or Phone. You can enter a custom field by choosing the Field next to the appropriate toggle. |
| Allow Fuzzy Matching | Allows the system to look for a similar match to the Phone Number, such as comparing the last four digits of a phone number with the value entered. This allows the system to find a match even when phone number formatting differs. |
| Default Country Code | Select the Default Country Code to be used to format phone numbers. |
| Allow Students to Create New Contact Record | Prevents students from creating a Contact record if no match is found in the system when unchecked. |
| Notifications | Indicates whether students should receive SMS alerts for activity in the room:
|
Configuring Engage Student Sign-In fields
Administrators can configure which field is used for the Student Sign-In window by selecting either Student Id, Email or Phone. You can enter a custom field by selecting the Field next to the appropriate toggle:
-
Navigate to TargetX Builder and click Engage.
- Click the
- Click the Room Settings icon (
-
In the Student Sign-In Fields section, enable any of the following: selecting the associated Field on the Contact object and adding a Label:
- Student Id
- Phone Number
Notes:
- If any of the above fields are selected, they will be REQUIRED when checking in a student.
- When multiple sign-in fields are enabled, an existing record must match all sign-in values to be considered a match. For example, if both Email and Phone are enabled and a record matches on Email but either lacks a Phone number or has a different one, a new Contact will be created.
Disabling the Request Advisor option
- Navigate to the Engage Rooms tab.
- Click the Engage Room Name where you want to disable advisor requests.
- Deselect the Allow requests for advisors checked into this room to disable Advisor requests.
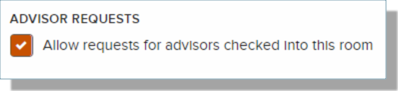
-
Save your changes.
Setting Hours of Operation
- Navigate to the Advisor Center.
- Click the
- Click the
icon, then click the
- Click the Room Settings icon (
- In the Hours of Operation section, click on the Days of the Week for specific day(s).
- Enter Open and Close times.
- Select Add More Hours to add additional day/time combinations.
- Select Create for new records or Update for editing records.
Setting up Meeting Reasons for a student to select
- Navigate to the Advisor Center.
- Click the
- Click on the Room Settings icon (
- In the Reasons for Visit section, click the checkbox for any of the reasons you want to be available for students checking in to this room.
- To add a NEW value, enter the reason into the blank field and select Add Another Reason.
- Click Update to save your changes.
To edit an existing value
- Select the Engage Meeting Reasons tab from the App Picker [
 ].
]. - Click the record you wish to update.
- Click Edit.
- Make any changes to the Engage Meeting Reason Name.
- Save your changes.
Using Quick Text in Engage
The Quick Text feature in Engage allows you to insert a pre-set response for common topics. For example, during Registration cycles, Advisors might consistently answer questions about Drop/Add procedures. If this is added as a Quick Text entry, the advisor needs only to select a Quick Text from the list and the information will be populated into their session. Since all Advisors have the ability to add their own Quick Text entries, we recommend that you institute naming conventions/processes around this in order to keep entries organized and useful. Users can create Quick Text in two ways:
Add Quick Text from the Advisor Center
- Navigate to the Advisor Center.
- Click the Settings icon (
) in the top right. The Settings window will display.
Add Quick Text from Meeting
- Select Add Quick Text to enter a new record.
- Enter a Topic and the Content of the note.
- Click Add.
- Navigate to a Room.
- Select Pick Up next to a student on the list.
- Select the Start Session button.
- In the Advisor Comments section, click the Save Message as Quick Text checkbox.
- Enter a Topic and the Content of the note.
- Click Save.
Note: you can add multiple Quick Text entries to the same Comment by selecting each one from the list. Each time Quick Text is selected, it will be appended to the end of the note.