Customizing Events
Adding Custom Time Zones in Events
Events Time Zones Custom Setting 
- Navigate to Setup and search for Custom Settings.
- Click Manage next to "Events Time Zones."
- Click New.
- In the "Name" field, enter the time zone name as one lowercase string. You must use one of the following names (without quotes): "africa", "antarctica", "asia", "australasia", "southamerica."
- Click Save.
Updating the Time Zone Picklist for Organization Events
Once you've created the time zones as custom settings, you must edit the picklist on the Organization Event object to make these new values available when creating events.
- Navigate to Setup and select Object Manager.
- Click the label for Organization Event.
- Under Custom Fields & Relationships click the field label for Time Zone.
- Add the new time zone values in the Picklist Values section. The new time zone must be in the Salesforce format located here. You do not need the name, only the code (the part in parenthesis).
Customizing the Organization Events tab
The Organization Events tab can be customized by updating the fieldset on the Organization Event object.
- To access the fieldset, navigate to Setup and select Object Manager.
- Click the Organization Event object.
- Click Field Sets.
- Using the fieldset that corresponds to the section you wish to update (details below), remove any fields you do not want to display.
- Save your changes.
The fieldsets, and their default fields are specified in the table below:
|
Field Set |
Default Fields |
|---|---|
|
Attendee Totals |
|
|
Custom Questions |
|
|
Event Details |
For more information about these event preferences, please see the Preferences section of the article Creating and Updating Events.
|
|
Interview Details |
|
|
Travel Details |
|
Adding and arranging new fields on the Organization Events page
To leverage new fields on the Organization Events, follow the steps below to add these new fields to your Organization Events calendar and page layout:
- Navigate to Setup and select Object Manager.
Note: If you are using Salesforce Lightning, go to Setup and, search for Object Manager, click label for the Organization Event object.
- In the Field Sets section, click Edit next to Custom Questions.
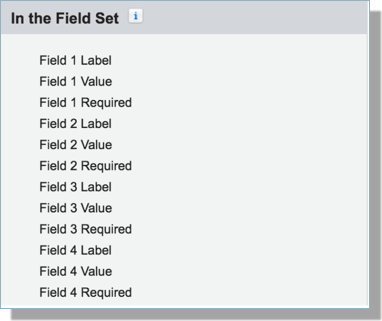
- In the Field Set box, arrange the ‘Field # Required’ fields similar to the screenshot below:
-
Click Save.
Custom Questions can be created for both event registrants and their guests. When creating custom questions for sub-events, be aware that registrants must answer the custom questions for each sub-event. Avoid repeating custom questions where possible to avoid confusing or frustrating the registrant.
Adding and Modifying fields on the Event Details Page
- Navigate to Setup and select the Object Manager.
- Click on the Organization Event.
- Scroll down to Field Sets; click Edit next to Event Details.
- To add a field to the view, drag a bold field name from the top section to the bottom, In the Field Set.
- To remove a field from the view, drag it from the section labeled In the Field Set to the top section.
- To reorder the fields, drag them to the appropriate order in the In the Field Set section.
- Click Save.
Note: Fields will be displayed in a 2-column layout, and consecutive entries in the vertical list will show in alternating columns. There is no way to insert a blank space.
If you wish to update other sections, you can do so using the same steps above, selecting a different section of the Events Page in step 3.
Customizing the 'Number of Guests' label for Events
DISCLAIMER: This CSS tag is not supported or maintained by TargetX and is meant as an example of how you may choose to use CSS within our products. Some or all of the customizations these tags provide may change or no longer apply to your instance at any time. If the CSS impedes expected functionality in the TargetX product at any time, we recommend you remove the CSS to regain functionality.
- Navigate to the App Picker and select the Events Custom Code tab.
- Click New.
- Enter a "Theme Name" and copy the exact name for reference in later steps.
- In the CSS field, enter the following:
label[for="type"]:after
{content:'\00a0(Not including student) '}
You can edit the text displayed by updating the text within the ( ).
Note: Custom CSS and Javascript will apply to all pages. Separate CSS or Javascript on a page-by-page setting is not available.
- Click Save.
- Navigate to Setup and search for Custom Settings.
- Select Manage next to Events Settings.
- Click Edit next to the custom setting to which you'd like to apply the CSS or Javascript.
- Type or paste the exact name of the custom code record you created into the Template Override field.
Preventing students from registering for multiple sub-events at the same time
- Navigate to the Event that has Sub-Events and select Edit.
- In the Preferences section, select the Block Sub Event Conflicts checkbox.
Note: This checkbox only needs to be selected on the PRIMARY event.
- Save your changes.
Setting up Event Waitlists
If an event has a limited number of attendees, including guests, then Events will automatically create a registration waitlist unless the event preferences are configured to disallow a waitlist. If an event is at capacity and a waitlist has not been activated, the event will be removed from the Event Organization Calendar or list of Organization Events.
Events with wait lists can be handled in different ways depending on how it has been configured:
- Select the Events application from the application picker in the top right corner.
- Click the Organization Events tab.
- To Create a new Event: Click the New button.
- To Edit an Event: Click on the Event Name for the Event you wish to edit and click the Edit button.
- Check the Waitlist field. When the Event is Full, registrants will be offered the opportunity to join the waitlist.
If an event has an opening, Events scans the waitlist and finds the first group with several members that will fit into the space. Example: If a group of three - the registered individual and her two guests - cancels, Events scans the waitlist, finds the first group of three or smaller, and automatically confirms them to the Event, sending the Off Waitlist email. If the group Events finds only has two members (i.e., the registrant and his sole guest), then Events re-scans the waitlist, looking for a single person to fill the remaining slot.
Occasionally, a person on the waitlist misses the notification that they have been confirmed, resulting in unused attendance slots. To prevent this, use the Email Wait list Promotion checkbox. If the Email Waitlist Checkbox is checked, Events will email the registrant for all the appropriately sized groups (or smaller) on the waitlist to complete the registration process. The first group to complete the registration process gets the slots.
Paid events are always treated as if the Email Waitlist Promotion checkbox is checked. When an event has an opening, and that Event has an associated fee, every registrant on the waitlist is emailed, inviting them to register for the Event. The open slot(s) will be awarded to the person or group that completes the registration, including fee payment, first.
Using Discount Codes for Events
- Log into Salesforce Events and select the Discounts tab. The settings on this tab allow you to edit an existing discount or create a new discount.
- Click the New button to create a new discount.
- Enter the information for the new discount as needed.
- Save your discount code.
Once the discount code is saved in the system, it will then be able to be used by registrants during the registration process by entering the specified code into the Discount Code field and clicking Apply to apply the code. Once the code is applied, the discount appears beneath the legal terms on the registration page.
|
Field Name |
Field Description |
|---|---|
|
Discount Name |
The name of the discount. |
|
Discount Type |
Determines whether the discount will deduct a percentage from the cost or a defined dollar amount. |
|
Discount Amount |
The value of the discount code (in percent or monetary value). |
|
Discount Code |
The value the user will enter to apply the discount. |
|
Event |
The name of the event for which the discount will apply. |
|
Owner |
The name/title of the creator/owner of the discount. |
|
Apply to Cart |
Determines whether this code applies to the event's price or the entire cart. |
|
Per Person |
Does this discount apply only once, or for each person? Note: You cannot use a percentage discount per person. |
|
Discount Open |
The date the discount code will become usable. |
|
Discount Close |
The date that the discount code ceases to be usable. |
Using the Next School Visit Trigger (Next Event Trigger)
TargetX Events module allows you to associate an Event with a single Account or group of Accounts. Data from this Event is then added to the Related Visits related list on the Account record so that you will have a log of visits or other Events that have taken place at that Account or that have involved that Account in some way.
You can use the Next School Visit Trigger (Next Event Trigger) to prevent users from having to scan through all Events in the Related Visits related list. This trigger will check all Events in the related list and find the soonest Event that is not canceled. Once it finds the Event, it will pull data into the following fields on the Account record:
- Next Event Name
- Next Event Date
- Next Event Time
- Next Event Date Time
Note: These fields reflect information for the earliest Event that is not canceled. If a new Event is created before others already scheduled for the Account, the values will be updated to reflect the new, earliest Event. Once the Event reflected in these fields passes, data for the next soonest Event will populate.
To activate and schedule the Next School Visit trigger, you must enable it from Custom Settings for Events.
The Next School Visit Trigger operates differently depending on whether you have your Event attached to a single Account, to multiple Accounts through a Travel Group, or to both a single Account and a Travel Group.
If an Event is only associated with a single Account and not with a Travel Group.
-
The Event will appear in the Related Visits related list for that single Account.
If an Event is associated with a Travel Group only and not a single Account
-
The Event will appear in the Related Visits related list for the Travel Group.
If an Event is associated with a single Account and a Travel Group.
-
The Event will only appear in the Related Visits related list for the single Account.
Reporting
To create a report featuring the Next School Visit Trigger fields, select the report Type of Contacts with Contact Schedule Item with Organization Event. The fields of Next Event Date, Next Event Date Time, Next Event Name, and Next Event Time will allow you to filter for your desired result. These fields are in the Account object under the Account Custom Fields & Relationships section.
Note: Currently, the Event Owner and Event Type are NOT rolled up to the Account Object. If you attempt to write a report for the use case of sending an email campaign to students who belong to the Account of the related Event, you will not be able to pull the Event Owner and Event Type into your report. Until this is allowed, you will want to remain consistent in your naming conventions of Event Name (i.e., ABC High School Visit) if you are attempting to pull only high school visit types. In addition, it is recommended that the Contact Owner match the Event Owner for the same reason. In this way, you can filter your report on ‘Next Event Name’ containing ‘school visit’ and ‘Event Owner Name’ containing ‘Name of Recruiter.’
Activating and scheduling the Next School Visit trigger
- Navigate to Setup and search for Custom Settings.
- Select Manage next to Event Settings.
- Click the default record and select Edit.
- Select the checkbox for Next School Visit Trigger enabled.
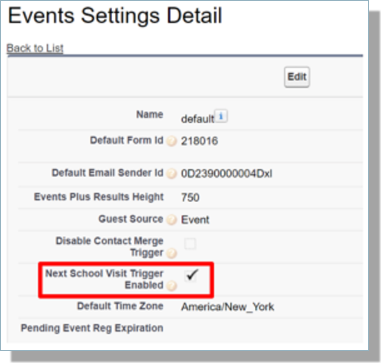
- Save your changes.
- Next, you’ll need to schedule the Apex class that will process the Next School Visit trigger:
- Navigate to Setup and search for Apex Classes.
- Click the Schedule Apex button.
- Enter a job name, such as Next School Visit Trigger.
- Click the magnifying glass next to the Apex Class field and search for/select: updateAccountNextEventSchedule.
- Set the schedule to run weekly on every day of the week.
- Set a start date, end date, and start time.
- Click Save to complete the process.
Using Events Keywords
Events Keywords allow you to add specific values to your events to filter and report on your Organization Events.
Prerequisites
- Users that need to add Keywords to Events need Permissions as defined in the Permission View for Event Management (Internal User) feature.
- Ensure that the Event Keywords field has been added to your Page Layout.
Configuring your Keywords picklist
Keywords can be selected based on a defined list of values. You can edit the available Keywords as follows:
- Navigate to Setup and select Object Manager.
- Locate and click the Organization Event Object.
- Click Fields & Relationships.
- Locate and click the Event Keywords field.
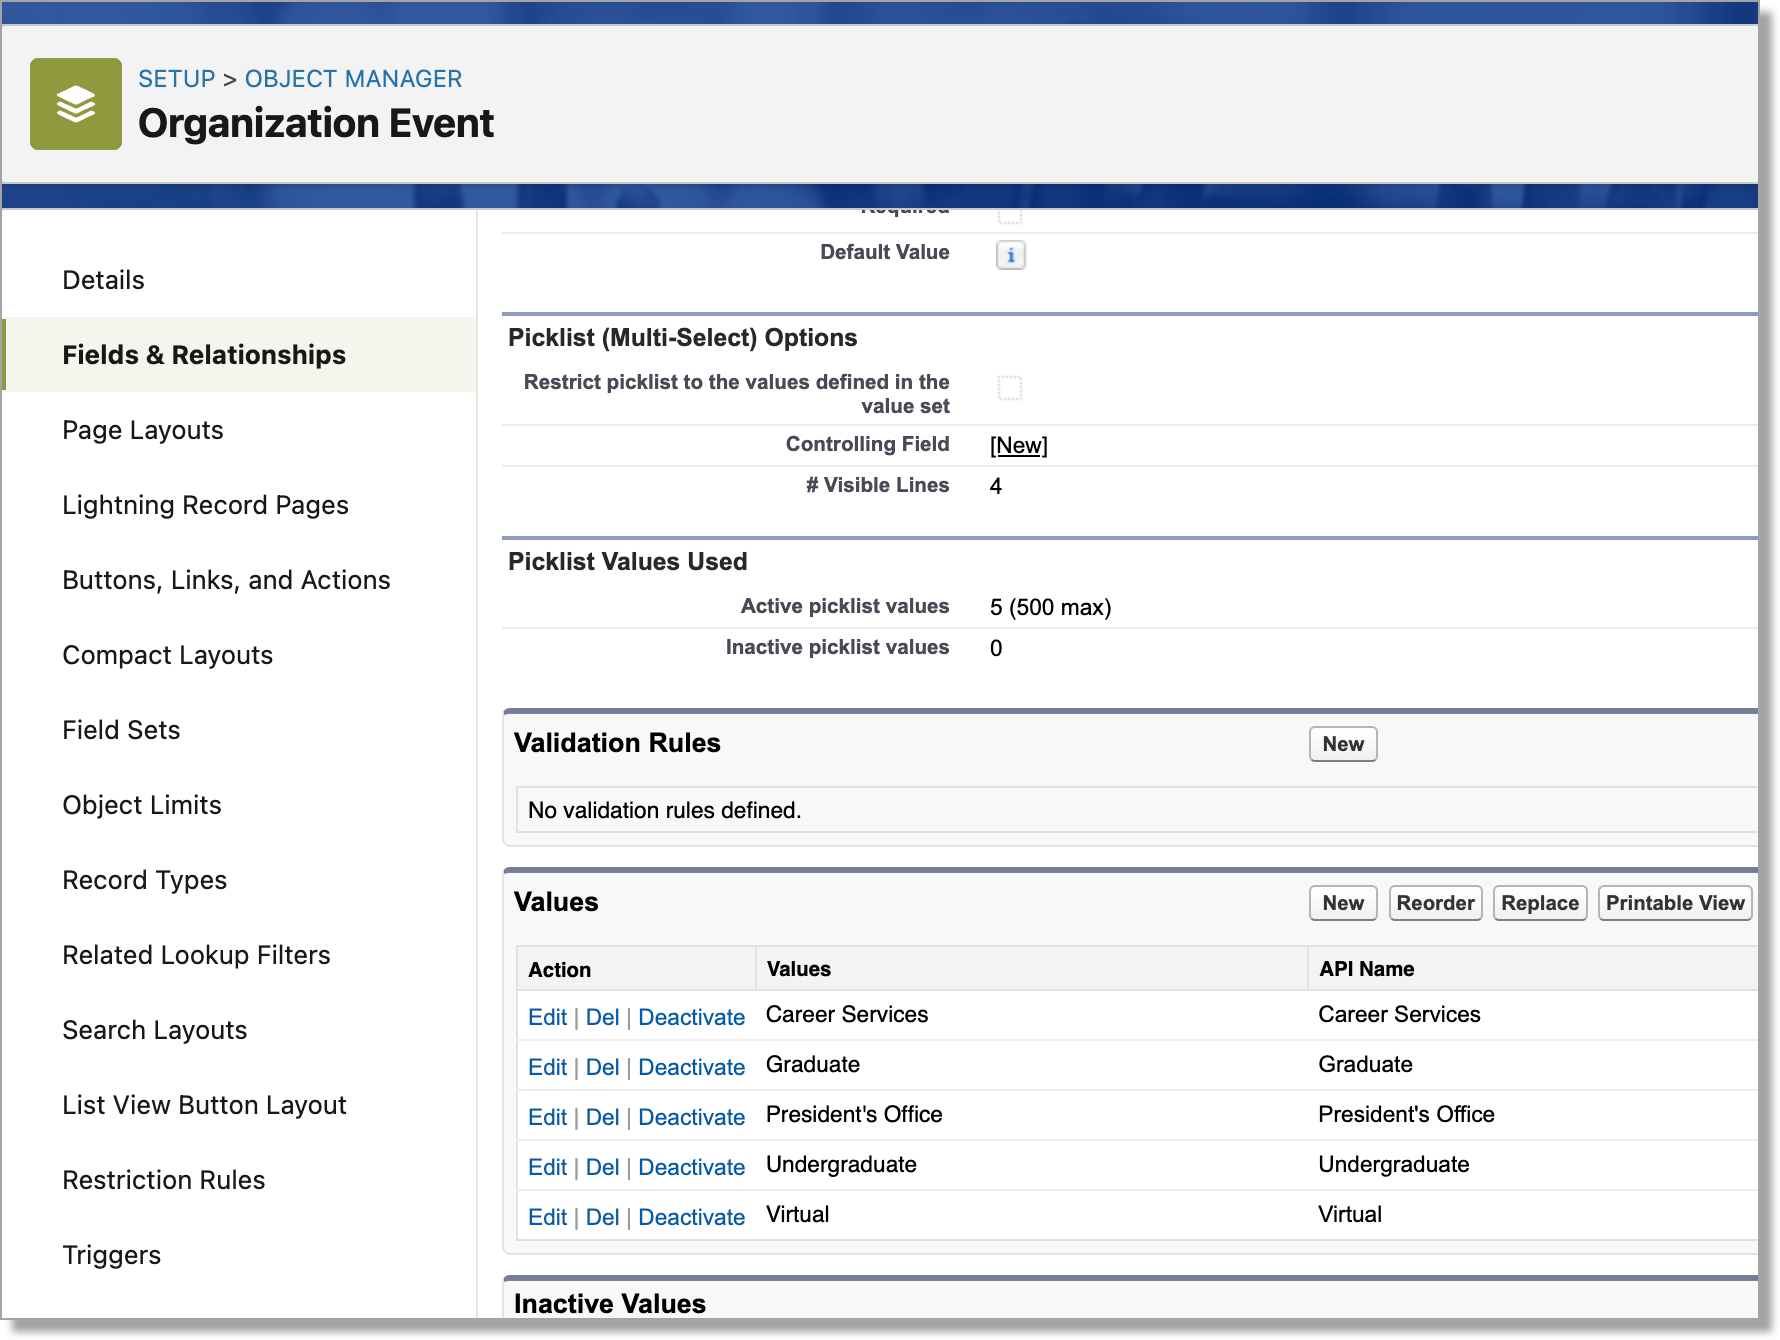
- Navigate to the Values section.
- Add New, Reorder, or Replace the values in the list.
- Save your changes.
Adding Keywords to Events
Once you’ve defined permissions and updated the list of Keyword values, you’re ready to add Keywords to your Organization Events:
- Navigate to the Organization Events tab.
- Click the Event where you want to add Keywords and click Edit.
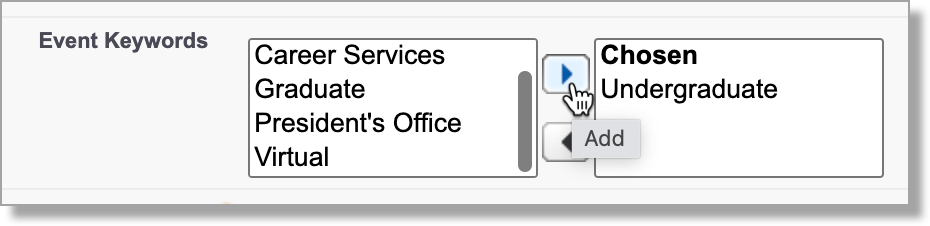
- Select the Keyword(s) from the Available list and then click the arrow to move it to the Chosen list.
- Save your changes.
Using Keywords in URL parameters
Once you’ve added Keywords to your Events, you can share a link that includes the Keyword if you want to direct users to a specific set of events. Add the following parameter to your Events url:
#/calendar?keyword=<<Keyword picklist value>>
For example:
https://yourschool.my.site.com/events#/calendar?keyword=Undergraduate
For more information on using URL parameters to display Events, see Limiting which events display to registrants using URL parameters.