Configuring Payment Connector Vendors
Converge (formerly VirtualMerchant)
Overview
Many TargetX clients utilize Elavon Incorporated’s Converge (formerly known as VirtualMerchant) as a payment gateway for various admissions, student success, and advancement related activities. To help make the process of getting set-up on Converge as smooth as possible, we have provided a few guiding points below. However, make sure you get the most current information from your Converge representative directly in case anything below has changed!
TargetX Basics
To set up Converge payments on the TargetX side please refer to the article Configuring Payment Connectors.
As part of our CRM implementation, we will:
- Provide you with a link to the Salesforce documentation listing the IP address(es) to the Salesforce server(s) for Test and Production (You will be asked for this by Converge.)
- Work with you and Converge to attempt a test connection from TargetX CRM to uPay
Note: Salesforce does not recommend the use of IP Allowlisting for their servers. You can read more in the Salesforce article Introducing Hyperforce - General Information & FAQ. If your Salesforce org has transitioned to Hyperforce (expected by the end of 2024), and your payment connector requires IP Allowlists, then you may need to use the IP addresses outlined in the Salesforce article Hyperforce External IPs.
Converge Tidbits
Converge requires a secure key. The secure key is a parameter that is attached to all notifications, not just payment notifications, that will validate the source of the transaction. In most cases the key will already be configured, and this step can be ignored.
- Navigate to the CustomKey Visualforce Page
- Go to Setup and search for Visualforce Pages.
- Find CustomKey and click preview.
- Enter the value desired as the custom key and save
Configuring your Converge Account 
TargetX has no access to your Converge account and cannot configure the account for you. The instructions provided below are more-or-less accurate but might not pertain to your institution's exact requirements.
To configure Converge you will need to contact their Customer Support line. They can be reached at 866-548-6826. They will ask you for the following information:
- Business/School Name
- What services will require online payment
- The typical amount of the online fee
- A customer service number, for payees to call should their be a problem
- Your institution's Privacy Policy and Refund Policy
Elavon will provide you with an application form requesting, among other things, what bank account numbers to use, the web address (URL) of your payment site, and the person(s) responsible for managing the online fee payment process. TargetX can help you with completing this form, but in many cases the answers will come from your own IT department or Elavon.
TargetX has no access to your Converge account and cannot create the account for you. We can, however, assist with connecting your TargetX applications to Converge and testing the Converge payment processes once you and Elavon have configured it.
Next steps
Contact Elavon Inc. at the number above and request either new Converge services, or an additional storefront if you are already using Converge.
Configuring the Converge Payment Connector
- Login to the Converge site: https://demo.myvirtualmerchant.com/VirtualMerchantDemo/login.do
- For the payment detail to be updated after a transaction has occurred, a custom field for the Payment Detail ID needs to be created.
- Create the Payment Detail ID field:
- Login to Converge’s website
- Hover over Terminal. There will be a dropdown menu. Hover over Merchant > Payment Fields
- Locate section titled Custom Fields. Click Add New Field.
- Fill in the following field values:
- Name: paymentDetailId (case-sensitive; must match exactly)
- Display Name: Payment Detail Id
- Section: Custom Fields
- Field Type: Text
- Maximum Number of Characters: 255
- Show in Virtual Terminal: checked/true
- Shown On Receipt: checked/true
- Forward on Approval: checked/true
- Forward on Decline: checked/true
- Click Add New Field.
- Set the responseHandler site in Converge:
- Login to Converge’s website
- Hover over Terminal. There will be a dropdown menu. Hover over Advanced > System Setup.
- Locate section titled Export Options. Fill in the following field values:
- * unmentioned fields should have no values
- paymentDetailId, Approval URL, Declined URL, and Error URL: responseHandler set with secureKey attached to the end as a URL parameter
- Enable Export Script: checked/true
- Click Update.
Converge Page Layout
If you are using the New Converge Gateway, you must update your Converge Page Layout with new fields:
- Navigate to Setup and select Object Manager.
- Click the Payment Connector object and select Page Layouts.
- Click Converge Layout.
- Drag the new fields onto the layout:
- Converge Merchant ID
- Converge Partner App ID
- Converge Vendor ID
- Post URL
- Post Verify URL
- Postback Verify URL
Note: The Converge PIN field has been deprecated and can be removed from the Page Layout.
Converge Remote Site Settings
You must add additional Remote Site Settings for sandbox and production:
- Navigate to Setup and search for Remote Site Settings.
- Click New Remote Site.
- Enter the following information, depending on whether you use a sandbox or production org. You will need to create TWO remote sites for sandbox and TWO for production:
- Suggested Remote Site Name: Converge sandbox API
- Remote Site URL: https://api.demo.convergepay.com
- Suggested Remote Site Name: Converge sandbox
- Remote Site URL: https://demo.convergepay.com
- Suggested Remote Site Name: Converge production API
- Remote Site URL: https://api.convergepay.com
- Suggested Remote Site Name: Converge production
- Remote Site URL: https://www.convergepay.com
- Suggested Remote Site Name: Converge sandbox API
- Active: should be checked.
- Click Save.
Behavior of the CRM and payment gateway transaction:
- Gateway: payment gateway vendor.
- Confirmation Page Location: location where the user lands on confirmation of payment.
- Receipt Page Location: location where the user lands on receipt of payment.
- Asynchronous Confirmations: does the CRM wait until the confirmation is completed by the payment gateway?
- Key Required: is a shared key required for this payment gateway?
| Gateway | Confirmation Page Location |
Receipt Page Location |
Asynchronous Confirmations |
Key Required? |
|---|---|---|---|---|
| Converge | Gateway | Gateway | Yes | Yes |
Converge Required Fields
- Gateway Account Name
- Converge Merchant ID
- Converge User ID
- Converge Pin (deprecated)
- Converge Partner App ID
- Converge Vendor ID
- Post URL
- Post Verify URL
- Postback Verify URL
If you are on a newer version of Payment Connector (i.e., April '23 or higher, v 2304.0 or higher), the following fields and expected values are required:
- Post Verify URL: https://api.convergepay.com/hosted-payments/transaction_token
- Postback Verify URL: https://api.convergepay.com/VirtualMerchant/processxml.do
- Post URL: https://api.convergepay.com/hosted-payments/
- Converge Partner App ID: TX (or your preferred value)
- Converge Vendor ID: sc100392
Troubleshooting Payment Connector problems with Converge
|
Issue/Error |
Resolution |
|---|---|
| After clicking the “Pay Now” button, an “Invalid Credentials” error page appears. | Ensure that you have the correct Merchant ID, User ID and PIN for the specific environments you want to test (Sandbox vs Production). |
|
After making a successful payment, the TargetX system doesn’t receive the payment’s asynchronous response/confirmation back. |
1) Ensure that you can navigate to the payment responseHandler site without error and can see the text “placeholder” on the page. 2) If the above fails, ensure that the Default Payment Gateway field is blank in the Payment Custom Settings. This is a known issue when doing Converge integration. 3) If Solution 2 has been applied and it still doesn’t work, ensure that we have the proper FLS permissions set up for your Community User profile. |
| The payment responseHandler site is working but the TargetX system still doesn’t receive the payment’s asynchronous response/confirmation. | Assuming it works with TargetX Converge test account, the issue may be on your Converge administrative account. TargetX Support will need to work with you to login and identify potential configuration issues. |
Converge Troubleshooting Tips
- Analyze your Converge Export Logs to identify issues.
- If the export says Failure, click the log and view the error by clicking the View Error button.
- If the export says Successful, click the log and view the log. Ensure that the “paymentDetailId” is included in the list of the POST parameters.
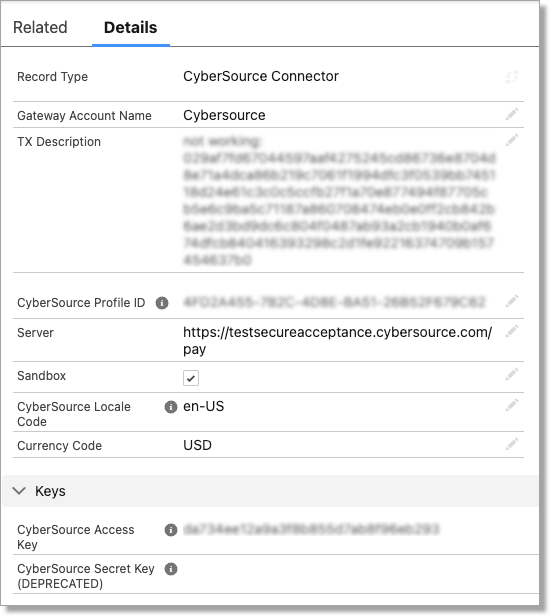
CyberSource
Note: TargetX Payment Connector is not fully compatible with Cybersource. The redirect to the "Review Application" page is not currently supported.
Contact CyberSource to attain your CyberSource Profile ID, Access Key, Custom Key and Server.
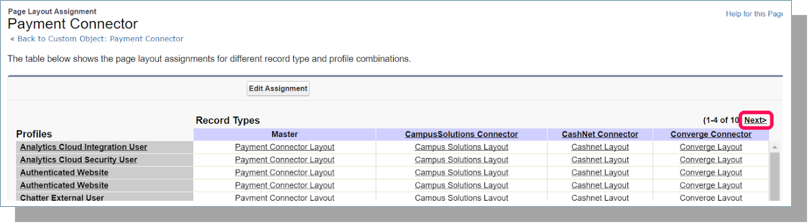
Assign Page Layout
- Navigate to Setup and select Object Manager.
- Click on the Payment Connector object.
- Navigate to the “Page Layout” section and select the Page Layout Assignment button.
- Select Edit Assignment.
- Scroll to the Cybersource column and select the column.
- In the Page Layout To Use list, select Cybersource Layout.
- Save your changes.
Configure Payment Connector Record Types
- Navigate to Setup and search for Profiles.
- Click on the System Administrator profile.
- Navigate to the “Record Type Settings” section.
- Select Edit next to Payment Connectors.
- From the “Available Record Types”, select Cybersource and Add.
- Save your changes.
Create Payment Connector record
- Navigate to your Payment Connectors tab.
- Select New.
- Enter the following:
- Gateway Account Name = CyberSource Payment Gateway
- CyberSource Profile ID = <Profile ID from CyberSource>
- CyberSource Access Key = <Access Key from CyberSource>
- CyberSource Custom Key = <Custom Key from CyberSource>
- Sandbox = unchecked
- Server = https://secureacceptance.cybersource.com/pay (for production)
- CyberSource Locale Code = en-US
- Currency Code = USD
Behavior of the CRM and payment gateway transaction
- Gateway: payment gateway vendor.
- Confirmation Page Location: location where the user lands on confirmation of payment.
- Receipt Page Location: location where the user lands on receipt of payment.
- Asynchronous Confirmations: does the CRM wait until the confirmation is completed by the payment gateway?
- Key Required: is a shared key required for this payment gateway?
| Gateway | Confirmation Page Location |
Receipt Page Location |
Asynchronous Confirmations |
Key Required? |
|---|---|---|---|---|
| Cybersource | Gateway | Gateway | Yes | No |
Cybersource Required Fields
- Gateway Account Name
- Cybersource Profile ID
- Cybersource Access Key
- Cybersource Custom Key (this is provided by Cybersource)
- Server
- Cybersource Locale Code
- Currency Code
Transact Payments (CASHNet)
Overview
Many TargetX clients utilize Transact Payments (CASHNet) as a payment gateway for various admissions, student success and advancement related activities. To help make the process of getting set-up on CASHNet as smooth as possible, we have provided a few guiding points below. However, make sure you get the most current information from your CASHNet representative directly in case anything below has changed!
TargetX Basics
- To set up CASHNet payments on the TargetX side please refer to Configuring Payment Connectors.
- As part of our CRM implementation, we will:
- Provide you with a link to the Salesforce documentation listing the IP address(es) to the Salesforce server(s) for Test and Production (You will be asked for this by Transact Payments (CASHNet).)
- Configure the TargetX CRM with uPay URL, uPay Site ID, TLink Web Service URL and your Transact Payments (CASHNet) Username/Password, once you provide the basic Transact Payments (CASHNet) authentication information to our team
- Work with you and Transact Payments (CASHNet) to attempt a test connection from TargetX CRM to uPay
Note: Salesforce does not recommend the use of IP Allowlisting for their servers. You can read more in the Salesforce article Introducing Hyperforce - General Information & FAQ. If your Salesforce org has transitioned to Hyperforce (expected by the end of 2024), and your payment connector requires IP Allowlists, then you may need to use the IP addresses outlined in the Salesforce article Hyperforce External IPs.
CASHNet Tidbits
Transact Payments (CASHNet) requires a secure key. The secure key is a parameter that is attached to all notifications that will validate the source of the transaction. In most cases the key will already be configured, and this step can be ignored.
- Navigate to the Payment Connector tab.
- Click on the CASHNet record.
- Enter your Secure Key into the Custom Key field.
- Save your changes.
If you are a current Transact Payments (CASHNet) client who has already implemented a Transact Payments (CASHNet) checkout merchant for a process other than TargetX, you should be able to access the TRAIN database and configure the new TargetX merchant. Example entries in the TRAIN database might be:
- Merchant: TGX
- Operator: TGX
- Location: TGX
- Station: TGX
- Payment Code(s): Anything unique for this merchant (e.g. TGXCC – TargetX Credit Card, TGXACH – TargetX Electronic Check)
- Default Customer: TGX
- Type: Checkout
- URL: ClientcodeTGXpaytest (eg. msutgxpaytest) when setup in TRAIN
Reference Items such as STUDENTID, FULLNAME and APPID should be created if it applies. These reference items make it easier to track specific transactions if there is a problem.
If you are a new CASHNet user, you can go here and request a sales rep contact you. They can get you started with configuring your CASHNet account.
Next steps
Reach out to your Transact Payments (CASHNet) Representative to talk about this integration as soon as you can.
Transact Payments (CASHNet)
- Navigate to Transact Payments (CASHNet) and log in.
- Once logged in, navigate to the Home tab.
- Click ‘Store Setup’ along the left side menu.
- From the dropdown menu (you have to click the arrow), select the information provided to your institution. You will be redirected upon selection.
- Click ‘Notifications’ along the left side menu.
- Replace the ‘for successful transactions’ URL with the responseHandler site you configured earlier. Optionally, you can fill in the ‘for failed transactions’ field.
- Click Save.
- Click ‘Implement Store’ along the left side menu.
- Click Continue.
Note: Ensure that the ?secureKey= parameter is appended to the Response URL in Transact Payments (CASHNet).
Behavior of the CRM and payment gateway transaction:
- Gateway: payment gateway vendor.
- Confirmation Page Location: location where the user lands on confirmation of payment.
- Receipt Page Location: location where the user lands on receipt of payment.
- Asynchronous Confirmations: does the CRM wait until the confirmation is completed by the payment gateway?
- Key Required: is a shared key required for this payment gateway?
| Gateway | Confirmation Page Location |
Receipt Page Location |
Asynchronous Confirmations |
Key Required? |
|---|---|---|---|---|
| Transact Payments (CASHNet) | Gateway | Gateway | Yes | Yes |
Important Note on using Transact Payments (CASHNet) with Events
If you are using Transact Payments (CASHNet) with paid Events that also contain paid sub-events where the registrant might have two or more separate costs associated with the registration, you MAY need a separate item code for the event and each paid sub-event. TargetX puts all items in this scenario into a single cart, and some Transact Payments (CASHNet) setups will reject duplicated item codes in a single cart.
If this is the case, you'll need to work with your Transact Payments (CASHNet) representative to obtain additional item codes.
Transact Payments (CASHNet) Required Fields:
- Gateway Account Name
- Checkout URL
- Merchant Code
- Default Item Code
Nelnet
Contact your Nelnet representative to configure Allowed Redirect URL and Async Confirmation/Post-Back URL:
- Add the "targetx_payment_confirm" page to the Allowed Redirects list.
- Example:
https://<YOUR DOMAIN NAME>.my.site.com/<ONLINE APP NAME>/targetx_payment__confirm
- Select Make web payer url private (require hash) and use SHA-256 hashing algorithm.

- Set the Async Confirmation/Post-Back URL (Nelnet calls this Real Time Payment Notification or RTPN) to the "targetx_payment_responsehandler" page.
- Example:
https://<YOUR DOMAIN NAME>.my.site.com/<ONLINE APP NAME>/apex/targetx_payment__responseHandler
- Example:
- Set the RTPN Hashcode Shared Secret to be the same as the key used in #3 above and use MD5 hashing algorithm.
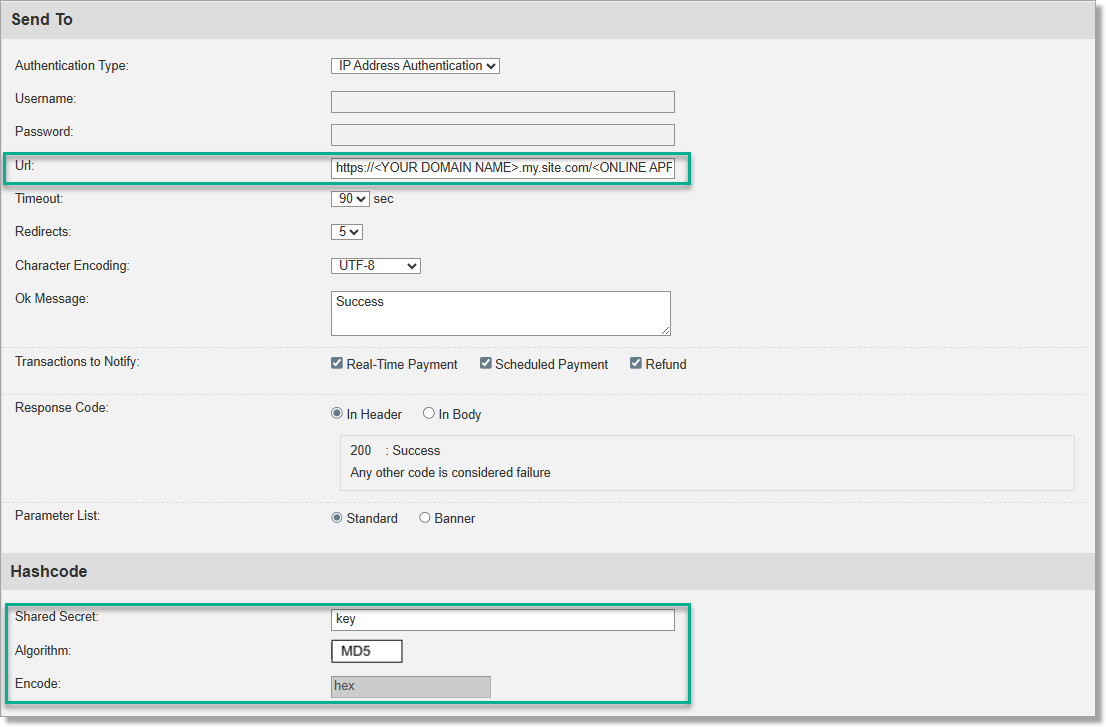
-
Confirm you RTPN parameter list matches the following list:
transactionType, transactionStatus, transactionSource, transactionId, originalTransactionId, transactionTotalAmount, transactionDate, transactionAcountType, transactionEffectiveDate, transactionDescription, transactionResultDate, transactionResultEffectiveDate, transactionResultCode, transactionResultMessage, orderNumber, orderType, orderName, orderDescription, orderAmount, orderFee, orderDueDate, orderAmountDue, orderBalance, orderCurrentStatusBalance, orderCurrentStatusAmountDue, payerType, payerIdentifier, payerFullName, actualPayerType, actualPayerIdentifier, actualPayerFullName, accountHolderName, streetOne, streetTwo, city, state, zip, country, daytimePhone, eveningPhone, email, userChoice1, userChoice2, userChoice3, userChoice4, userChoice5, userChoice6, userChoice7, userChoice8, userChoice9, userChoice10, userChoice11, userChoice12, userChoice13, userChoice14, userChoice15, userChoice16, userChoice17, userChoice18, userChoice19, userChoice20, userChoice21, userChoice22, userChoice23, userChoice24, userChoice25, timestam
Behavior of the CRM and payment gateway transaction
- Gateway: payment gateway vendor.
- Confirmation Page Location: location where the user lands on confirmation of payment.
- Receipt Page Location: location where the user lands on receipt of payment.
- Asynchronous Confirmations: does the CRM wait until the confirmation is completed by the payment gateway?
- Key Required: is a shared key required for this payment gateway?
| Gateway | Confirmation Page Location |
Receipt Page Location |
Asynchronous Confirmations |
Key Required? |
|---|---|---|---|---|
| Nelnet HPP | Gateway | CRM | No | No |
| Nelnet Commerce Manager | Gateway | Salesforce | Yes | No |
*Important Notes for Nelnet Customers
There is currently a known limitation with the Nelnet Payment Gateway where Nelnet imposes a 100-character limit in the payment confirmation URL. Payments will still be processed and completed successfully, however, if your Salesforce Org's URL exceeds the Nelnet 100 character limit you may either not receive a payment confirmation or receive an incomplete payment confirmation in Salesforce.
In the Nelnet processor configuration (i.e., Nelnet's site, not TargetX), the "use payment gateway" checkbox should NOT be checked.
Nelnet Commerce Manager Required Fields
- Gateway Account Name
- Shared Secret Key (this is provided by Nelnet)
- Payment Site URL
Nelnet Hosted Payment Pages (HPP) Required Fields
- Gateway Account Name
- Login
- Password
- Form ID (This will require you to create a form in Cryptpay.)
- Sandbox (check if using a test environment)
Nelnet Campus Commerce
Create Payment Connector record
Follow the steps below to create your payment connector:
- Click the Payment Connectors tab.
- Click the New button.
- Choose your payment gateway in the Record Type list and select Continue.
- Using the documentation provided by your payment gateway vendor, enter the information needed to create the connector.
- All payment connectors require a Gateway Account Name. This name will be used when setting up your default Payment Gateway and when applying it to the online application or events products.
- Click Save.
Assign Page Layout
- Navigate to Setup and select Object Manager.
- Click on the Payment Connector object.
- Navigate to the “Page Layout” section and select the Page Layout Assignment button.
- Select Edit Assignment.
- Scroll to the Nelnet Checkout Connector column and select the column.
- In the Page Layout To Use list, select Nelnet Checkout Layout.
- Save your changes.
Edit Payment Connector Record Types
- Navigate to Setup and search for Profiles.
- Click the System Administrator profile.
- Click Object Settings.
- Select Edit next to Payment Connectors.
- From the Record Types and Page Layout Assignments, select Nelnet Checkout Layout and Add.
- Save your changes.
Configure Field-Level Security
- Navigate to Setup and search for Profiles.
- Click on the System Administrator profile.
- Click Apex Class Access.
- Select Edit in the Apex Class Access section.
- Add the NelnetCheckoutResponseHandler Apex Class.
- Save your changes.
Behavior of the CRM and payment gateway transaction
- Gateway: payment gateway vendor.
- Confirmation Page Location: location where the user lands on confirmation of payment.
- Receipt Page Location: location where the user lands on receipt of payment.
- Asynchronous Confirmations: does the CRM wait until the confirmation is completed by the payment gateway?
- Key Required: is a shared key required for this payment gateway?
| Gateway | Confirmation Page Location |
Receipt Page Location |
Asynchronous Confirmations |
Key Required? |
|---|---|---|---|---|
| Nelnet Checkout Connector | Gateway | Gateway | No | Yes |
Required Fields
- Post URL
- Post Verify URL
- Postback Verify URL
- Secure Key
Nelnet Quik Pay
Contact your Nelnet representative to configure Redirect Parameters and Hash Order.
- Redirect Parameters is a Comma-delimited list of parameters to be included in user redirect URL.
- Hash Order is a Comma-delimited list of parameters listed in the order defined by the payment gateway as required for proper hashing.
Assign Page Layout
- Navigate to Setup and select Object Manager.
- Click on the Payment Connector object.
- Navigate to the “Page Layout” section and select the Page Layout Assignment button.
- Select Edit Assignment.
- Scroll to the Nelnet QuikPay Connector column and select the column.
- In the Page Layout To Use list, select Nelnet QuikPay Layout.
- Save your changes.
Edit Payment Connector Record Types
- Navigate to Setup and search for Profiles.
- Click on the System Administrator profile.
- Navigate to the “Record Type Settings” section.
- Select Edit next to Payment Connectors.
- From the Available Record Types, select Nelnet QuikPay Connector and Add.
- Save your changes.
Configure Field-Level Security
- Navigate to Setup and search for Profiles.
- Click on the System Administrator profile.
- Navigate to the “Field-Level Security” section.
- Select [View] next to Payment Connector.
- Select Edit.
- Set the following READ permissions:
| Object: Payment Connector READ |
||
|---|---|---|
| Fieldname | Read | Edit |
| Hash Order | ✓ | ✓ |
| Redirect Parameters | ✓ | ✓ |
- Save your changes.
Create Payment Connector record
- Navigate to your Payment Connectors tab.
- Select New.
- Enter the following:
- Record Type = Nelnet QuikPay Connector
- Gateway Account Name = Nelnet QuikPay
- Nelnet URL = <obtained from Nelnet>
- Nelnet Shared Secret = <obtained from Nelnet>
- Redirect Parameters = <obtained from Nelnet>
- Hash Order = <obtained from Nelnet>
Create formula fields
This step is ONLY needed if you have additional parameters you wish to send to Nelnet QuikPay outside of the ‘standard fields’.
The standard fields that are sent to Nelnet QuikPay include:
- orderDescription
- amountDue
- userChoice10
- redirectUrl
- redirectUrlParameters
- timestamp.
If you plan to include additional information to Nelnet QuikPay, complete the steps below.
Application Fees Formula
- Navigate to Setup and select Object Manager.
- Click on the Application object label.
- In the “Custom Fields & Relationships” section, select New.
- Enter the following for Application Fees:
- Data Type = Formula
- Field Label = Application Fee Custom Parameters
- Field Name = Application_Fee_Custom_Parameters
- Formula Return Type = Text
- Select Next.
- Enter your formula. For additional information, please see the Sample Formula.
- Save.
Enrollment Deposit Formula
- Navigate to Setup and select Object Manager.
- Click on the Application object label.
- In the “Custom Fields & Relationships” section, select New.
- Enter the following for Enrollment Deposit:
- Data Type = Formula
- Field Label = Enrollment Deposit Custom Parameters
- Field Name = Enrollment_Deposit_Custom_Parameters
- Formula Return Type = Text
- Select Next.
- Enter your formula. For additional information, please see the Sample Formula.
Sample Formula
Client A has configured their Nelnet QuikPay account and agreed on the following hash order:
- userId
- fullName
- orderType
- orderDescription
- amountDue
- userChoice10
- redirectUrl
- redirectUrlParameters
- retriesAllowed
- timestamp
This means that the system MUST send all 10 of these parameters, in the exact order listed, with every payment transaction. By default, TargetX CRM will automatically include 4,5,6,7,8,10. You must specify the missing parameters and values in the proper Application formula field referenced above.

In this sample, the actual formula would be:
"userId=" & TargetX_SRMb__Contact__c & "&" &
"fullName=" & TargetX_SRMb__Contact__r.FirstName & " " & TargetX_SRMb__Contact__r.LastName & "&" &
"orderType=application_fee" & "&" &
"retriesAllowed=0"
OPC
The OPC-assigned custom data field is one of five custom fields that OPC can enable or disable. Only one can be used to hold the paymentIdentifier field, which holds the payment detail ID. These fields are used to capture custom data that you deem necessary for your payment records.
Postback URL is:
https://<site>/services/apexrest/targetx_payment/opc/
where <site> is the site (e.g., example.force.com)
Behavior of the CRM and payment gateway transaction
- Gateway: payment gateway vendor.
- Confirmation Page Location: location where the user lands on confirmation of payment.
- Receipt Page Location: location where the user lands on receipt of payment.
- Asynchronous Confirmations: does the CRM wait until the confirmation is completed by the payment gateway?
- Key Required: is a shared key required for this payment gateway?
| Gateway | Confirmation Page Location |
Receipt Page Location |
Asynchronous Confirmations |
Key Required? |
|---|---|---|---|---|
| OPC | Gateway | Gateway | No | No |
OPC Required Fields
- Gateway Account Name
- Product ID
- TransID Name
- OPC Postback URL
- Post URL
PayPal
Overview
Many TargetX clients, like yourself, utilize PayPal as a payment gateway for various admissions, student success and advancement related activities. To help make the process of getting set-up on PayPal as smooth as possible, we have provided a few guiding points below. However, ensure you get the most current information from your PayPal representative directly in case anything below has changed!
TargetX Basics
To set up PayPal payments on the TargetX side please refer to Configuring Payment Connectors.
As part of our CRM implementation, we will:
- Provide you with a link to the Salesforce documentation listing the IP address(es) to the Salesforce server(s) for Test and Production (You will be asked for this by PayPal.)
- Configure the TargetX CRM with your PayPal Username/Password, once you provide the basic PayPal authentication information to our team (see tidbits below).
- Work with you and PayPal to attempt a test connection from TargetX CRM to uPay
Note: Salesforce does not recommend the use of IP Allowlisting for their servers. You can read more in the Salesforce article Introducing Hyperforce - General Information & FAQ. If your Salesforce org has transitioned to Hyperforce (expected by the end of 2024), and your payment connector requires IP Allowlists, then you may need to use the IP addresses outlined in the Salesforce article Hyperforce External IPs.
PayPal Tidbits
The secure key is a parameter that is attached to all notifications, not just payment notifications, that will validate the source of the transaction. In most cases the key will already be configured, and this step can be ignored.
- Navigate to the CustomKey Visualforce Page
- Go to Setup and search for Visualforce Pages.
- Located CustomKey and click Preview.
- Enter the value desired as the custom key and save
Configuring your PayPal Account
TargetX has no access to your PayPal account and cannot configure the account for you. The instructions provided below are more-or-less accurate, but might not pertain to your institution's exact requirements. PayPal has a business account help line which can be found here.
- Go to PayPal website www.paypal.com and click the “Business” tab.
- Select the appropriate option from the business menu (probably “Credit Card Processing”).
- Determine who will be responsible for managing the PayPal account
- You will need this person’s email address and Social Security Number.
- You may also need an Employer ID Number (EIN).
- Complete online forms. You will mostly likely be using website payment, but other options may apply for your institution.
- Upon completing all forms and verifying the email address used in step 2 you will be presented with your new Merchant ID and your PayPal Profile.
- Update any fields on the profile that do not have information or are incorrect.
- The My Money section contains information about your bank account
- The “My settings” section contains information regarding access to your PayPal account and other security settings.
- The “My Selling Tools” is where you will configure your online payment options. You will likely need to configure API access.
- Enable Instant Payment Notification (IPN) and set the notification url to your responseHandler url.
If you need assistance setting up your PayPal Account, contact PayPal at 1-844-213-2855.
Next steps
Once your profile is completely configured you’ll want to run a test payment. Follow these steps to configure TargetX for transmitting payments. Coordinate with PayPal to verify the PayPal account:
- Log into the paypal sandbox with the information provided to your institution.
- Stay logged in to the sandbox, and remain logged in for the test to process.
- Complete the payment using your Paypal SANDBOX credentials.
Behavior of the CRM and payment gateway transaction
- Gateway: payment gateway vendor.
- Confirmation Page Location: location where the user lands on confirmation of payment.
- Receipt Page Location: location where the user lands on receipt of payment.
- Asynchronous Confirmations: does the CRM wait until the confirmation is completed by the payment gateway?
- Key Required: is a shared key required for this payment gateway?
| Gateway | Confirmation Page Location |
Receipt Page Location |
Asynchronous Confirmations |
Key Required? |
|---|---|---|---|---|
| Paypal | Gateway | Gateway | Yes | No |
Paypal (standard) Required Fields
- Gateway Account Name
- Login Email
- Notify URL (the site configured in your Salesforce Org to redirect to responseHandler)
- Country Code
- Currency Code
- Sandbox (check if using a test environment)
TouchNet
Overview
Many TargetX clients utilize TouchNet as a payment gateway for various admissions, student success and advancement-related activities. To help make the process of getting set up on TouchNet as smooth as possible, we have provided a few guiding points below. However, make sure you get the most current information from your TouchNet representative directly in case anything below has changed!
TargetX Basics
- TargetX has product certification as a ‘TouchNet ready partner’.
- To set up TouchNet payments on the TargetX side, please refer to Configuring Payment Connectors
As part of our CRM implementation, we will:
- Provide you with a link to the Salesforce documentation listing the IP address(es) to the Salesforce server(s) for Test and Production (You will be asked for this by TouchNet.)
- Configure the TargetX CRM with uPay URL, uPay Site ID, TLink Web Service URL and your TouchNet Username/Password, once you provide the basic TouchNet authentication information to our team
- Work with you and TouchNet to attempt a test connection from TargetX CRM to uPay.
Note: Salesforce does not recommend the use of IP Allowlisting for their servers. You can read more in the Salesforce article Introducing Hyperforce - General Information & FAQ. If your Salesforce org has transitioned to Hyperforce (expected by the end of 2024), and your payment connector requires IP Allowlists, then you may need to use the IP addresses outlined in the Salesforce article Hyperforce External IPs.
TouchNet Tidbits
To integrate TouchNet smoothly with TargetX’s products, you will need to have the following:
- “Marketplace uPay Software” (which gives you a uPay site ID).
- “T-Link Integration Components” (with SOAP payments enabled).
Even if you are already utilizing TouchNet, for each TargetX-TouchNet connection, TouchNet will require a new addendum to your existing contract
- NOTE:This may come with an annual hosting fee and fees associated with a TouchNet supported implementation.
According to TouchNet, the implementation takes approximately 2-4 weeks after your contract with TouchNet has been signed. We have seen this timeline vary significantly from client to client, so get started as soon as you can!
You should have a dedicated project manager/consultant from TouchNet to work with during the entirety of this implementation.
Once you begin working with them, as your TouchNet representative for the “TargetX Data Gathering Guide.” Filling this out will help TouchNet kick-start the implementation!
High Level Project Plan
The high-level project plan for setting up the payment gateway looks something like this:
| Task | Who? |
|---|
| Submit executed contract to TouchNet | You |
| Provide TargetX contract to TouchNet | You |
| Schedule implementation call with you | TouchNet |
| Provide project plan and “TargetX Data Gathering Guide” to you | TouchNet |
| Complete and send TouchNet “TargetX Data Gathering Guide” | You (with help from TargetX |
| Allow the IP provided in the “TargetX Data Gathering Guide” into the TouchNet firewall | TouchNet |
| Provide the basic authentication username and password to you | Touchnet |
| Add payment gateway merchant (for production, test is optional) | You (TouchNet can provide assistance & training) |
| Create your uPay Site(s) and provide the Site IDs to those involved | You (TouchNet can provide assistance & training) |
| Configure TargetX CRM with uPay URL, uPay Site ID, TLink Web Service URL and Username/Password | TargetX |
| Attempt test connection from TargetX CRM to uPay | TouchNet, You & TargetX |
Next steps
Reach out to your TouchNet Representative to talk about this integration as soon as you can!
- Login to TouchNet using your Client Login.
- Navigate to Applications | Marketplace and select your Targetx uPay Site.
- Click on Payment Settings.
- Under the “Transaction ID Settings” section, check Yes for Show External Transaction Id in URL.

- Save your changes.
Behavior of the CRM and payment gateway transaction
- Gateway: payment gateway vendor.
- Confirmation Page Location: location where the user lands on confirmation of payment.
- Receipt Page Location: location where the user lands on receipt of payment.
- Asynchronous Confirmations: does the CRM wait until the confirmation is completed by the payment gateway?
- Key Required: is a shared key required for this payment gateway?
|
Gateway |
Confirmation |
Receipt Page |
Asynchronous |
Key Required? |
|---|---|---|---|---|
|
Touchnet |
CRM |
CRM |
No |
No |
Touchnet Required Fields*
- Gateway Account Name
- Username
- uPay Site Id
- Server
- uPay URL
*Note: For Touchnet, the Username and Password fields are used to authenticate that the transaction is coming from TargetX. Thus, the TargetX username(t@rget) and password should be used. The Password should be entered in the Payment Custom Key field.
Customizing the TouchNet warning
You can customize the warning message for TouchNet payments. As the TouchNet Warning custom label is delivered via a managed package, you must override the label to change the message contents.
(TouchNet Customers Only)
- Navigate to Translation Workbench > Translation Settings and click Enable.
- Navigate to Setup > Create > Custom Labels.
- Select ‘TouchNet Warning custom label’.
- Override the default label by clicking on the “New Local Translations / Overrides” button
- Select "English" as the language
- Enter desired text in the Translation Text field
For example: Our system indicates a previous attempt to make a payment was made. Please contact the Bursar’s Office at (610)555-1212 to confirm payment was not posted.
- Save your changes.
WPM
Behavior of the CRM and payment gateway transaction
- Gateway: payment gateway vendor.
- Confirmation Page Location: location where the user lands on confirmation of payment.
- Receipt Page Location: location where the user lands on receipt of payment.
- Asynchronous Confirmations: does the CRM wait until the confirmation is completed by the payment gateway?
- Key Required: is a shared key required for this payment gateway?
|
Gateway |
Confirmation |
Receipt Page |
Asynchronous |
Key Required? |
|---|---|---|---|---|
|
WPM |
Gateway |
Gateway |
Yes |
Yes |
WPM Required Fields
- WPM_Callback_URL__c
- WPM_Client_ID__c
- WPM_Department_ID__c
- WPM_Pathway_ID__c
- WPM_Pathway_URL__c
- WPM_Payment_Option_Code__c
- WPM_Shared_Secret__c
RTS
Postback URL
https://<site>/services/apexrest/targetx_payment/rts/
For example: https://targetxdemo.force.com/paymentResponse/services/apexrest/targetx_payment/rts/
Behavior of the CRM and payment gateway transaction
- Gateway: payment gateway vendor.
- Confirmation Page Location: location where the user lands on confirmation of payment.
- Receipt Page Location: location where the user lands on receipt of payment.
- Asynchronous Confirmations: does the CRM wait until the confirmation is completed by the payment gateway?
- Key Required: is a shared key required for this payment gateway?
|
Gateway |
Confirmation Page Location |
Receipt Page Location |
Asynchronous Confirmations |
Key Required? |
|---|---|---|---|---|
|
RTS |
Gateway |
Gateway |
Yes |
Yes |
RTS (standard) Required Fields:
- Post URL
- PostBack Url
- Key