Working with Local GPAs
Getting Started with Creating Custom GPAs
Video Overview
Overview
Local GPAs allow you to create a customized GPA from all classes in desired subject areas, classifications, and academic years. Once a Local GPA is configured, each applicant has a GPA calculated based on their applicable classes. Local GPAs are also available when working with Lists, Exports, and Scoring.
If you want to build a Local GPA to replicate a CAS-calculated GPA, you can view how these GPAs are built in your CAS's Applicant Help Center. These help centers are accessible in your CAS Program User Guide.
Gaining Access to This Feature
The Local GPAs feature is available under the Management panel and access to this tool is controlled through Work Groups. You must have the:
- Configure Software permission to create and edit Local GPA templates.
- Modify Applicants' Custom Fields, Local GPAs, Prerequisites, and Requirements permission to update an applicant's Local GPA.
Creating Local GPAs
By default, every applicant’s Local GPA will be calculated using verified and unverified coursework.
- Using the Menu Bar, open the Management panel, then click Local GPAs.
- Click New Local GPA.
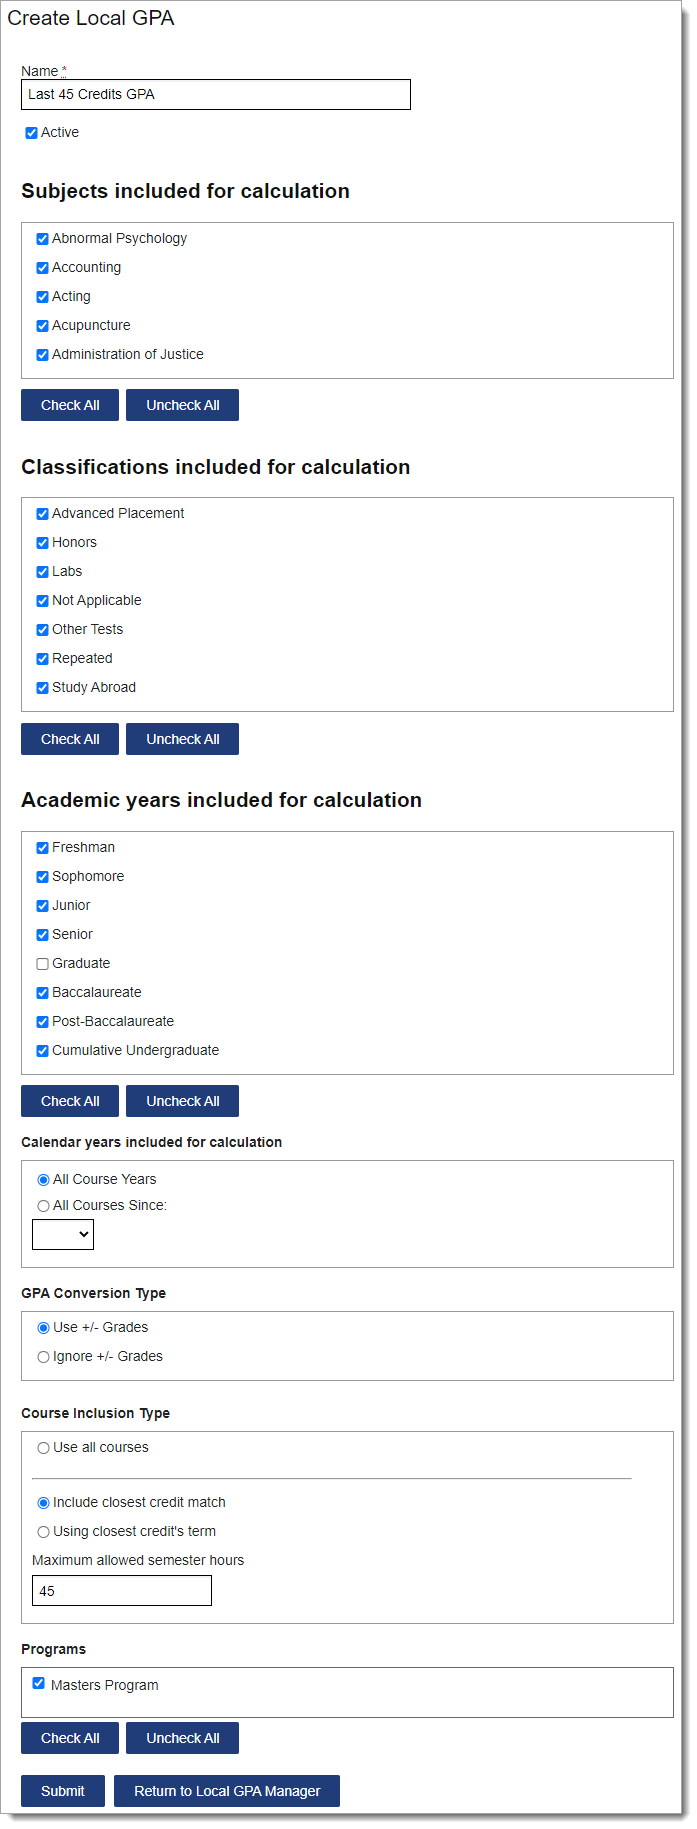
- Enter a name.
- Select the Active checkbox to activate or deactivate the template, as needed.
- Select the course subjects included in the calculation. If you want the Local GPA to include all course subjects, click Check All.
- Select the course classifications included in the calculation. Most courses fall into the Not Applicable category, as this is the default category used when a course does not match any of the other categories (e.g., Advanced Placement, Honors, etc.). We recommend including Not Applicable in your template.
- Select the academic year(s) included in the calculation.
- Select the calendar year(s) included in the calculation.
- Select whether you are including or ignoring +/- grades. For example, if you select Use +/- Grades, then a B+ is calculated as a 3.33. If you select Ignore +/- Grades, then a B+ is calculated as a 3.00.
- Select if you are including all courses or a specified last number of credits. For example, you can create a Last 45 Credits GPA calculation, where WebAdMIT starts with the last course an applicant has received a grade and credit for and works backward until it meets the maximum allowed semester hours (in this example, 45 credits). When using this filter, you must select how you want WebAdMIT to address the last course that meets the maximum allowed semester hours.
- If you select Include closest credit match, then WebAdMIT will calculate the GPA from the last course to the course that meets the maximum number of credit hours. Selecting this option allows you to have a more standard credit total in the GPA calculation across applicants.
- If you select Using closest credit's term, then WebAdMIT will calculate the GPA from the last course to the course that meets the maximum number of credit hours. If that course is in the middle of a term, then the entire term's courses are also included in the GPA. Selecting this option takes into consideration how each applicant performed over the entire term, not just in a few courses in that term. The number of credits included in this GPA calculation varies more widely across applicants, depending on how and where their courses fall within terms.
- Select the programs you want to use this Local GPA for. You can batch check/uncheck all programs.
- Click Submit to save your template or click Return to Local GPA Manager to discard your template.

Viewing Local GPAs
Once Local GPAs are configured, each applicable applicant has a GPA calculated. To view Local GPAs:
- Navigate to the Applicant Details page.
- Go to the GPA Overview panel, By Local GPA subpanel.

To view which courses are included in the Local GPA calculation:
- Go to the Electronic Transcript panel.
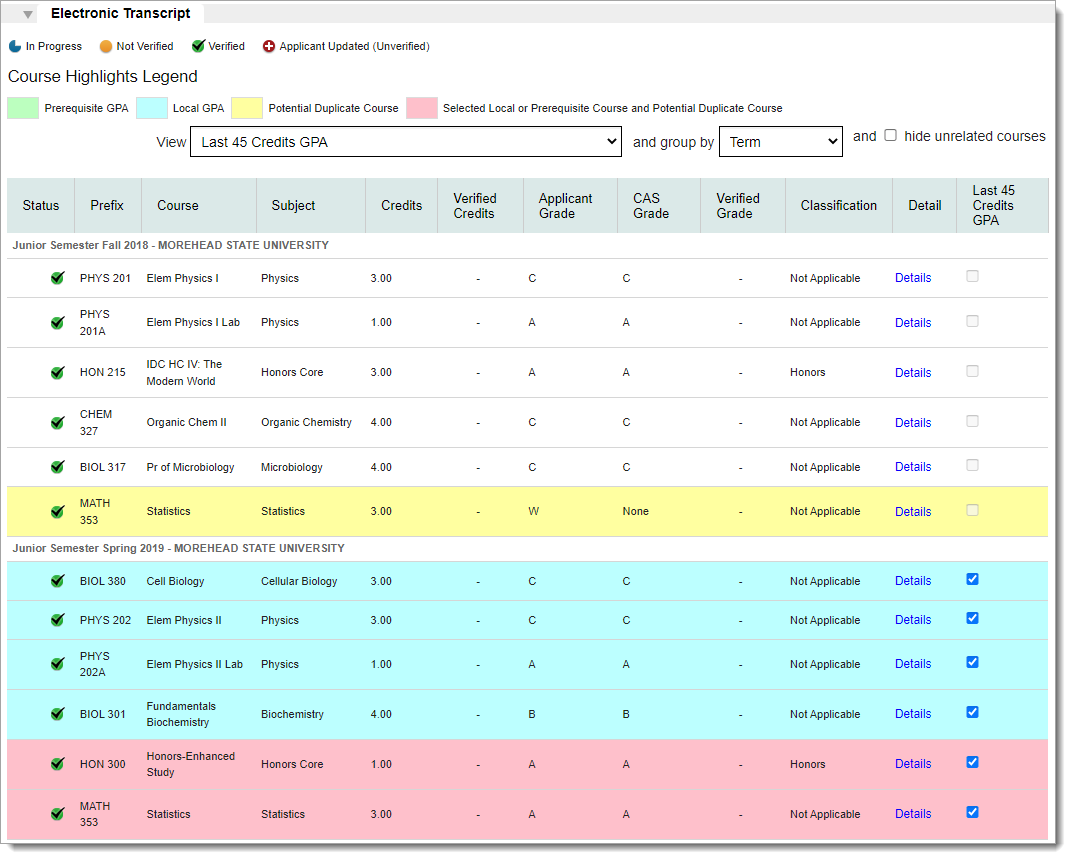
- Select the desired Local GPA from the View drop-down. To view only the courses included in the selected Local GPA, click the hide unrelated courses checkbox. Courses included in the calculation are highlighted in blue and pink.

Updating Courses Included in a Local GPA Calculation
If desired, you can remove courses from an applicant's Local GPA calculation. This may be helpful if you want to remove repeated coursework or you want to select an alternate course in a Last 45 Credits GPA calculation. Be aware that removing courses from a Local GPA is a temporary action. Adjustments to the Local GPA template or updates to an applicant’s application will cause Local GPAs to recalculate and manual course selections to be overwritten.
To remove a course:
- Navigate to the Applicant Details page.
- Go to the Electronic Transcript.
- Select the desired Local GPA from the View drop-down. Courses included in the calculation are highlighted in blue and pink.
- Click the checkbox to remove a course. Depending on your Local GPA template configuration, you may be able to select alternate courses.
Managing Local GPAs
To manage existing Local GPAs, click Local GPAs from the Menu Bar.

Reordering Local GPAs
Use the grip icon to drag and drop the Local GPA template into the preferred order.
Editing Local GPAs
Use the pencil icon to edit an existing Local GPA template.
Deactivating Local GPAs
Use the trash icon to deactivate Local GPA templates.
