Managing Requirements
Video Overview
Overview
Gaining Access to This Feature
Creating Requirements
Once Requirements are configured, they can be worked with for each applicant in the Requirements panel on the Applicant Details page.
- Using the Menu Bar, open the Management panel, then click Requirements.
- Begin by creating a new Requirement category.
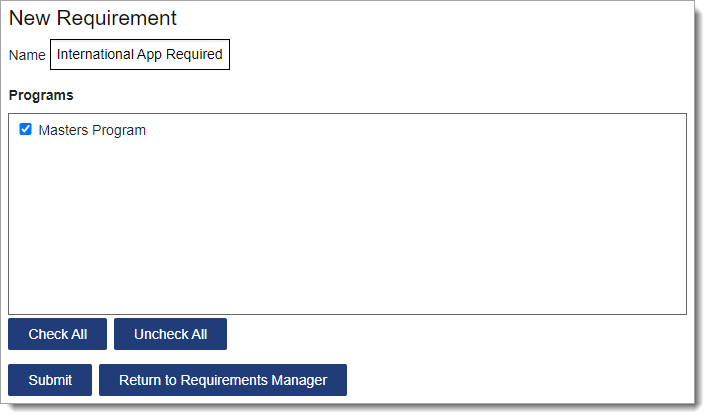
- Click New Requirement.
- Enter a name.
- Select the programs associated with this Requirement.
- Click Submit to save your template or Return to Requirements Manager to discard your template.
- Once you create the Requirement category, then you can add criteria under it.
- Click add criterion.
- Enter a description for the new criterion.
- If desired, you can additionally configure:
- Due date
- Comments, where you create a custom drop-down. You can select a default value, where each applicant has this value populated automatically. If you later change the default value, it will only affect new applicants.
- Notes, where users can enter comments in a text box.
- Click Submit to save your criterion or Return to Requirements Manager to discard the criterion.

Fulfilling Requirements
Once Requirements have been created, they can be updated for applicants:
- Individually from the Requirements panel on the Applicant Details page.
- In batch via Lists, Searches, or the Clipboard.
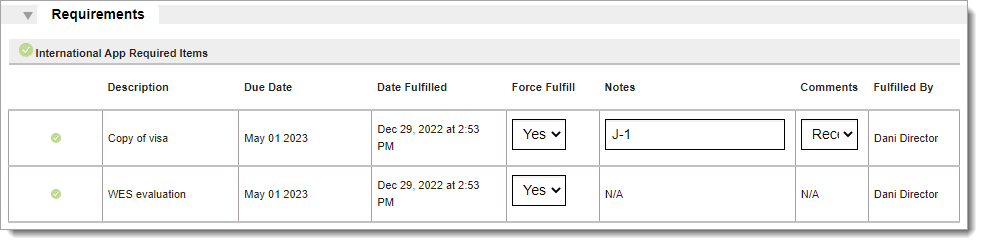
Each Applicant Details page contains a Requirements panel that populates with all the Requirements that have been created and enabled for the applicant. WebAdMIT for AMCAS keeps track of who made the most recent change to each Requirement.
Once all associated criteria are marked Yes or N/A, the set of requirements is considered complete and a green checkmark appears to the left of the requirement set name.
Fulfilling Requirements Individually
- Navigate to the Applicant Details page.
- Go to the Requirements panel.
- Update the Force Fulfill drop-down and other fields, as necessary. You may need to use the tab key or click off the field to save your change. The row flashes green to indicate a saved change.
Fulfilling Requirements in Batch
You can run a batch Requirement update through the:
- Search features using the Search Actions button.
- Clipboard feature using the Clipboard Actions button.
- List Manager using the List Actions button.
You can exclude applicants from your change by unchecking them before initiating a batch update.
Follow the steps below to run a batch Requirement update through the List Manager; you can follow similar steps for the Search and Clipboard features.
- Using the Menu Bar, open the Applicant Lists panel, then click List Manager.
- Click on a list name to run it.
- Click List Actions.
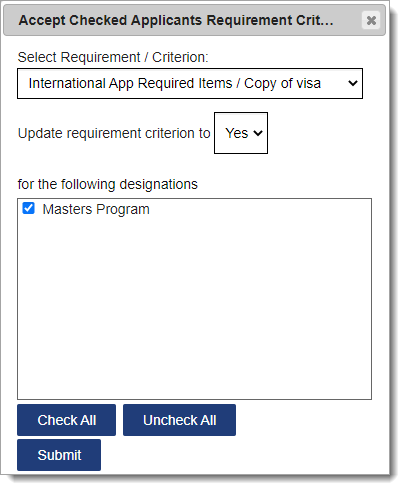
- Click Accept Checked Applicants Requirement Criterion.
- In the window, select the Requirement from the drop-down.
- Update the field as appropriate.
- Select the designation(s) you'd like this change to impact.
- Click Submit.
Managing Requirements
To manage existing Requirements, click Requirements from the Menu Bar.

Reordering Requirements
Use the grip icon to drag and drop the Requirement category and criteria into the preferred order.
Editing Requirements
Use the pencil icon to edit an existing Requirement category and criteria.
Deactivating Requirements
Use the trash icon to deactivate Requirement categories and criteria.