Working with Prerequisite GPAs
Video Overview
Overview
WebAdMIT for AMCAS allows you to analyze applicants using two types of GPAs:
- Local GPAs: create a customized GPA from classes in one or more subject areas. On an individual basis, you can also review an applicant’s Electronic Transcript and remove classes that factor into that GPA.
- Prerequisite GPAs: create, describe, and track prerequisite coursework required for admission. On an individual basis, you can also review an applicant’s Electronic Transcript and mark courses as fulfilling a prerequisite GPA.
The Prerequisite GPAs feature allows you to create a set of prerequisite courses and match them for each applicant. Prerequisite GPAs also become available when working with Lists, Exports, Reports, Scoring, and Email Templates as merge fields.
Gaining Access to This Feature
Creating Prerequisite GPAs
- Using the Menu Bar, open the Management panel, then click Prerequisite GPAs.
- Begin by creating a new Prerequisite GPA category.
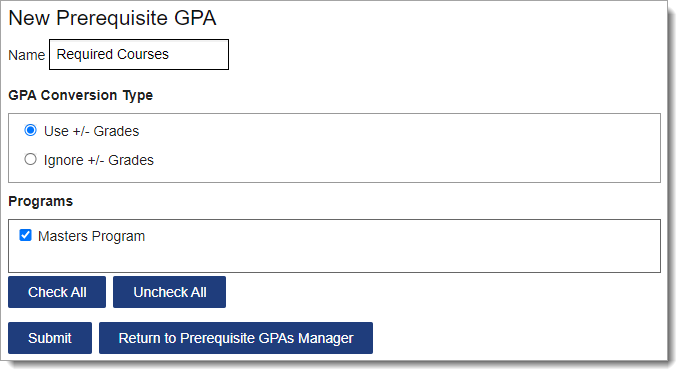
- Click New Prerequisite GPA.
- Enter a name.
- Select whether you are including or ignoring +/- grades. For example, if you select Use +/- Grades, then a B+ is calculated as a 3.33. If you select Ignore +/- Grades, then a B+ is calculated as a 3.00.
- Select the programs associated with this Prerequisite GPA.
- Click Submit to save your template or Return to Prerequisite GPAs Manager to discard your template.
- Once you create a Prerequisite GPA category, then you can add criteria under it.
- Click add criterion.
- Enter a description for the new criterion.
- If desired, enter values for the course's minimum GPA and minimum credits (calculated in semester credits).
- Click Submit to save your criterion or Return to Prerequisite GPAs Manager to discard the criterion.

Working with Prerequisite GPAs
Once Prerequisite GPAs have been created, you can match an applicant's courses to them. Matching and editing prerequisites must be done individually for each applicant. For this reason, we recommend that you use this feature further in your review process, as you can focus on fewer applicants.
Viewing Prerequisite GPAs in the GPA Overview Panel
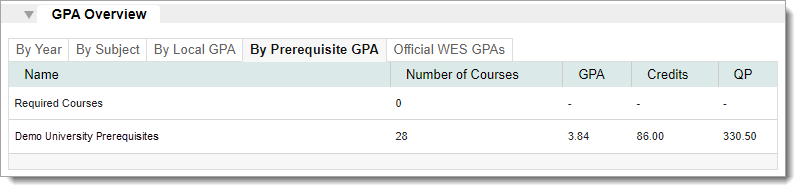
Prerequisite GPAs built in WebAdMIT for AMCAS will initially have a 0.00 calculated GPA, as courses must be matched to the prerequisites first before a GPA is calculated.
- Navigate to the Applicant Details page.
- Go to the GPA Overview panel, By Prerequisite GPA subpanel.
Matching Prerequisites in the Electronic Transcript Panel
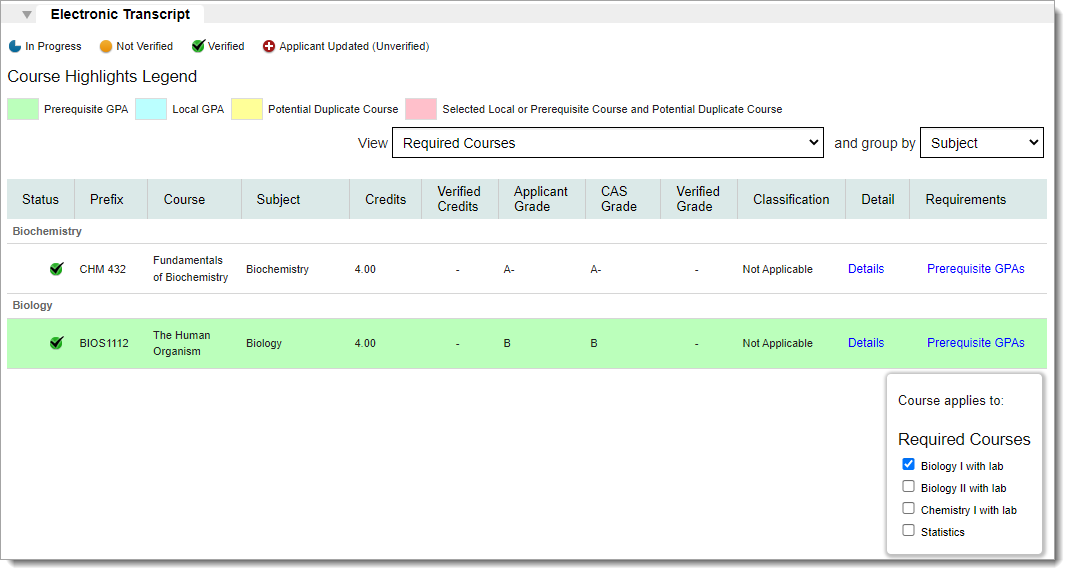
As you match courses to prerequisites, the Prerequisite GPA calculation in the GPA Overview panel automatically updates.
- Navigate to the Applicant Details page.
- Go to the Electronic Transcript panel.
- Select the desired Prerequisite GPA from the View drop-down.
- A Requirements column appears at the end of the table. To add a course to a prerequisite, click the Prerequisite GPAs link and select the applicable prerequisite. The course will then be highlighted in green or pink. If you're linking courses to subject-related prerequisites, we recommend selecting Subject in the group by drop-down to easily find courses.
Reviewing Course Selections in the Prerequisite GPAs Panel
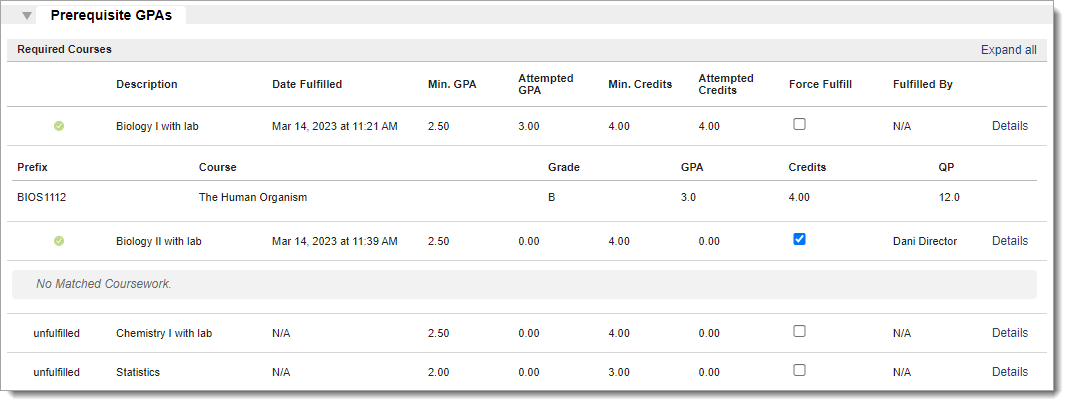
The Prerequisite GPAs panel displays a summary of your prerequisites, whether the applicant has completed the minimum GPA and/or credit requirements, and the applicant's total credits and average GPA used to fulfill each criterion. Note that:
- If an applicant's course meets the prerequisite's minimum GPA and credits, a green checkmark appears in the first column.
- If an applicant's course does not meet the prerequisite's minimum GPA and credits, or no course is matched to the prerequisite, then unfulfilled appears in the first column.
Be aware that all applicant courses are converted to semester credits and prerequisite minimum credit values are semester-based. The standard conversion ratio is 1 quarter credit equals 0.667 semester credits. If an applicant completed a 4-credit course based on a quarter system, their converted credits will be 2.667 semester credits. Some prerequisites may be marked unfulfilled because the converted credit value is less than the minimum credits. In this scenario, you can click the Force Fulfill checkbox to mark the criterion as fulfilled.
- Navigate to the Applicant Details page.
- Go to the Prerequisite GPAs panel.
- Click Details to view an individual prerequisite's matched course information, or click Expand all to view all the prerequisites' matched course information.
- If desired, you can manually fulfill a prerequisite by clicking the Force Fulfill checkbox, and a green checkmark will appear in the first column.
Managing Prerequisite GPAs
To manage existing Prerequisite GPAs, click Prerequisite GPAs from the Menu Bar.

Reordering Prerequisite GPAs
Use the grip icon to drag and drop the Prerequisite GPA category and criteria into the preferred order.
Editing Prerequisite GPAs
Use the pencil icon to edit an existing Prerequisite GPA category and criteria.
Deactivating Prerequisite GPAs
Use the trash icon to deactivate Prerequisite GPA categories and criteria.