Creating an Event
Overview
If your institution holds events that inquiries, applicants, or other associates are invited to attend, you can manage those experiences using the Events feature. With this tool, you can schedule your events, track registration, communicate with registrants, and check registrants in.
Event Types
Before you begin creating events, you'll need to know if the event is online or in-person. Although there are similarities between configuring both types of events, major differences exist between them. EMP has an integration with GoToWebinar to sync online events so they can be managed directly in EMP. Learn how to set up your GoToWebinar integration.
Creating an Event
You can create an event to keep track of any occasions you'd like to manage in the software. There are three steps in creating Events:
- Configuring Event Setup: here, you'll establish what type of event you're creating along with any relevant details, when the event will occur, and who can see and register for the event.
- Configuring Form Settings: here, you'll configure registration confirmation emails and payment gateways.
- Configuring Form Questions: here, you can add customized questions to your event registration form.
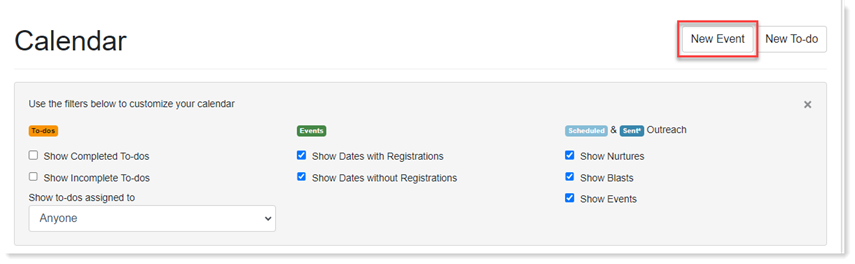
To create a new event, navigate to the Calendar and click New Event to open the event page.
Step 1: Configuring Event Setup
Details
- Complete the event details.
- If you are configuring an online event:
- Check the box confirming this is a webinar event.
- Select the Webinar Organizer. You can add the organizer in EMP Settings. Learn how to configure the GoToWebinar settings in our article.
- Check the box to indicate if the webinar is Simulated Live. If yes:
- Select the webinar recording from the recording asset drop-down menu.
EMP includes rating scores for events, and the defaulted scores appear at the bottom of the page. If you are not using scoring, you can remove the scores.
Date & Times
- Complete the date and time information for the event.
Registration Limits
If you are hosting an event with limited space capacity – for example, a regional Accepted Student Reception – you may want to only allow students to bring a specific number of guests. You can limit the number of guests using the Attendance Limit. Click Separate limits for students and guests to configure the maximum number of registrants and guests. For example, if the event allows for 100 students to bring 2 guests, set the maximum number of students to 100 and the maximum number of guests to 200.
Repeating Events
You might have recurring events such as daily campus tours or weekly informational sessions. These events can be set up to automatically repeat. Under the Event Setup section, click Dates & Times and select the appropriate option from the drop-down menu to designate how often the event should repeat. Complete the date range information. You can edit an already existing event to initiate the reoccurrence, or you can create a new event to have it repeat. Before finalizing and publishing the event, we recommend checking the Calendar for any dates that should be excluded from this repeating pattern. EMP won't recognize when events shouldn't be held due to holidays. To address scheduling conflicts, choose dates to be excluded or updated under Schedule Exceptions.
Event Times
The Time of Event defaults to All Day Event. If your event takes place during a specific time frame, choose Specify Time Slots from the drop-down menu to configure the time of the event.
Publishing Options
Determine when you want your event registration to open and close.
When configuring Who can see this event, make sure to choose a Group from the drop-down menu. If you don't select a group, no filtering will be applied to the event, and all students will have access to the event.
To disable sign-ups for an event, set the through published date to a past date to close registration, or match the Max # of students or guests to the current count.
Step 2: Configuring Form Settings
General
Auto responders are automated communications once a student completes an interaction. You can choose from three types of Auto responders to be sent to students upon the completion of their registration. For example, you can add an Email auto responder that will be sent to students, confirming that their registration has been processed correctly.
SEM Forms
When linking an event to an SEM Form, the form will prioritize information from the event, presenting SEM Form questions only after displaying the event details.
Payments
You have the option to collect a registration fee for an event.
Click Add Payment Item to name the fee and the dollar amount to be collected. If the student must complete the payment to register for the event, check the box next to Required.
If you offer discount or promo codes for the event, click Add Promo Code to add the name and the dollar amount for the code. The promo code can cover the entire cost of the event, or a discounted rate for the event. If you enable a promo code, all students will see the promo code option at the time of payment.
Step 3: Configuring Form Questions
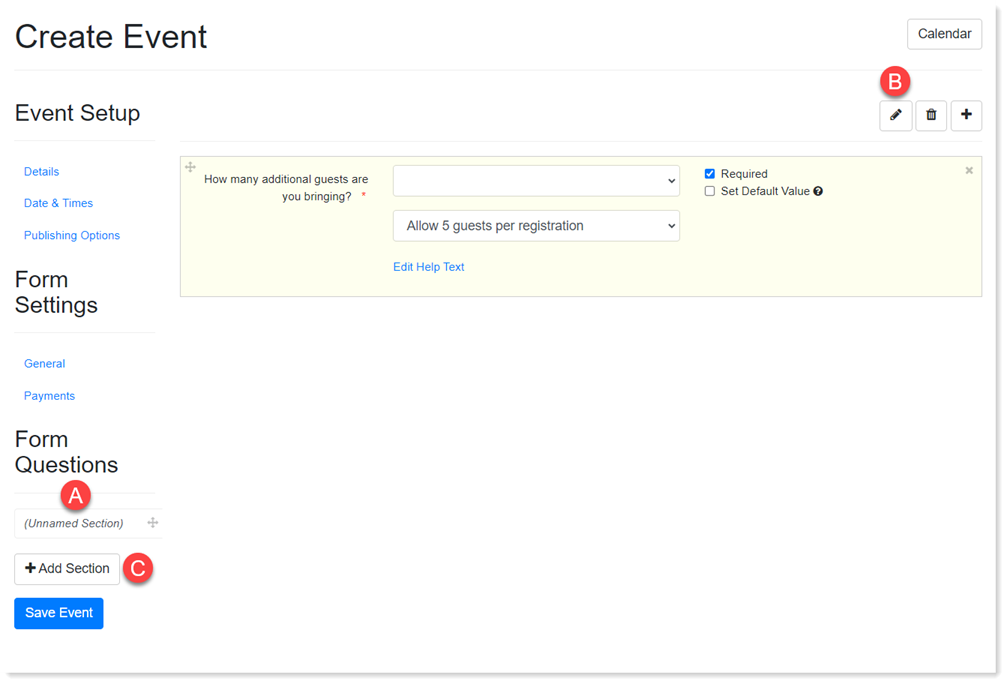
You can add questions to the event registration form to collect supplemental information from the student. Click the plus sign to add questions and the trash can icon to remove questions. By default, the questions are named "Unnamed Section" (A) and thus will not have a section header on the event registration form. If you want to add a section header, click the edit pencil (B) to add a name. Additionally, to create another section for supplemental questions, click Add Section (C) under Form Questions.
Event Actions
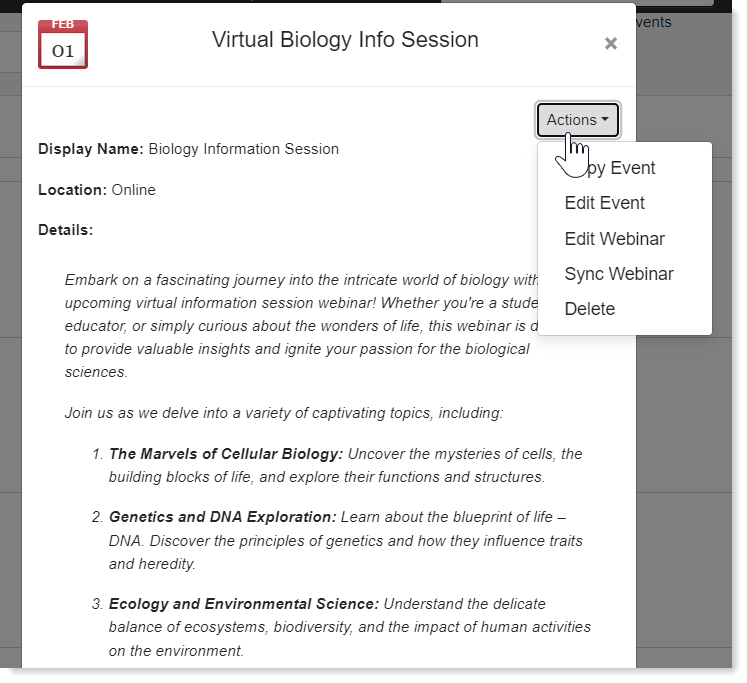
You can make changes to your events and webinars through Event Actions. To access Event Actions:
- Click Calendar in the top navigation bar.
- Click the event, then Actions.
- Click the applicable action from the drop-down menu and the event page appears.
Copying Events
Copying events is an easy way to reproduce similar events. Once the event page appears, edit the Event Details. A duplicated event will always include "copy" at the end of the event name in the event details and carry over the copied event date, time, and publishing options.
If you are copying an online event, you must designate that it is a webinar event in the event details, as well as follow the steps to sync the event with GoToWebinar.
Editing Events
Once the event page appears, make any necessary edits to the event and Save.
Editing and Syncing Online Events
Once the webinar has been created in EMP, all edits and changes to the webinar are managed through GoToWebinar. Clicking Edit Webinar from the Actions drop-down will redirect you to the webinar page in GoToWebinar for you to make any updates.
For EMP to reflect any changes made in GoToWebinar, you need to sync the webinar with EMP. To do this, click Sync Webinar from the Actions drop-down menu. The event will refresh on the Calendar. Click Edit Webinar to review the event, ensuring all changes are reflected correctly in EMP.
After an event has concluded, sync the webinar so the attendance data is accurately reflected in EMP. The registration/attendance data does not automatically update after an event. Failure to sync the webinar after an event will result in the registration data remaining unchanged, as if no one attended the event.
You can also sync webinar attendance individually on the Student Record.
Deleting Events and Webinars
Deleting an event will cause any signups to be deleted, deactivate event-specific emails, remove event-specific triggered To-do's, and remove it from event exports.
When deleting a webinar, you must also delete the webinar in GoToWebinar; deletion in EMP does not automatically remove the event in GoToWebinar.
If you created an Event Campaign, the campaign needs to be deleted separately and will not be automatically deleted if the event is deleted.