Working with Tags
Overview
Tags are labels you can add to applications, providing descriptions or categorizations. Their flexibility allows for various uses, such as organizing applicants, setting reminders, flagging applications, or assigning reviewers.
Adding and Removing Tags
You can add or remove tags as needed. You can apply multiple tags to the same application, and you can add tags to individual applications or to multiple applications at once. After you create tags, they become available for use in other areas of the Program Portal. For example, you can use tags as a condition when creating a segment, or add them to the applications grid for quick viewing.
Adding Tags to Individual Applications
To create a new tag:
- From the full application, open the information panel in the top right.
- Under Tags, click the + icon.
- Select an existing tag or create a new one.
- To create a new tag, type the Tag name in the Search or create tags field, then click Create new tag.
- Click the tag to apply it to the application.

- The new tag is now available to add to other applications.
Adding Tags to Multiple Applications
- On the applications grid, select the applications you want to tag.
- Click Tag.

- Select an existing tag or create a new one.
- To create a new tag, type the Tag name in the Search or create tags field, then click Create new tag.

- Click Apply.
- The new tag is now available to add to other applications.
Removing Tags
To remove tags on an individual application, click the X on the tag.

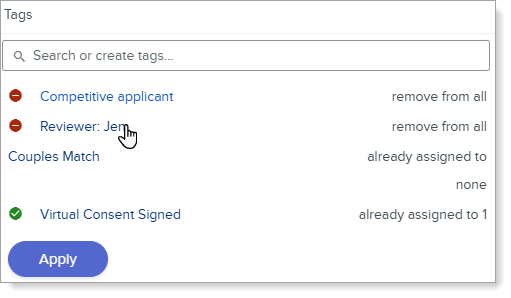
To remove tags on multiple applications:
- On the applications grid, select the applications.
- Click Tag.
- Select the tag – this changes it from green to red.
- Click Apply.
Note: to remove a tag entirely from ResidencyCAS, delete it from all applications and it will no longer appear.
Viewing Tags in the Application Grid
When you click the gear icon to open the Grid Customizer, you're presented with a list of all application fields. To add tags to the grid:
- Type Tag in the search bar.
- In the Available Fields section, click and drag the Tags option located under “Application” to the Shown on Grid section.
- Click Save.

Searching for Applicants with Tags
To find applications with tags, you can search for them in two ways:
- Using the Search Applications function on the applications grid.
- Building a segment.
Using Search Applications
- On the Applications Grid, click the magnifying glass icon to open the Search Applications function.
- Type the tag in the search bar. Applicants with that tag are filtered and displayed on the page.
- Click X in the search bar to clear the search and return to view all applicants.

Building a Segment
- Click Segment to open the segment builder.
- Click Add Criteria, then select Tags.
- From the drop-down menu, select the mode you want to use to build the segment.
- Click the + icon to choose the tags you want to segment by.
- Click Apply.
