Managing TX Forms
Editing a TX Form
You can edit your TX Forms using the Action Menu for the selected form:
- Navigate to TargetX Builder.
- Select the TX Forms icon.
- Choose the form type.
- Choose the Action Menu at the end of the row. This menu includes options to View Published, Edit Draft, Share (if the form is published), Duplicate, Version History, and Responses (if responses have been received).

Note: The Share option is only available for General or Application form types.
Deleting a TX Form
Administrators can delete unpublished forms that don’t have historic versions.
- Navigate to TargetX Builder.
- Select the TX Forms icon.
- Click the General, Events, or Application Form icon to locate the form you want to delete.
- From the list, click the Action Menu and select Delete:

Note: If you don’t see the Delete option, it means the form is either published, has existing versions, or you don’t have the appropriate delete permissions.
Assigning a TX Form to your Event
- Navigate to the Organization Events tab.
- Click on the Event that you wish to assign your form.
- Click Edit.
- Scroll to the TargetX Event Forms section.
- Click on the Search icon [
 ] to search for your form.
 - Click on the Form you wish to assign.
- Save your changes.
Cloning TX Forms
- Navigate to TargetX Builder.
- Select the TX Forms icon.
- Click the General, Events, or Application Form icon to locate the form you want to clone.
- From the list, click the Action Menu and select Duplicate.

- The clone will be named: <Form Name> (copy)
- Make any necessary changes and click Save.
Previewing your TX form
You can Preview your TX form by selecting the Preview icon [] from the Forms list or the form itself. This is an internal preview:
![]()
When an Events TX Form is previewed, the left pane will display a default panel. Event-specific custom questions will NOT be displayed. You can also preview Events TX Forms by using the Event Registration Link.
Validating your TX Form
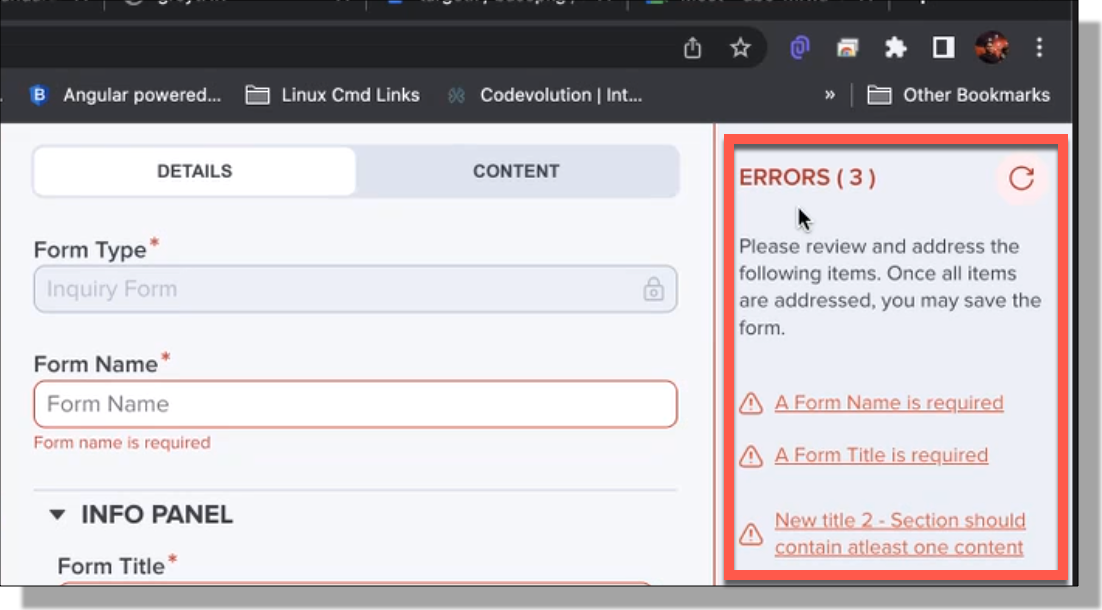
If your form has errors, upon saving, an error panel will display on the right. You will be able to view the number of errors along with a link to the section that needs to be corrected.
For example:
Once you’ve corrected any errors, you can either Refresh the error panel [] or attempt to Save again.
Sharing a TX Form
The Share option is only available for General or Application forms.
- Locate the form you wish to share.
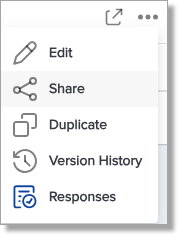
- Click the ellipses, then select Share:

- Select a Site, and the URL will default with an option to Copy. For example, if you have an Inquiry Site, select that Site from the list.
Note: the Public URL information is used to build the URL dynamically and Embed Code Snippet displayed. This information is NOT saved along with your form.
-
The Embed Code Snippet is automatically generated. If you want to embed the form on your website, please share this code with the appropriate team. Please note that using the Embed Code Snippet will not include the left panel.
Changing a TX Form type
You can change the Type of TX Form from General to Events or vice versa.
- Navigate to TargetX Builder.
- Select the TX Forms icon.
- Click the General, Events, or Application Form icon to locate the form you want to change.
- Select to Edit the form.
- Change the Form Type radio button to the new type.
- Save your changes.
Note: When altering the Form Type, it is crucial to note that any information specific to one form type but not applicable to the other will not be retained. For instance, if you transition from a General type to an Event type form, the Logo URL and Poster URL will be lost in the process.
Customizing record matching in TX Forms
By default, TX Forms matches First Name, Last Name, and Email. TX Forms can be configured to include additional matching on the Question widget when creating General or Events TX Forms. When adding fields, select the toggle for Use for Matching to include the field in Contact Matching.
The matching logic works as follows:
- First Name, Last Name, and Email will default to ON for Use for Matching.
- When Use for Matching fields match exactly, that record is used as a record to update instead of creating a new record.
- A new record will be created if no fields are included for Use For Matching.
- If any matching fields are left blank, the field is dropped from consideration and only the remaining Use For Matching fields are considered.
- If more than one record matches, the record with the most recently created date will be updated.
- For Contact child records, the record must be related to the Contact record to match.
- If a new Contact gets created, all related child records will also be new.
- If a Contact record matches an existing record, the system will check Child records for matching fields before creating a new child record.
- Matching is not case-sensitive.
