Testing Email
Creating an Email Test list
Use the steps below to create a test list for an email campaign:
- Select the "Email" application from the application picker in the top right corner.
- Click on the Campaign Builder tab.
- Select the Recipients icon.

- Click the + in the top right corner and select Add Test List.
- Enter a Name and a Description.
- Select the Members tab.
- In the 'New Members' section, enter the member's contact information. For multiple records, separate the values with a semicolon.
- Click Add Members.
- Click Save.
Testing a Broadcast Email
Notes:
- Test & Preview ONLY works for emails that can be sent through a Campaign.
- Test emails containing merge fields on objects NOT directly related to Contacts or Leads may not be sent.
- Select the Email application from the application picker in the top right corner.
- Click the Campaign Builder tab.
- Set up your email Campaign as described in Creating a new Email Campaign.
- On the Schedule window, select the Preview & Test button.
- If your campaign includes Conditional Content, select the appropriate Section to preview either Default content or your Conditional Content:

Notes:
- Conditional Content only works with the default or conditions built on the Contact object. Testing Conditional Content on objects like Application or other related objects requires a Campaign.
- When previewing an email template that does not have a plain text version, a plain text version will be created at the time of Preview. But it will not send a plain text version test message until you save the template with the plain text version available.
- When making changes to a template, you must first Save the changes and then send the test message. If you do not save the changes first, you will receive the last saved version in the test message sent, not what you currently see in the Preview.
- When using the Image Gallery Widget, you must fill out the first image fields to display the 2nd-4th images.
- Test your Email by selecting the Test panel on the right, selecting Recipients (Test list), adding any additional recipients by entering the email address, or choosing a Test Record. The test record (Contact) selected cannot be opted out or bounced and must have a valid email address. If they do not meet these criteria, fields will not be populated.
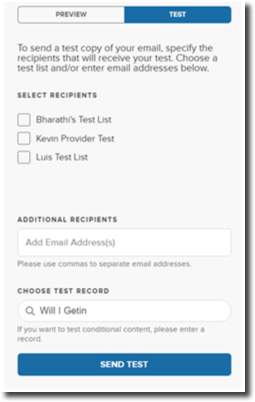
- After entering an email address or selecting your Test list(s), click Send Test. You must SAVE your Template before you can send a Test email.
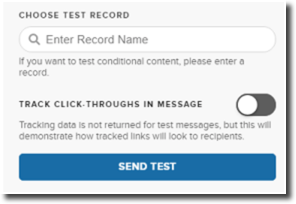
- Choose whether you want to Track Click-Throughs In Message:
- The recipient(s) of the test message will receive both an HTML and a plain text version (if both have been created).
Notes:
- Tracking data is not returned for test messages, but this setting will demonstrate how tracked links will look to recipients.
- The parameters in tracked links for test messages will not match the format used in Live broadcast sends.
- The initial Tracked URL will match the format used in Live sends.
- Preview of HTML emails will not show all fonts and line breaks accurately when viewed in Firefox.
- Choose Test Record allows users to select a Contact.
- You cannot have Contact and Lead merge fields in the same email template for testing. It causes a failed test message send. This is expected since Leads and Contacts should not have the same merge fields in the same templates.
- The Preview will choose a random record if a student has multiple records for a child object.
Testing emails in a sandbox instance
Email installation links can be used in a sandbox if you change "login" in the URL to."test". For example, if the URL begins with "https://login.salesforce.com," you'd change it to "https://test.salesforce.com". The password remains the same.
*CAUTION*
Enabling email in a full or partial sandbox can lead to data integrity issues. As a result, we cannot configure email in a Full or Partial sandbox. Email may be enabled in a Developer sandbox only.
For example, refreshing the Sandbox will bring down broadcast records to the Sandbox. The sandbox Broadcast and the production Broadcast with the same ID would be sent to our email servers for delivery. When this happens, the first received ID is considered the master of the two, leading to the possibility that emails will send from the sandbox and not your production CRM. The email server cannot distinguish between these duplicate broadcast IDs and won't send both.
If you are installing email in a sandbox for the first time, you must open a case with the Client Services Team so the features can be enabled for your institution. You must also configure the following in your sandbox:
IMPORTANT
When Email Deliverability is turned on, any automated email alerts in processes, Flows, or custom triggers could trigger emails to the student records in your sandbox environment.
TargetX recommends that you deactivate any Flows or processes while testing emails in sandbox OR Create an Informatica process that updates email addresses for all existing contacts in the system after a refresh. This will ensure that only test records created in the sandbox will have valid email addresses, and students won't accidentally get emails.
When opening a case, please feel free to use the following template for the request:
Please enable email for use in my sandbox instance. The name of the sandbox is <<INSERT NAME>>, and the org ID is <<INSERT ORG ID>>.
Once the email package is installed and configured for your sandbox instance, you can create email templates and campaigns and send live and test messages.
Note: Should you refresh a sandbox with email installed, you must notify the Client Services Team if you intend to send emails from the sandbox. Refreshing a sandbox changes the password and token for all users, so the Client Services Team must update the credentials on file for our user after the refresh.
When opening a case, please feel free to use the following template for the request:
We have refreshed the <<NAME OF SANDBOX>> that we use for testing emails. Please update your server's credentials to allow emails to be sent from this sandbox after the refresh.
Since email can only be tested in a Developer sandbox, your Email Preferences are not cloned from production in a sandbox creation/refresh. You must save your Email Preferences in the sandbox before attempting to send test messages or schedule broadcasts. For details on configuring Email Preferences, review the article: How to Configure Email Preferences.