Configuring CAPTCHA
Configuring CAPTCHA for the Online Application
CAPTCHA was introduced in the 1902.x version of Communities. If you are on version of 1902.x or higher, follow the steps below. If you are on a Communities version PRIOR to 1902.x, follow the steps outlined in February '19 Communities Upgrade. To disable CAPTCHA in versions 1902.x or higher, follow the steps outlined below in Disabling CAPTCHA in the Online Application.
Notes:
- You MUST complete the steps in a sandbox environment before pushing to production via an Outbound Change Set.
- When a Sandbox is refreshed, you need to register your Sandbox site with Captcha, i.e., your Captcha keys have to be reset.
Step 1: Update the TX_CommunitiesSelfReg visualforce page
The code is available in the TX_CommunitiesSelfReg page, and you will need to uncomment the code for it to be available:
- Navigate to Setup and search for Visualforce Pages.
- Select the TX_CommunitiesSelfReg page and click Edit.
- Search for the comments of reCaptcha:
- The first one is an html comment, simply remove the <!-- and --> surrounding the line.
- The second one is javascript comment surrounded by /* and */, remove those.
- Save your changes.
Step 2: Update the TX_CommunitiesSelfRegController apex class
The code is available in the TX_CommunitiesSelfRegController apex class, and you will need to uncomment the code for it to be available:
- Navigate to Setup and search for Apex Classes.
- Select the TX_CommunitiesSelfRegController apex class and click Edit.
- Search for isCaptchaEnabled = true; (around line 28)
- Remove the comment tag: //
- Save your changes.
Step 3: Register for CAPTCHA keys
- Navigate to: https://www.google.com/recaptcha/intro/v3.html
- Click Admin Console.
- Click the + to Register a New Site.
- Enter a Label.
- Select reCAPTCHA v2.
- Select the “I’m not a robot” Checkbox option.
- Add your Domain (this is your Site URL) WITHOUT the http:// portion:
Example: targetxuniversity.my.site.com
Note: Do NOT include anything AFTER the Base URL, such as /portal or /app
- Add additional Owners by entering the appropriate Email address.
- Click Accept the reCAPTCHA Terms of Service Field.
- Click Submit.
- You will then see your Site Key and Secret Key. COPY these values for the next step.
Step 4: Enter Keys into CAPTCHA Setup 
- Note your Salesforce URL up to the force.com.
Examples: https://na10.salesforce.com OR https://myenhanceddomain.lightning.force.com
- Append /apex/TargetX_Base__CaptchaSetup to the URL.
Examples: https://na10.salesforce.com/apex/TargetX_Base__CaptchaSetup OR https://myenhanceddomain.lightning.force.com/apex/TargetX_Base__CaptchaSetup
- Paste in your Site Key and Secret Key from the previous step.
- Click Save Keys.
Note: The CAPTCHA Setup page will NOT display your old values to keep them locked down. Save will overwrite your old values with the new ones.
Step 5: Deploy your Change Set
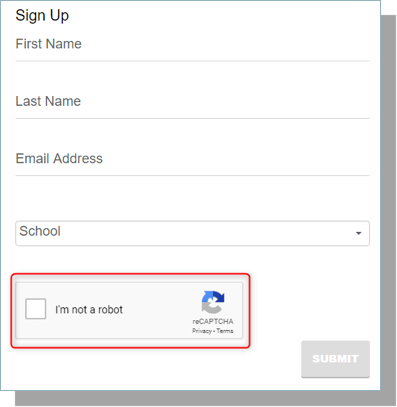
Once complete, users will see the ReCaptcha checkbox when signing up for your Online Application Community:

Step 6: Enter Keys into CAPTCHA Setup in PRODUCTION 
Once you have deployed your Change Set in Production, you must enter your Site & Secret Keys specific to production.
- Login to your production org.
- Note your Salesforce URL up to the salesforce.com. Example: https://na10.salesforce.com
- Append /apex/TargetX_Base__CaptchaSetup to the URL. Example: https://na10.salesforce.com/apex/TargetX_Base__CaptchaSetup
- Paste in your Site Key and Secret Key from the previous step.
- Click Save Keys.
Note: The CAPTCHA Setup page will NOT display your old values to keep them locked down. Save will overwrite your old values with the new ones.
Disabling CAPTCHA in the Online Application
You MUST complete the steps in a sandbox environment before pushing to production via an Outbound Change Set.
The code for CAPTCHA is available in the TX_CommunitiesSelfReg page, and you will need to comment out the code you previously changed to disable CAPTCHA.
Step 1: Update TX_CommunitiesSelfReg Visualforce Page
- Navigate to Setup and search for Visualforce Pages.
- Select the TX_CommunitiesSelfReg page and click Edit.
- Locate the line:
<TargetX_Base:Captcha callback="callback"/>
- Comment out the line by adding <!-- at the beginning and --> at the end:
<!-- <TargetX_Base:Captcha callback="callback"/> -->
- Locate the line:
<apex:commandButton action="{!registerUser}" styleClass="targetx-button" value="{!$Label.site.submit}" id="submit"/>
- Comment out the line by changing it to:
/* <apex:commandLink action="{!registerUser}" styleClass="targetx-button" value="{!$Label.site.submit}" id="submit"/>*/
- LOCATE the STYLE tag and Comment it out the line by adding <!-- at the beginning and --> at the end:
<!-- <style>
    input[disabled], input[disabled]:hover {
      background-color: #ddd;
      box-shadow: 0 2px 0 #bbb;
    }
  </style> -->
- LOCATE the Script tag and Comment it out the line by adding <!-- at the beginning and --> at the end:
<!-- $("input[id$=submit]").prop('disabled', true);
function callback() {
  $("input[id$=submit]").prop('disabled', false);
} -->
-
Save your changes.
Step 2: Update the TX_CommunitiesSelfRegController apex class
There is additional code is available in the TX_CommunitiesSelfRegController apex class, and you will need to update the isCaptchaEnabled value:
- Navigate to Setup and search for Apex Classes.
- Select the TX_CommunitiesSelfRegController apex class and click Edit.
- Search for isCaptchaEnabled = true; (around line 28)
- Update isCaptchaEnabled to false.
- Save your changes.
Auditing CAPTCHA code for the Online Application
If you have determined during a Communities upgrade that pieces of code related to Captcha are not appearing, follow these instructions to verify/update the CAPTCHA-related Communities code.
Notes:
Timeline of changes/updates for Captcha:
- February ‘19 - initial release
- December ‘19 - code changes for defect fix CL-647
- April ‘20 - code changes for defect fix CL-811
Compare YOUR code for the following components with the most current code (linked below). Click to Download the file.:
- TX_CommunitiesSelfReg Visualforce Page
- TX_CommunitiesSelfRegController Apex Class
Use an online tool like Text-Compare! to compare YOUR code against the latest version.
Note: Keep in mind that you may see differences if your institution has added customizations.
If you are missing any code other than customizations, you can replace it with the above files and then add your customizations back.
