Working with Application Snapshots
Enabling Auto-Generated Application Snapshots
The Application PDF snapshot feature is enabled by updating a custom setting, scheduling the automation, and configuring a remote setting to allow access to the TargetX PDF generation service.
Step 1: Configure Access to TargetX Servers
To allow your CRM to connect to the TargetX PDF generation service:
- Create a Remote Site Setting:
- Navigate to Setup and search for Remote Site Settings.
- Select the New Remote Site button
- For Remote Site Name enter any name you wish, such as: PDF_Oauth
- For Remote Site URL enter:
https://login.salesforce.com/services/oauth2/token
- Save your changes.
Note: Upon saving, the URL will change to https://login.salesforce.com.
Notes about Remote Site Settings:
- In Sandboxes, Remote Site settings will need to be recreated after a sandbox refresh.
- If Remote Site Settings are incorrect or missing, users will receive an error about an Unauthorized endpoint.
- Create a Named Credential (US clients only)
Note: You must create a NEW Named Credential, even if you have an existing version in your Org.
- Navigate to Setup and search for Named Credentials.
- Click the arrow next to the New button and select New Legacy.
- For Label, enter: TargetX_URL_to_PDF
- For the Url enter:
https://targetx-print-url-to-pdf.herokuapp.com
- The remaining options will default.
- Save your changes.
- Create a Named Credential (EU clients only)
- Navigate to Setup and search for Named Credentials.
- Click on New Named Credential button.
- For Label, enter: TargetX URL to PDF EU Production
- For the Url enter:
https://targetx-url-to-pdf-eu.herokuapp.com/
- The remaining options will default.
- Save your changes.
Step 2: Enable Custom Setting
After you’ve logged into your Org, add /apex/TargetX_App__Settings to the URL:
https://mysalesforceorg.com/apex/TargetX_App__Settings
This will display the following Settings page:
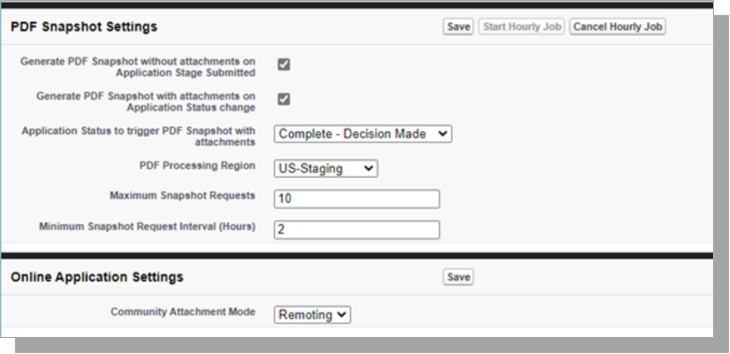
The custom setting enables a trigger on the Application object:
- To generate a PDF that excludes attachments: choose "Generate PDF Snapshot without attachments on Application Stage Submitted". The PDF of the snapshot without attachments will be generated when:
- The application.json snapshot file exists on the Application record.
- The Application Stage equals "Submitted" and
- A PDF of the snapshot has not already attached to the record.
- To generate a PDF that includes attachments when the Application Status changes: choose "Generate PDF Snapshot with attachments on Application Status change" and select the status that will trigger the PDF creation on "Application Status to trigger PDF Snapshot with attachments"
Select the PDF Processing Region:
This option determines which server is used when processing PDFs. Select the appropriate region for your institution.
- US-Production - for U.S. clients
- EU-Production - for EU client
Maximum Snapshot Requests defines the maximum number of times to request the generation of an Application Snapshot PDF. If this is left blank or set to 0, there will be no limit to the number of requests. Default Value = 5. *DO NOT UPDATE this value unless instructed to do so by TargetX Support.*
Minimum Snapshot Request Interval (Hours) defines the amount of time to wait (in hours) before sending another request for an Application Snapshot PDF. If left blank, or set to 0, a request will be sent every time the job runs if no Snapshot PDF exists. Default Value = 2. *DO NOT UPDATE this value unless instructed to do so by TargetX Support.*
The pdf will be available under Notes & Attachments and will be named ApplicationSnapshot.pdf or ApplicationSnapshotWithAttachments.pdf.
Note: The Application PDF Snapshot feature is compatible with the TargetX Online Application only. Application records MUST have an associated Application Form for the PDF snapshot to be attached.
Step 3: Schedule Automation
Note: For the application snapshot Service to connect to your org, the user scheduling the job needs to be set up with one of the Salesforce-supported verification methods for multi-factor authentication. For details, see the Salesforce Help & Training article Verification Methods for Multi-Factor Authentication.
The PDF snapshot is generated using a scheduled job; select Start Hourly Job on the custom settings screen to begin the job. The creation of the PDF snapshot runs hourly, so you may notice a slight delay in the pdf creation.
- Select which option to generate (with or without attachments).
- Select the PDF Processing Region.
- Save.
- Click Start Hourly Job.
Notes:
- The PDF will not re-generate if an application snapshot PDF exists on the record.
- The Apex job creates the Snapshot for the oldest application available.
- If you are implementing Application Snapshot for the first time in a production environment in which a large number of submitted applications already exist you may want to prioritize which applications get snapshots first or exclude applications altogether:
- You can exclude applications from the apex job that meet the app snapshot creation criteria by setting the Snapshot Requests field value (in the Application record) to your Maximum Snapshot Requests, which is set in the PDF Snapshot Settings, for those respective application records you would like excluded. If you have questions or need further assistance please contact TargetX Support.
- You may encounter errors the first time you enable snapshots as the system runs through all your records. Any failed records will be re-attempted, up to five times, after a two-hour interval. If you continue to receive errors after 24 hours, please contact TargetX Support.
Viewing a snapshot or PDF of a submitted online application
Because applicant data is dynamic, data originally submitted by an applicant may change over time via imports and/or staff member updates. Users can access a snapshot of the original submission in order to view the original data if any question related to the original submission occurs.
When a student clicks submit, an application.json attachment file of application data saved at the point of submission is created and stored on the Application object.
Users can select the View Submitted App button on the application to view a print preview of an application. If the application has not been submitted, you will receive an error.
If desired, a PDF of the snapshot can be generated and attached to the application record. The PDF can be configured to either include or exclude any attachments that were included at the point of submission.
- To exclude attachments, Choose "Generate PDF Snapshot without attachments on Application Stage Submitted." The PDF of the snapshot without attachments will be generated when:
- The application.json snapshot file exists on the Application record.
- The Application Stage equals "Submitted," and
- A PDF of the snapshot has not already been attached to the record.
- To include attachments: Choose "Generate PDF Snapshot with attachments on Application Status change" and select the status that will trigger the PDF creation on "Application Status to trigger PDF Snapshot with attachments. "
- Select the PDF Processing Region; this option determines which server is used when processing PDFs. Select the appropriate region for your institution.
- US-Production - for US clients
- EU-Production - for EU client
The pdf will be available under Notes & Attachments and named ApplicationSnapshot.pdf (no attachments) and ApplicationSnapshotWithAttachments.pdf (with attachments).
Note: The Application Snapshot feature is only compatible with the TargetX Online Application. Application records MUST have an associated Application Form for the snapshot to be attached and viewed.
To enable this functionality, please see Enabling Auto-Generated Application Snapshots.
Viewing a submitted Application
Once an application has been submitted, you can use the View Submitted App from the Application tab. You can add the View Submitted App button to your page layout using these steps:
- Navigate to Setup and select Object Manager.
- Click on the Application object.
- Click Page Layouts, then the Application Layout.
- In the Page Layout palette, click the Buttons option.
- Drag the View Submitted App button into the Custom Buttons section:
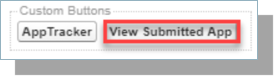
- Save your changes.