Working with Decision Letters and Reply to Offer
Understanding how Decision Letters and Reply to Offer work
The applicant will have the option to Accept or Decline the offer. If you do NOT want an applicant’s decision to display, uncheck the Show Reply to Offer and Accept Enrollment Deposit fields. You can also create a ‘generic’ Decision Letter which states that a decision has been mailed to the applicant.
The decision letter displayed to applicants is configured using the Visualforce page “decisionLetter” which is included in the Communities package.

Visualforce is the component-based user interface framework for the Force.com platform which includes a tag-based markup language, similar to HTML. Like HTML, Visualforce pages allow for numerous customizations.
The components relevant to customizing the decision letter display are:
Note: The decisionLetter Visualforce page includes sample text with comments to get you started.
Visualforce Resources
For information on Visualforce, see the Salesforce Help & Training articles Defining Visualforce Pages and An Introduction to Visualforce.
Conditional Display
To conditionally display content within the decision letter, use the <apex:outputPanel> tag with the rendered attribute. For example, to display the text of a letter for applicants with Application Status = Accepted, surround the content of the letter with the following tags:
<apex:outputPanel rendered="{!TargetX_SRMb__Application__c.TargetX_SRMb__Application_Decision__c == 'Accepted'}">
CONDITIONALLY DISPLAY TEXT
</apex:outputPanel>
Notes:
- You must use the API name of the field within the <apex:outputPanel> tag.
- The standard controller associated with the decisionLetter Visualforce page is for the Application object. All fields must therefore include the Application API Name (TargetX_SRMb__Application__c). For fields on Contact, use {!TargetX_SRMb__Application__c.TargetX_SRMb__Contact__r.FIELDNAME}.
For multiple conditions, include a double ampersand (&&) between each condition. For example, to display the text of a letter for applicants with Application Status = Accepted AND Level = Undergraduate, surround the content of the letter with the following tags:
<apex:outputPanel rendered="{!TargetX_SRMb__Application__c.TargetX_SRMb__Application_Decision__c == ‘Accepted’ && {!TargetX_SRMb__Application__c.TargetX_SRMb__Level__c == ‘Undergraduate'}">

CONDITIONALLY DISPLAY TEXT
</apex:outputPanel>

For an OR condition, use the following syntax:
<apex:outputPanel rendered="{!OR(CONDITION1, CONDITION2)}">

CONDITIONALLY DISPLAYED TEXT
</apex:outputPanel>
For example, if you want to display the same text for applicants with an “Accepted” decision or a “Accepted Conditionally” decision, use the following syntax:
<apex:outputPanel rendered="{!OR(TargetX_SRMb__Application__c.TargetX_SRMb__Application_Decision__c == 'Accepted', TargetX_SRMb__Application__c.TargetX_SRMb__Application_Decision__c == ‘Accepted Conditionally')}">
For more information on <apex:outputPanel>, please see the Salesforce Help & Training article apex:outputPanel.
Merge Fields
To include merge fields within your Visualforce page, use the following syntax:
{!TargetX_SRMb__Application__c.FIELD_API_NAME}
Merge Examples
- To include a merge field for the field Program, use the following syntax:
{!TargetX_SRMb__Application__c.TargetX_SRMb__Program__c}
- To include a field on Contact, use the following syntax:
{!TargetX_SRMb__Application__c.TargetX_SRMb__Contact__r.FIELDNAME}
- To include a merge field for the field “First Name”, include the following:
{!TargetX_SRMb__Application__c.TargetX_SRMb__Contact__r.FirstName}
Images
To include an image within your letter (such as a header image or signature), use the following syntax, where IMAGE_NAME is replaced with the name of your image:
<img src="{!$resource.IMAGE_NAME}" />

Note: The image must be stored as a Static Resource (Setup > Develop > Static Resources).
URLs
To include a link within the text of your letter, use the following syntax, where URL is replaced with the full web address (e.g., http://targetx.com/) along with any text you want displayed for the link replacing Displayed Text for link:
<a href=“URL" target="_blank”>DISPLAYED TEXT FOR LINK</a>
Enabling Reply to Offer and Enrollment Deposits
Decision Letters, Reply to Offer, and Enrollment Deposits are features that build upon each other:
- You can have Decision Letters configured.
- or You can have Decision letters and Reply to Offer configured.
- or You can have Decision letters, Reply to Offer, and Enrollment Deposits configured.
Step 1: Configure Decision Letters
Configure your Decision Letters as outlined here.
Step 2: Enable 'Reply to Offer' 
These steps outline how to manually update a single Application record to display Reply to Offer.
- Navigate to the Application tab.
- Click the Application you wish to update.
Note: Applications MUST have an associated Application Process populated on the Application record.
- Update the following:
- Application Stage = Submitted
- Application Status = Complete - Decision Made
- Application Decision = [Any Decision Values you are using]
- Show Reply to Offer = Checked
- Decision Publish Date/Time = <Date/Time Before Today>
- Save your changes.
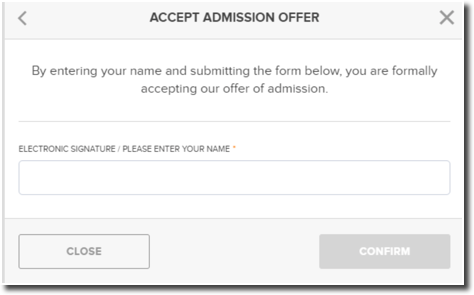
When a Student clicks View Your Decision, then Reply to Offer, the Reply to Offer option displays:

If Accept Enrollment Deposit is unchecked, the Accept Offer option displays as:
Step 3: Enable Enrollment Deposits
Item 1: Configure Enrollment Deposits
Follow the article Configuring Enrollment Deposits for detailed steps on updating your Page Layouts, Application Forms, and associated Triggers for Enrollment Deposits.
Item 2: Enable Enrollment Deposits
These steps outline how to update a single Application record to display the Enrollment Deposit when a student chooses Reply to Offer.
- Navigate to the Application tab.
- Click the Application you wish to update.
Note: Applications MUST have an associated Application Process populated on the Application record.
- Update the following:
- Application Stage = Submitted
- Application Status = Complete - Decision Made
- Application Decision = [Any Decision Values you are using]
- Show Reply to Offer = checked
- Decision Publish Date/Time = <Date/Time Before Now>
- Accept Enrollment Deposit = checke
- Save your changes.
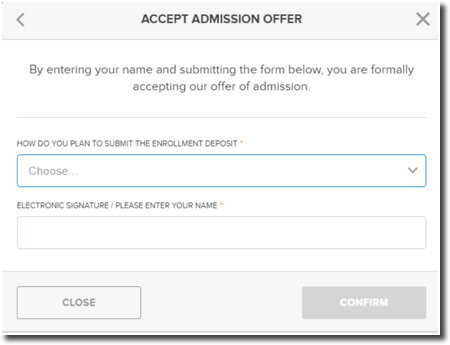
When the Accept Enrollment Deposit checkbox is checked, and the Student chooses to Accept the Reply to Offer, they are then prompted to submit an Enrollment Deposit.
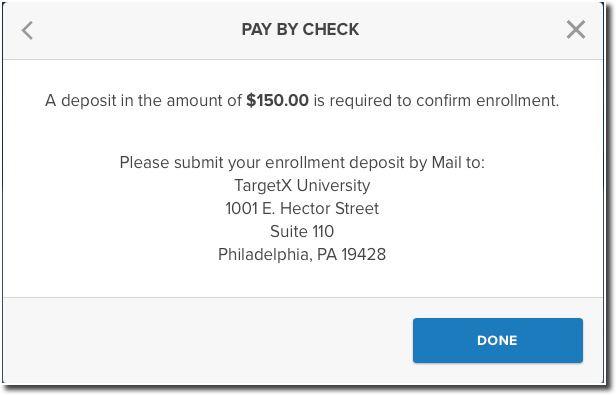
- You can disable Mail-in Payments for Enrollment Deposits by unchecking the Allow Deposit Mail-In Payment field in the associated Application Forms.
- If you enabled Mail-in Payments for Enrollment Deposits, you can customize the Pay by Mail message by completing the Enrollment Deposit Pay by Mail Text. This will display when the student selects the Pay by Mail option:
For details on the process once a student responds to an offer, see Understanding what happens when Applicants respond to Enrollment Offers.
Configuring Decision Letters
To configure your Decision Letters you will need to add a CSS file to Static Resources and then copy the Visualforce below into the "decisionLetter" Visualforce page.
Step 1: Download the CSS file
Copy the CSS file below, DecisionLetter.css
DecisionLetter.css
/*------------------------------------*\
   DOC-REVIEW
\*------------------------------------*/
/**
*
* @block doc-review
*/
.doc-preview {
  /* Display and box model */
  -webkit-box-flex: 1;
  -webkit-flex: 1;
      -ms-flex: 1;
          flex: 1;
  display: -webkit-box;
  display: -webkit-flex;
  display: -ms-flexbox;
  display: flex;
  -webkit-box-orient: vertical;
  -webkit-box-direction: normal;
  -webkit-flex-direction: column;
      -ms-flex-direction: column;
          flex-direction: column;
  margin: 1.875rem;
  margin-top: 0;

}
.doc-preview__content {
  /* Display and box model */
  display: -webkit-box;
  display: -webkit-flex;
  display: -ms-flexbox;
  display: flex;
  -webkit-box-align: center;
  -webkit-align-items: center;
      -ms-flex-align: center;
          align-items: center;
  -webkit-box-pack: center;
  -webkit-justify-content: center;
      -ms-flex-pack: center;
          justify-content: center;
  height: 21.875rem;
  min-width: 15.625rem;
  margin: 0 auto;
  /* Appearance */
  border: solid 1px #D5D5D5;
  border-radius: 0.1875rem;
}
.doc-preview__letter {
  /* Display and box model */
  padding: 2.5rem;
}
.doc-preview__block {
  /* Display and box model */
  margin-bottom: 1.25rem;
}
.doc-preview__header {
  /* Display and box model */
  margin-bottom: 2.5rem;
}
.doc-preview__footer {
  /* Display and box model */
  margin-top: 1.25rem;
  max-width: 20rem;
}
.doc-preview__footer--pad-top {
  /* Display and box model */
  margin-top: 2.5rem;
}
.doc-preview__footer--no-margin {
  /* Display and box model */
  margin: 0;
}
.doc-preview__title {
  /* Appearance */
  font-family: 'proxima-nova-bold', Helvetica, Arial, San-serif;
  font-weight: normal;
  text-transform: uppercase;
}
.doc-preview__logo {
  /* Display and box model */
  margin: 0 auto;
  max-width: 100%;
  text-align: center;
}
.doc-preview__copy {
  /* Appearance */
  font-size: 0.9375rem;
  line-height: 1.4em;
}
.doc-preview__copy--style--bold {
  /* Appearance */
  font-family: 'proxima-nova-semibold', Helvetica, Arial, San-serif;
  font-weight: normal;
}
.doc-preview__container {
  /* Display and box model */
  display: block;
  max-width: 50rem;
  margin: 1.875rem auto;
  /* Appearance */
  border: solid 1px #F7F7F7;
  box-shadow: 0 0 3px rgba(0, 0, 0, 0.25);
}
.doc-preview__sig {
  /* Display and box model */
  max-width: 200px;
}
@media (min-width: 1025px) {
  .doc-preview {
    /* Display and box model */
    margin-top: 1.875rem;
    max-width: 20rem;
  }
}
@media (print) {
  h1.accessibility-hidden {
    /* Display and box model */
    display:none;
  }
}
Step 2: Create a new Static Resource for the file created in Step 1
- Navigate to Setup > Develop > Static Resources.
- Select New.
- Choose File: Select the CSS file you downloaded in Step 1.
- Name the file - decisionLetter.
- Set the Static Resource to Public.
- Save.
Step 3: Add a banner image for the decision letter to Static Resources
- Navigate to Setup > Develop > Static Resources.
- Select New.
- Choose the image file you wish to upload.
- Set the Static Resource to Public.
- Save.
Step 4: Add a signature image for the decision letter to Static Resources
- Navigate to Setup > Develop > Static Resources.
- Select New.
- Choose the image file you wish to upload.
- Set the Static Resource to Public.
- Save.
Step 5: Add new Visualforce page and customize
- Navigate to Setup > Develop > Visualforce Pages.
- Create a new Visualforce page named “decisionLetter” and copy the template below into the page.
- Update the image names in the document to match the names for the uploaded files in steps 3 and 4 in order to save the Visualforce page.
- To replace the Banner image name, search for:
{!$resource.TargetX_University_Logo}
And replace TargetX_University_Logo with your Banner Image name.
- To replace the Signature image name, search for:
{!$resource.ElvisPresleySignature}
And replace the ElvisPresleySignature with your Signature Image name.
Note: Signature logo optimal height is 75px.
- Configure the new Visualforce Page to match your institution’s needs; using Decision Letter Visualforce Template as a reference.
Note: Using the provided CSS, the maximum width for the letter is 720px so images wider than this will automatically be resized to 720px.
Step 6: Add new Visualforce page to Online Application User Profile
- Navigate to Setup > Manage Users > Profiles > Online Application User Profile.
Note: this will be a custom profile and may have a different name from Implementation. E.g. Community User, Customer Community User, Community User Login
- Select Edit.
- Navigate to Visualforce Page Access.
- Select “decisionLetter” from left hand side and use right arrow to ADD to righthand, “Enabled Visualforce Pages” side.
- Save your changes.
Note: When adding merge fields to your Decision Letter, make sure you update the Online Application profile that is associated to Students and grant Read access to all fields being used in the Decision Letter.
Decision Letter Visualforce Template
<apex:page standardcontroller="TargetX_SRMB__Application__c"
    showHeader="false" applyHtmlTag="false" applyBodyTag="false"
    standardStylesheets="false" docType="html-5.0" >

    <head>
        <link class="user" href="{!$Resource.targetx_portal__pbResources}/app/css/main.css" rel="stylesheet" type="text/css" />
    </head>

    <apex:variable var="app" value="{!TargetX_SRMB__Application__c}" />
    <apex:variable var="decision"
        value="{!TargetX_SRMB__Application__c.TargetX_SRMb__Application_Decision__c}" />

    <article class = "doc-preview__letter txpage"><br/>

    <!-- UPLOAD IMAGE.  Upload banner image to "Static Resources" (Setup > Develop > Static Resources); replace "TargetX_University_Logo" below with Static Resource "Name" -->

        <apex:image
            styleClass="txcenterimg" url="{!$Resource.TargetX_University_Logo}" /><br/><br/>

        <!-- MERGE FIELDS.  To merge a field from the CRM, use the syntax the following syntax (replace "FIELD_API_NAME" with the merge field's API name): -->
        <!-- Fields on Contact:  {!app.TargetX_SRMb__Contact__r.FIELD_API_NAME} -->
        <!-- Fields on Application:  {!app.FIELD_API_NAME}  -->


        <apex:outputText value="{0, date, MMMM d','  yyyy}">
            <apex:param value="{!app.TargetX_SRMb__Decision_Publish_Date_Time__c}" />
        </apex:outputText>
        <br /><br />
        {!app.TargetX_SRMb__Contact__r.name}<br />
        {!app.TargetX_SRMb__Contact__r.mailingStreet}<br />
        {!app.TargetX_SRMb__Contact__r.mailingCity}, {!app.TargetX_SRMb__Contact__r.mailingState} {!app.TargetX_SRMb__Contact__r.mailingPostalCode}<br />
        {!app.TargetX_SRMb__Contact__r.mailingCountry}<br /><br/>
        <div class = "doc-preview__block">
            <p class = "doc-preview__copy">
                Dear {!app.TargetX_SRMb__Contact__r.FirstName}
                    {!app.TargetX_SRMb__Contact__r.LastName},
            </p>
        </div>
        <br/>

        <!-- **DECISION CONDITION START**  Include your decision condition here.  Replace "Accept" below with one of your "Application Decision" custom picklist values.  Repeat this section (copy from DECISION CONDITION START to DECISION CONDITION END and paste below DECISION CONDITION END) for each decision condition.) -->

        <apex:outputPanel
            rendered="{!decision == 'Accept'}">

            <!-- DECISION LETTER TEXT.  Replace the sample text below with your decision letter text for the decision in the condition above. -->
            <p class = "doc-preview__copy txindent">
                Thank you for applying to the TargetX University. It is my pleasure
                to inform you that you have been accepted to the {!app.TargetX_SRMb__Program__c}
                program for {!app.TargetX_SRMb__Start_Term_and_Year__c}.
            </p>
            <p class = "doc-preview__copy txindent">
                Please do not hesitate to
                <apex:outputLink value="http://www.targetx.com/contact-us/" target="_blank"> Contact Us</apex:outputLink>
                if you have a question or needs assistance!
            </p>

        </apex:outputPanel>

        <!-- **DECISION CONDITION END** -->

        <apex:outputPanel
            rendered="{!decision == 'Deny'}">
            <p class = "doc-preview__copy txindent">
                Thank you for your interest in the TargetX University. Although
                you are a strong candidate, I regret to inform you that you have
                been not been accepted to the TargetX University.
            </p>
            <p class = "doc-preview__copy txindent">
                We wish you the best in your future endeavors!
            </p>
        </apex:outputPanel>

        <apex:outputPanel
            rendered="{!decision == 'Waitlist'}">
            <p class = "doc-preview__copy txindent">
                Thank you for your interest in the TargetX University. We would
                like to inform you that you have been placed on the waitlist.
            </p>
        </apex:outputPanel>

        Sincerely, <br/><br/>

        <!-- UPLOAD IMAGE.  Upload banner image to "Static Resources" (Setup > Develop > Static Resources); replace "TargetX_University_Signature" below with Static Resource "Name" -->

        <apex:image url="{!$Resource.TargetX_University_Signature}" /><br/>
        Office of Enrollment Management<br/>
        TargetX University<br/>
        <br/><br/>
    </article>

    <style type="text/css">
        .txbold{
            font-weight: bold;
        }
        .txitalic{
            font-style: italic;
        }

        .txindent{
        /*    text-indent: 50px; */
            margin-bottom: 1em;
        }

        .indentText{
            text-indent: 50px;
        }

        .txpage{
            padding-left:23px;
            padding-right:23px;
        }

        .txcenter{
            text-align:center;
        }
        .txcenterimg {
            display: block;
            margin: auto;
        }

        .txfooter {
            /* Display and box model */
            margin-top: 2.25rem;
            max-width: 60rem;
            font-size: 14px;
            font-style: italic;
        }

        .sidebarOrderList {
            list-style-type: decimal;
            margin-left: 1em;
        }
        .sidebarOrderListAlpha {
            list-style-type: lower-alpha;
            margin-left: 1em;
        }
        .sidebarList {
            list-style-type: disc;
            margin-left: 1em;
        }
        .sideBarListItem {
            padding-bottom: 1em;
            padding-left: 0.5em;
        }
        .sideBarListItem2 {
            padding-left: 0.5em;
            padding-top: 0.20em;
        }
    </style>
</apex:page>
Adding a text field to Decision Letters to display if a checkbox is checked
Disclaimer: This code is not supported or maintained by TargetX, and is simply meant as an example of how you may choose to use our products. Some or all of the example provided may change or no longer apply to your instance at any time. If at any time the example code impedes expected functionality in the TargetX product, our recommendation will be for you to remove the code to regain functionality.
- Navigate to your Decision Letter.
- Enter the following, replacing the items in bold with your field and desired text:
{!IF(TargetX_SRMb__Application__c.My_Field__c = TRUE,'My text',null)} </p>
- Save your changes.
Adding Confetti to Decision Letters
You can add Confetti to the display of your decision letters so that when a student opens their Decision Letter, they see confetti:
To add confetti to your Decision Letters you will need to add the ConfettiCSS css file and the ConfettiJS javascript file to Static Resources.
You should complete these steps in a sandbox environment before pushing to production via an Outbound Change Set.
Step 1: Add the “ConfettiCSS” css file to Static Resources
- Download the css file below, ConfettiCSS.css.
- Navigate to Setup and search for Static Resources.
- Click New.
- Enter the Name of the Static Resource = ConfettiCSS
- Choose the ConfettiCSS.css file you just downloaded from above.
- Set the Cache Control of the Static Resource to be Public.
- Click Save.
ConfettiCSS.css [1]
/* Copyright moonglows76 */

        .container {
			width: 100%;
			height: 100%;
        }

		:root {
			--color1: #f2d74e;
			--color2: #95c3de;
			--color3: #ff9a91;
		}

        .confetti {
          width: 15px;
          height: 15px;
          background-color: var(--color1);
          position: absolute;
          left: 50%;
          animation: confetti 5s ease-in-out -2s infinite;
          transform-origin: left top;
        }
        .confetti:nth-child(1) {
          background-color: var(--color1); left: 10%; animation-delay: 0;
        }
        .confetti:nth-child(2) {
          background-color: var(--color2); left: 20%; animation-delay: -5s;
        }
        .confetti:nth-child(3) {
          background-color: var(--color3); left: 30%; animation-delay: -3s;
        }
        .confetti:nth-child(4) {
          background-color: var(--color1); left: 40%; animation-delay: -2.5s;
        }
        .confetti:nth-child(5) {
          background-color: var(--color2);; left: 50%; animation-delay: -4s;
        }
        .confetti:nth-child(6) {
          background-color: var(--color3); left: 60%; animation-delay: -6s;
        }
        .confetti:nth-child(7) {
          background-color: var(--color1); left: 70%; animation-delay: -1.5s;
        }
        .confetti:nth-child(8) {
          background-color: var(--color2);; left: 80%; animation-delay: -2s;
        }
        .confetti:nth-child(9) {
          background-color: var(--color3); left: 90%; animation-delay: -3.5s;
        }
        .confetti:nth-child(10) {
          background-color: var(--color1); left: 100%; animation-delay: -2.5s;
        }

        @keyframes confetti {
          0% { transform: rotateZ(15deg) rotateY(0deg) translate(0,0); }
          25% { transform: rotateZ(5deg) rotateY(360deg) translate(-5vw,20vh); }
          50% { transform: rotateZ(15deg) rotateY(720deg) translate(5vw,60vh); }
          75% { transform: rotateZ(5deg) rotateY(1080deg) translate(-10vw,80vh); }
          100% { transform: rotateZ(15deg) rotateY(1440deg) translate(10vw,110vh); }
        }
[1] Copyright moonglows76 via codeseek.co [css-confetti-BRVrgZ]
Step 2: Add the “ConfettiJS” javascript file to Static Resources
- Download the javascript file below, ConfettiJS.js.
- Navigate to Setup and search for Static Resources.
- Click New.
- Enter the Name of the Static Resource = ConfettiJS
- Choose the ConfettiJS.js file you just downloaded from above.
- Set the Cache Control of the Static Resource to be Public.
- Click Save.
ConfettiJS.js
setTimeout(hideConfetti, 10000);

function hideConfetti()
{
  var confettiDiv = document.getElementsByClassName('confetti');

  for(var i=0; confettiDiv[i]; i++) {
   confettiDiv[i].style.display = 'none';
  }
}
Step 3: Update the “DecisionLetter” Visualforce Page
A. You need to update the DecisionLetter Visualforce Page to include the ConfettiCSS css file and the ConfettiJS javascript file:
- Navigate to Setup and search for Visualforce Pages.
- Locate the DecisionLetter Visualforce page (or whichever Visualforce Page you use to display Decision Letters) and click Edit.
- Locate the following lines (should be at the top of the Visualforce page):
<apex:page standardcontroller="TargetX_SRMB__Application__c"
  showHeader="false" applyHtmlTag="false" applyBodyTag="false"
    standardStylesheets="false" docType="html-5.0" >

    <head>
        <link class="user" href="{!$Resource.targetx_portal__pbResources}/app/css/main.css" rel="stylesheet" type="text/css" />
    </head>
- Replace the above lines with the following:
<apex:page standardcontroller="TargetX_SRMB__Application__c"
showHeader="false" applyHtmlTag="false" applyBodyTag="false"
    standardStylesheets="false" docType="html-5.0" >

    <apex:includeScript value="{!$Resource.ConfettiJS}"/>

    <head>
        <link class="user" href="{!$Resource.targetx_portal__pbResources}/app/css/main.css" rel="stylesheet" type="text/css" />
        <apex:stylesheet value="{!$Resource.ConfettiCSS}"/>
    </head>
B. The following steps will update the DecisionLetter Visualforce Page to define CSS code to not display confetti when printing:
- Locate the below line of code (should be at the bottom of the Visualforce page):
</apex:page>
- Replace the above line with the following:
<style type="text/css" media="print">
.confetti {
            display: none;
        }
    </style>
</apex:page>
C. Next, you'll update the DecisionLetter Visualforce Page to display confetti for when the Application Decision is Accepted.
- Add the below code under the opening <article class = "doc-preview__letter txpage"> tag. (If confetti needs to be displayed for another decision value, replace Accepted below with the decision value you wish to use):
<apex:outputPanel rendered="{!TargetX_SRMB__Application__c.TargetX_SRMb__Application_Decision__c == 'Accepted'}">
<div class="confetti"></div><div class="confetti"></div><div class="confetti"></div><div class="confetti"></div><div class="confetti"></div>
            <div class="confetti"></div><div class="confetti"></div><div class="confetti"></div><div class="confetti"></div><div class="confetti"></div>
            <div class="confetti"></div><div class="confetti"></div><div class="confetti"></div><div class="confetti"></div><div class="confetti"></div>
            <div class="confetti"></div><div class="confetti"></div><div class="confetti"></div><div class="confetti"></div><div class="confetti"></div>
            <div class="confetti"></div><div class="confetti"></div><div class="confetti"></div><div class="confetti"></div><div class="confetti"></div>
            <div class="confetti"></div><div class="confetti"></div><div class="confetti"></div><div class="confetti"></div><div class="confetti"></div>
            <div class="confetti"></div><div class="confetti"></div><div class="confetti"></div><div class="confetti"></div><div class="confetti"></div>
            <div class="confetti"></div><div class="confetti"></div>
        </apex:outputPanel>
- Save your changes.
- If you wish to change the Color of the confetti to match your school colors, see the article: Changing the Colors of the Confetti in the Decision Letters.
Step 4: Test the changes in your Sandbox
Step 5: Create an Outbound Change Set
- Navigate to Setup and search for Outbound Change Sets.
- Select New.
- Name the Change Set, for example: Decision Letter Confetti update.
- Add a Description and Save your changes.
- In the Change Set Components section, select Add.
- Select a Component Type of Visualforce Page.
- Select the Visualforce Page(s) you updated to add Confetti.
Step 6: Upload your Change Set
- From the Change Set you created above, select the Org you want to send the Change Set to.
- Click Upload.
Note: Uploading the Change Set will send it to the Target Org; it will NOT change in your production Org until you Deploy the Change Set.
Step 7: Validate the Change Set in your Production Org
- Login to your Production Org.
- Navigate to Setup and search for Inbound Change Sets.
- The Change Set you uploaded should be available under Change Sets Awaiting Deployment.
- Click the Change Set you want to deploy.
- Click Validate.
Step 8: Deploy the Change Set in your Production Org
- Login to your Production Org.
- Navigate to Setup and search for Inbound Change Sets.
- The Change Set you uploaded should be available under Change Sets Awaiting Deployment.
- Click the Change Set you want to deploy.
- Click Deploy.
For additional information on deploying Change Sets, please see the Salesforce Help & Training article Deploying a Change Set.
Changing the Colors of the Confetti in the Decision Letters
If you've configured your Decision Letters to display confetti, you can change the color of the confetti using these steps:
Update the “ConfettiCSS” css file to use different colors
- Download the ConfettiCSS file from the Static Resources by navigating to Setup and search for Static Resources or download the ConfettiCSS.css file from here.
- Open the ConfettiCSS file in a plain text editor.
- Locate the following lines:
:root {
--color1: #f2d74e;
            --color2: #95c3de;
            --color3: #ff9a91;
        }
Note: The color hex codes #f2d74e, #95c3de, and #ff9a91 might be different in the file if you changed it previously.
- Find the color hex codes for the colors you wish to change in the Confetti (There are three different colors currently used within the Confetti).
- Replace the color hex codes following --color1:, --color2:, and --color3: with the hex codes for the new colors:
:root {
--color1: #f2d74e;
            --color2: #95c3de;
            --color3: #ff9a91;
        }
- Save the file.
- Navigate to Setup and search for Static Resources.
- Locate the ConfettiCSS file and click Edit.
- Choose the ConfettiCSS.css file you just updated.
- Click Save.
Adding Additional Colors
You can add additional colors beyond the three provided by following these steps:
- Add additional lines after the colors listed, adding the appropriate #hexnumber:
--color3: #ff9a91;
--color4: #hexnumber;
--color5: #hexnumber;
- In your ConfettiCSS.css file, make sure to update specific sections with the new color additions to ensure they appear correctly in the confetti:
Example:
background-color: var(--color3);
left: 30%;
animation-delay: -3s;
Would be changed to:
background-color: var(--color4);
left: 30%;
animation-delay: -3s;
Each of the new colors added must be included in the above section for them to display.
Testing Decision Letters
Step 1: Complete a test application through the Student Portal and submit it.
- Navigate to Setup and search for All Communities.
- Copy and Paste the student portal link into a new browser tab.
- Register and submit an application.
Step 2: In the TargetX CRM update your test application record:
- Navigate to the test application record and update “Application Decision” to “Accepted.”
- Enter today’s or a retroactive date in “Decision Publish Date.”
- (OPTIONAL) To allow applicants to accept offers - Check “Show Reply to Offer.”
- Navigate to Contact Record > Manage External User button > Login into Community as User > View Your Decision button.
Note: The letter will need to be updated/built for various decisions (directions commented out in visualforce code); repeat these steps with different decisions to test the conditional content.
Updating the signature on your Decision letter
Step 1: Add the signature image for the decision letter to Static Resources
- Navigate to Setup and search for Static Resources.
- Select New.
- Select the image file you wish to upload.
- Set the Static Resource to Public.
- Save your changes.
Step 2: Update your Decision Letter
- Navigate to Setup and search for Visualforce Pages.
- Select Edit next to the Decision letter you wish to update.
- Search for {!$resource.OldSignatureImageName}where OldSignatureImageName is the name of the image file you are replacing.
- Replace the OldSignatureImageName with your new Signature Image name.
Note: Signature logo optimal height is 75px.
- Save the changes.
To preview your decision letters, please see Testing Decision Letters.
Viewing a copy of a student's decision letter
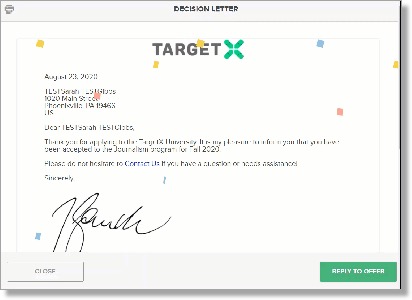
The TargetX Decision Letter feature supports creation of Visualforce pages that render an electronic decision letter to students in the Applicant Dashboard or Student Portal. These letters can be viewed by internal users by way of logging in as a student or through the creation of a custom button.
One way to view a copy of the student's decision letter is to log-in as the student. This can be done from within the CRM using the "Manage External User" button found near the top of the Contact record.
- Search for the Contact whose letter you would like to view
- Click the "Manage External User" button
- Select "Log in to Community as User
- From the Applicant Dashboard or Portal you can click to view a given application and then choose to view the decision.
NOTE: Permission must be granted to users for this button to display. Please see the Salesforce Help & Training article, Unable to see 'Manage External Users' button in Contact layout for more information.
Create Custom Decision Letter Button in CRM
To view a student's decision letter without having to log in as the student, you can create a custom button on the Application record. Please note that only CRM Admins should proceed with the instructions below.
- Navigate to the Application Object by clicking on Setup > Create > Objects > Application
- In the Buttons, Links, and Actions section, click New Button or Link
- Label: View Decision Letter
- Name: View_Decision_Letter
- Display Type: Detail Page Button
- Behavior: Display in New Window
- Content Source: Visualforce Page
- Content: decisionLetter
- Save your button
- Add your new button to the Application Page Layout
- On the Application Object setup screen find the Page Layouts section.
- Edit the desired layout(s)
- Click on Buttons
- Drag the View Decision Letter button onto the layout in the Custom Buttons section
- Save your changes
- In the Buttons, Links, and Actions section, click New Button or Link
- Grant users access to view the decisionLetter Visualforce page
- Navigate to Setup > Administration Setup > Users > Profiles
- Click the Profile Name for the profiles which will require access to use the new button
- Under Enabled Visualforce Page Access, check to see if the decisionLetter page is on the list. If not, click Edit and move the page from Available to Enabled
- Save you changes
- Test your button
- Navigate to an Application record that has a Decision Letter available
- Click the View Decision Letter button and confirm a new window opens and displays the letter.