Working with Enrollment Deposits
Understanding what happens when Applicants respond to Enrollment Offers
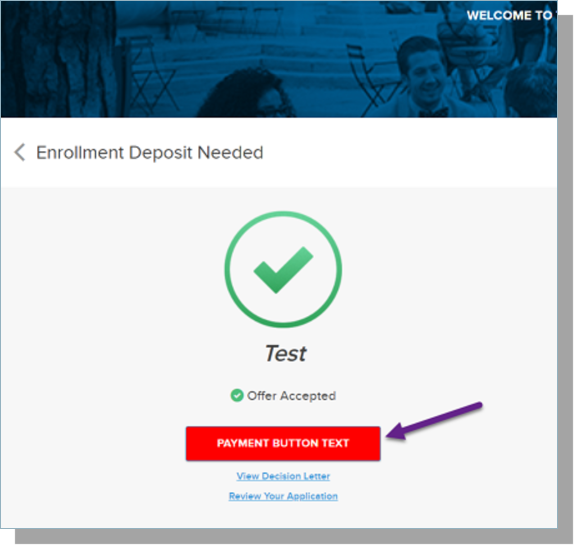
When an Accepted applicant navigates to the Community, any ‘Accepted’ applications will display a trophy icon and message with the option to either ‘Accept our Offer’ or ‘Review’ the application.
- An applicant must have the Accept Enrollment Deposit checkbox selected on the application record to pay a deposit.
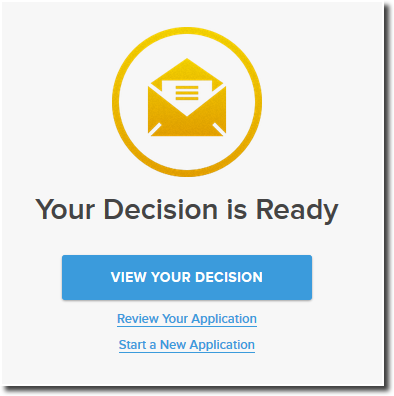
- If the Accept Enrollment Deposit checkbox is checked, the Online App will display a link to View Your Decision and prompt the applicant to Reply to Offer. If they Accept the offer, they are then prompted to submit an Enrollment Deposit.
Note: ONLY check 'Reply to Offer' for Accepted or Waitlisted students; otherwise, Rejected students will see the Reply to Offer button.
Applications MUST have an associated Application Process.
Note: Decision Letters must be configured for Applicants to view their decision. If you are NOT using Decision Letters, you will not be able to use Reply to Offer or Enrollment Deposits.
Note: If you are using the Applicant Dashboard (i.e., ‘Portal’ v1), set the Decision Publish Date to be a date in the past, check the Applicant Enrollment Deposit checkbox, and check the Show Reply to Offer checkbox.
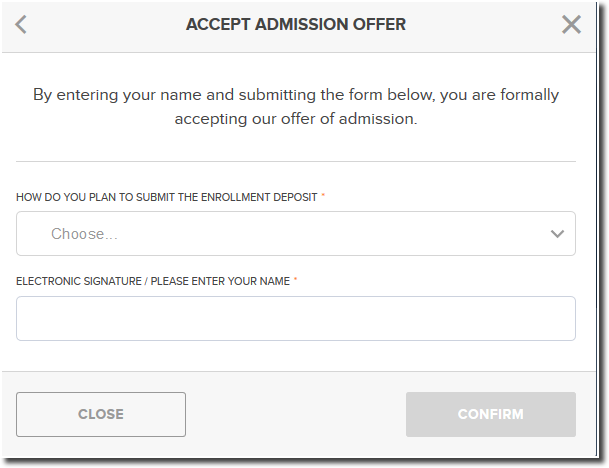
After the applicant clicks the Accept Our Offer button, they are presented with the option of accepting or declining the offer of admission.
If they choose to decline the offer of admission, they are prompted to indicate a decline reason as well as the Institution they are attending instead. The Deposit Intent to Enroll field on the Application will be populated with the value “No” based on the applicant’s selection. The Decline Reason and Attending Instead fields will be populated based on the applicant’s selection.
If they choose to accept the offer of admission:
- The Deposit Intent to Enroll field on the Application will be populated with the value “Yes” based on the applicant’s selection.
- The applicant is then presented with a message asking them to confirm their intent to enroll.
- If they select Yes, the will be asked to provide an electronic signature which will be saved in the Deposit Signature field.
- Once they save their signature, the Enrollment Deposits window will display.
If they choose to decline the offer of admission:
- They are prompted to indicate a decline reason.
- The Institution they are attending instead.
- The Deposit Intent to Enroll field on the Application will be populated with the value “No” based on the applicant’s selection.
- The Decline Reason and Attending Instead fields will be populated based on the applicant’s selection.
Note: The Attending Instead field will only display to applicants if the Decline Reason starts with 'Attending Another...'.
Understanding how Applicants Pay Enrollment Deposits
Once an Applicant accepts an enrollment offer, they have the option to Pay by Mail or Pay Online. This article describes how each option works.
If the applicant elects to make the payment by mail:
Administrators can disable Mail-in Payments for Enrollment Deposits by unchecking the Allow Deposit Mail-In Payment field in the associated Application Form.
- The application landing page will display as ‘Offer Accepted’ with an option to Deposit Now.
- In the CRM, the Enrollment Deposit Payment Type field will be populated with the value “Pay by Mail.”
- Once the school receives the payment, enter the date the payment was received in the Deposit Paid Date field on the Application detail page.
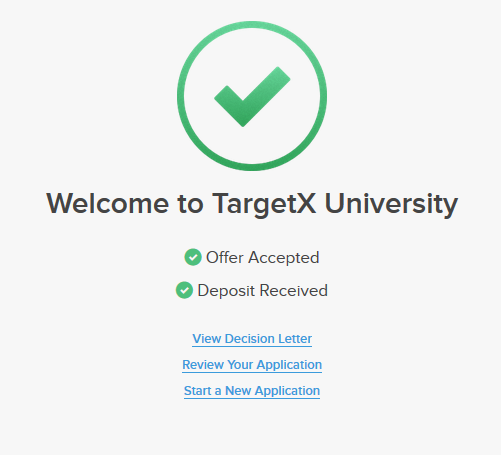
- The applicant will see “Deposit Received” on the Online Application landing page, and the Deposit Now button will no longer display.
If the applicant elects to pay online:
-
The applicant is directed to the configured Payment Connector. Once they complete their payment, they will receive an on-screen message confirming the payment was received. The applicant will see “Deposit Received” on the Online Application landing page, and the Deposit Now button will no longer display.
- In the TargetX CRM, the Enrollment Deposit Payment Type field will be populated with the value “Pay Online”; the Deposit Amount will display the deposit amount received; the Deposit Authorization Number will be populated and the Deposit Paid Date will show the date of the transaction.
- To configure Enrollment Deposits, please read Configuring Enrollment Deposits.
Configuring Enrollment Deposits
Note: Enrollment Deposits are configured by Application Form/Type. You can not configure different Deposit Amounts within the same Application Form/Type.
Step 1: Update the Application Page Layout 
Ensure that your Application Page Layout includes the following fields:
- Accept Enrollment Deposit
- Deposit Intent to Enroll
Step 2: Update the Contact Page Layout
Ensure that your Contact Page Layout includes the following field:
-
Student Stage
Step 3: Update the Application Form
For any Application Form that will use an Enrollment Deposit, you must select an Enrollment Deposit Payment Connector and Enrollment Deposit Amount.
- Navigate to the Application Forms tab.
- Select the Application Form that you want to add an Enrollment Deposit.
- Select Edit.
- Select the appropriate Enrollment Deposit Payment Connector.
For information on Payment Connectors, see Configuring Payment Gateways.
- Enter the Enrollment Deposit Amount.
- Save your changes.
You can disable Mail-in Payments for Enrollment Deposits by unchecking the Allow Deposit Mail-In Payment field in the associated Application Form.
Step 4: Enable the Enrollment Deposit Trigger (optional)
The Enrollment Deposit option in Recruitment Manager Preferences will update the "Student Stage" field on the Student Object to "Deposited" when an application deposit is received.
Note: This trigger does not update the "Student Stage" if it is already set to "Enrolled."
Changing the text on the Deposit Payment Button
- Navigate to the Application Form tab.
- Click the Application Form where you want to change the text on the Deposit payment button.
- Update the field Deposit Payment Button Text with the new text.
- Save your changes.