Managing Work Groups
There are two areas involving user management in WebAdMIT for AMCAS:
- Admissions Users are created to give access to colleagues.
- Work Groups allow administrators to establish permissions and viewing rights for their Admissions Users.
What are Work Groups?
Work Groups allow you to manage permissions for a group of users, as opposed to managing permissions for each individual user. Using WebAdMIT’s Work Groups feature, you can decide:
- What actions a user can perform. These functions are granted via permission sets. Each Permission Set determines the options that appear in the user’s Menu Bar, as well as the admissions data they can update.
- What applicant data a user can view. You can decide which sections of an application users can view. The data available for viewing is controlled by panels and subpanels that you enable or disable for users, as needed.
- What reports a user can run. When creating a report, you select the Work Group(s) that can access the report. Since reports incorporate multiple applicant data points, the Report Manager does not take into consideration the panels and subpanels that are enabled or disabled for each Work Group. This means that when a Work Group is granted access to a report, all report data becomes viewable for all users in that Work Group, even if some of that data resides in panels and subpanels that are disabled for viewing. Users in Work Groups that are not granted access to a report will not be able to view the report.
As you create Work Groups, you add users to them. You can create as many Work Groups as necessary (each with their own unique permission sets), move users among groups as desired, and change the permissions or viewing ability for all users in any given Work Group. Note that an individual can only belong to one Work Group at a time. So, for example, if Bob is both a screener and an interviewer and those roles have different permission sets, you can:
- Move Bob from the Screener Work Group to the Interviewer Work Group (and vice versa) as needed, or
- Create a hybrid Screener-Interviewer Work Group with a specific set of permissions for people who perform both of those tasks.
Note that a WebAdMIT Administrators Work Group is available by default and provides users with full administrative access.
The WebAdMIT Administrators Work Group
Gaining Access to This Feature
Creating Work Groups
- Using the Menu Bar, open the Management panel, then click Work Groups.
- Click New Work Group.
- Enter a name for the Work Group and select the group’s permission sets. Each permission set determines what options appear in the user's Menu Bar as well as what admissions data the user can update.
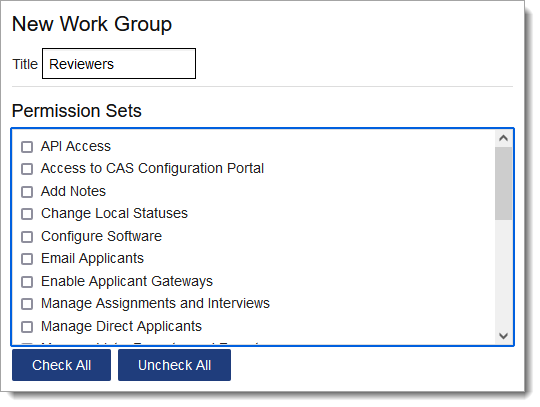
Permission sets may include:- API Access: allows users to query WebAdMIT for AMCAS using the API.
- Access to CAS Configuration Portal: allows users to work in the Configuration Portal.
- Add Notes: allows users to enter notes on the Applicant Details page. Users without this permission can read, but not create notes.
- Change Local Statuses: allows users to change the Local Status of an applicant's designation, either individually on the Applicant Details page, or in batches via list or search actions.
- Configure Software: allows users to access all management functions.
- Email Applicants: allows users to email applicants.
- Enable Applicant Gateways: allows users to enable (individually or in batch), disable, and extend deadlines for Applicant Gateway activities.
- Manage Assignments and Interviews: allows users to assign and delete Assignments and Interviews on applicant pages. Users with this permission can also edit submitted Assignment and Interview results.
- Manage Direct Applicants: this permission set does not apply to WebAdMIT for AMCAS and can be ignored.
- Manage Lists, Reports, and Exports: allows users to create lists, reports, and exports and define their visibility.
- Manage Uploaded Documents: allows users to upload and delete documents on an applicant's record for an organization.
- Manage Users and Work Groups: allows users to create and modify admissions users and Work Groups.
- Modify Applicants' Custom Fields, Local GPAs, Prerequisites, and Requirements: allows users to update an applicant's Custom Fields and Requirements, either from the Applicant Details page or in batches. This permission set also allows users to update courses included in an applicant's Prerequisite or Local GPA via the Electronic Transcript.
- Request Background Check: this permission set does not apply to WebAdMIT for AMCAS and can be ignored.
- View All Applicants: allows users to view information for all applicants. Users without this permission can only view their assigned applicants.
- View Background Check: this permission set does not apply to WebAdMIT for AMCAS and can be ignored.
- View Other User's Assignment/Interview Results: allows users to view any applicant’s Assignments and Interviews, both on the Applicant Details page and on the search Assignments and search Interviews screens. Users without this permission can only view their assigned Assignments and Interviews.
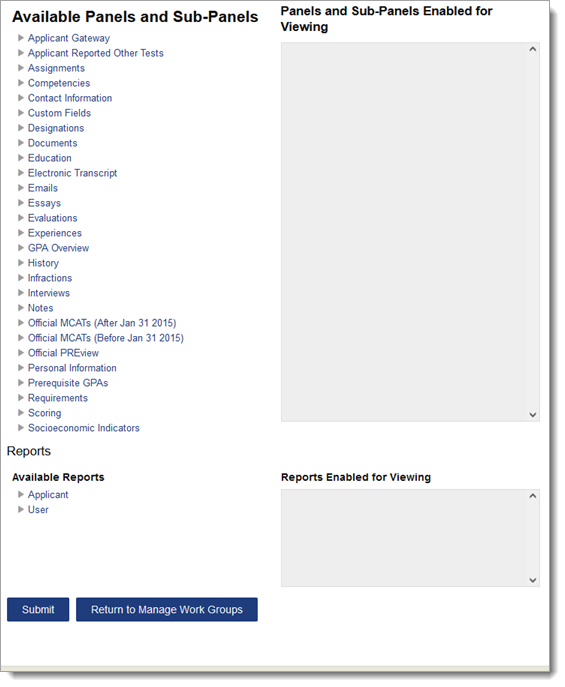
- Select the panels and subpanels that the group can view on the Applicant Details page. Note that this function controls the data users can view throughout WebAdMIT for AMCAS; if a user is restricted from viewing a panel of data, then they cannot view that data in the following functions:
- Applicant Details
- List Manager
- Export Manager
- Applicant Header
- Scoring
- Email Templates
- Full Application PDF
- Note: Work Groups that are not granted access to the Documents panel will not be able to download from the PDF Manager any of the documents that are displayed on this panel. Similarly, if a user does not have access to the Evaluations panel, they will not be able to download from the PDF Manager any of the Evaluation PDFs.
- Select which Reports the group can work with. Note that when creating a report, you select the Work Group(s) that can access the report. Since reports incorporate multiple applicant data points, the Report Manager does not take into consideration the panels and subpanels that are enabled or disabled for each Work Group. This means that when a Work Group is granted access to a report, all report data becomes viewable for all users in that Work Group, even if some of that data resides in panels and subpanels that are disabled for viewing. Users in Work Groups that are not granted access to a report will not be able to view the report.
- Click Submit. Note that permissions sets and panels will need to be used together. For example, if you add the “Add Notes” permission set to the Work Group, you’ll also need to add the “Notes” panel.
Adding Users to Work Groups
- Using the Menu Bar, open the Management panel, then click Admissions Users.
- Click the pencil icon for the applicable user. Note that you can only add existing users to Work Groups. To create a new user, see the Managing Users topic.
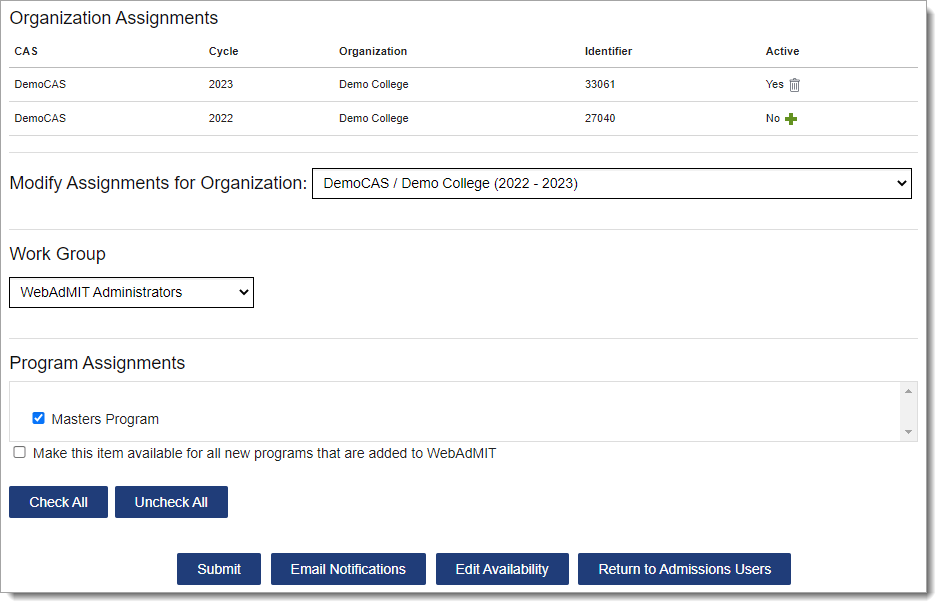
- Select the appropriate organization and cycle using the Modify Assignments for Organization drop-down.
- Select the applicable Work Group.
- Click Submit.
Managing Work Groups
To manage existing Work Groups, click Work Groups from the Menu Bar. Changes made to Work Groups take effect immediately.
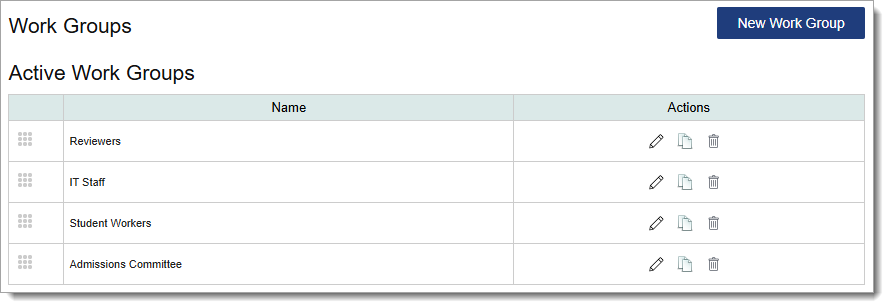
Reordering Work Groups
Use the grip icon to drag and drop the Work Group into the preferred order.
Editing Work Groups
Use the pencil icon to edit an existing Work Group template.
Copying Work Groups
Use the duplicate icon to copy an existing Work Group template.
Deactivating Work Groups
Use the trash icon to deactivate Work Group templates. Note that you cannot deactivate a Work Group that is currently assigned to a user.