Using the List Manager – Field Lists
Video Overview
What are Lists?
Gaining Access to This Feature
Creating a Field List
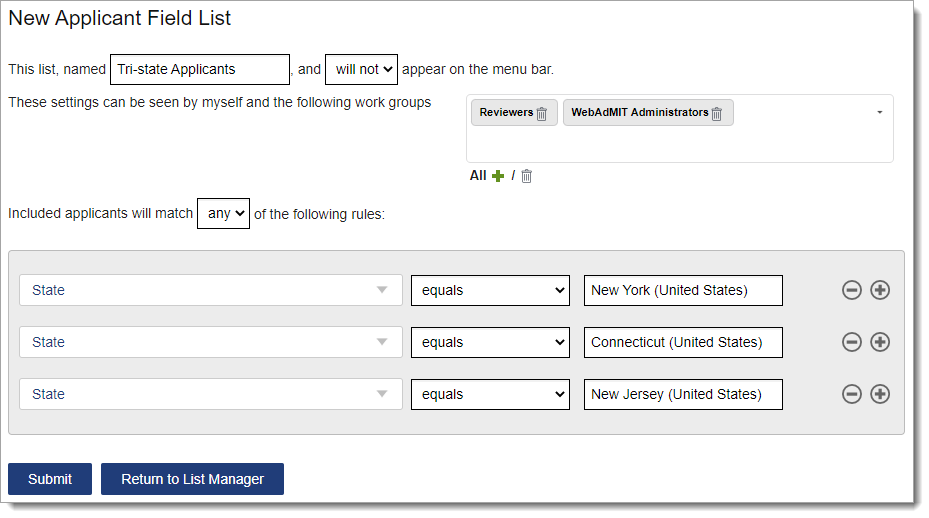
Use field lists to search for applicants using and/or criteria. For example, you can create a list that contains complete applicants who are in-state (i.e., application complete and in-state) or a list that contains applicants who reside in a regional area (e.g., New York or Connecticut or New Jersey).
- Using the Menu Bar, open the Applicant Lists panel, then click List Manager.
- Click New Field List.
- Name the list. Your list name must be unique within the organization for a specific CAS and cycle. If an existing list has the same name, even if you cannot see it based on Work Group and list sharing permissions, you’ll get an error message. Additionally, you cannot name a list Everyone or Clipboard, as these are standard selections in the list drop-down in the Export Manager.
- Indicate if the list should appear in the Menu Bar under the My Lists subpanel in the Applicant Lists panel. This option provides you with quick access to run the list.
- Select who can view it (e.g., just yourself, specific Work Groups, or all Work Groups). Institution Managers who are in the WebAdMIT Administrators Work Group can view and delete any lists created within their organization.
- Select if you want your query to match all (i.e., and Boolean logic) or any (i.e., or Boolean logic) of the rules you subsequently establish.
- Create a query by selecting a field, an operator, and criteria. For some fields, the List Manager offers real-time suggestions after you begin typing in the criterion field.
- If applicable, click the plus or minus signs to add or remove a criterion.
- Click Submit to save your template or Return to List Manager to discard the template.
Using List Operators
The fields you select are associated with several operators. Review your CAS's data dictionary to learn the field types for fields. Additionally, be aware of the following:
- Search queries are case-insensitive.
- When searching on numeric fields such as GPA or hours, you can only use numbers and decimals. For example, enter 1000 instead of 1,000 or enter 3000.00 instead of 3,000.00.
|
Field Type |
Available Operators |
|---|---|
|
All Field Types |
|
|
Lookup, String, Numeric, and Date |
|
|
String Only |
|
|
Numeric and Date Only |
|
|
Date Only |
Although a day begins at 12:00 AM ET and ends at 11:59 PM ET, applicant time zones and other varying factors can impact how data is pulled during this standard timeframe. When searching using the within ... last days operator, include a two- or three-day overlap. For example, if you're searching for applications that were verified within the past 1 day, enter 3 days for the search criteria. While this may result in duplicates, it ensures you capture all verified applications regardless of the applicant’s time zone. To avoid duplicates, consider additional tools for tracking applicants, like incorporating a Custom Field or using the Last Exported Date Field. |
|
Time Only |
When searching using the within ... last hours operator, include a one-hour overlap. For example, if you're searching for updates made within the past 5 hours, enter 6 in the search criteria. This ensures that any updates made in the current hour and the preceding five hours are included. |
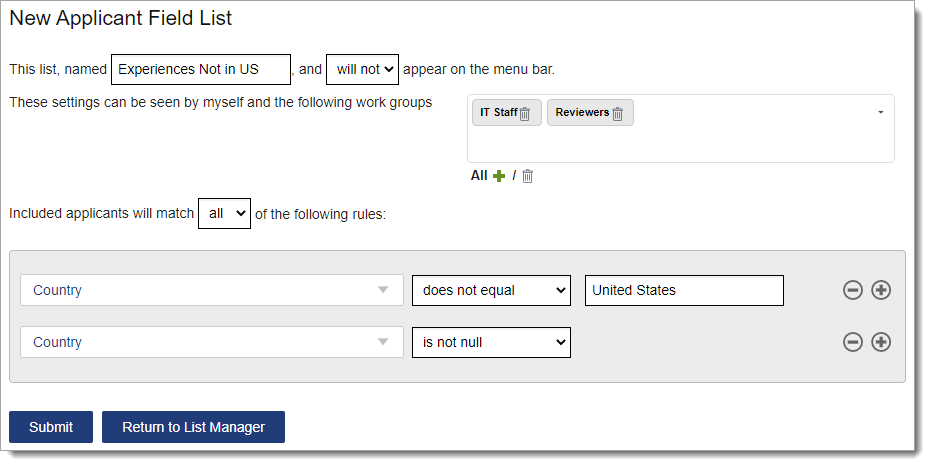
Excluding Null Values
When searching your applicant pool, consider including a second operator of Is Not Null if you wish to ignore empty fields. This ensures your list includes only those applicants with data in a given field.
For example, if you want a list of applicants who reported experiences outside of the United States, but you don’t want to include the applicants who did not report any experience at all:
- Include applicants who match all your rules,
- Use the query Experience Country does not equal United States, and
- Use the query Experience Country is not null.
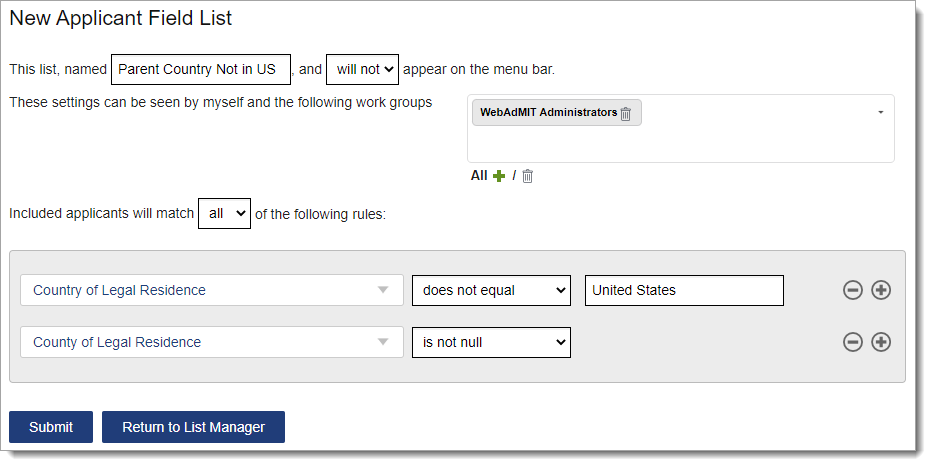
Fields with Multiple Values
Some applicant questions may result in multiple answers. For example, an applicant could report speaking multiple languages, having multiple ethnicities, or having multiple parents.
When you create a list on a field with multiple values, the resulting list includes any applicant that has at least one value meeting the defined conditions. For example, if you want all applicants who have a parent from a country other than the United States:
- Include applicants who match all your rules,
- Use the query Parents/Guardians Country of Legal Residence does not equal United States, and
- Use the query Parents/Guardians Country of Legal Residence is not null.
The resulting list includes all applicants who have at least one parent that meets these conditions, though not all their parents are from a non-US country.
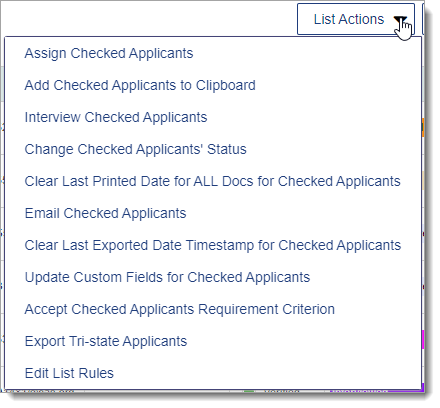
Applying List Actions to Selected Applicants
Use the checkboxes in the first column of your search results to select multiple applicants and apply an action. The options you see are limited to your Work Group permissions.
- Assign Checked Applicants: assign the selected applicants to a specific admission user (this function only appears if Assignments are configured).
- Add Checked Applicants to Clipboard: add the selected applicants to the Clipboard.
- Interview Checked Applicants: create an Interview for the selected applicants (this function only appears if Interviews are configured).
- Change Checked Applicants' Status: change the Local Status for the selected applicants (this function only appears if Local Statuses are configured).
- Clear Last Printed Date for ALL Docs for Checked Applicants: remove the Document Last Printed date recorded in WebAdMIT for AMCAS for the selected applicants.
- Email Checked Applicants: send an email to the selected applicants.
- Clear Last Exported Date Timestamp for Checked Applicants: remove the Last Exported date recorded in WebAdMIT for AMCAS for the selected applicants.
- Update Custom Fields for Checked Applicants: update the custom fields that have been defined for selected applicants (this function only appears if Custom Fields are configured).
- Accept Checked Applicants Requirement Criterion: select a requirement and update the response to that requirement for the selected applicants (this function only appears if Requirements are configured).
- Enable Applicant Gateway Activities for Checked Applicants: activate the pre-configured Applicant Gateway activities for selected applicants (only available for select CASs; this function only appears if Applicant Gateway activities are configured).
- Export List Name: export the list to .csv, .xls, or .txt formats.
- Edit List Rules: return to list setup and change, add, or delete list criteria.
Warning: enabling Applicant Gateway Activities and Assigning/Interviewing Checked Applicants are advanced functions that can’t be undone in batch. Confirm that your search results and selections are accurate before performing the change.
Managing Lists
From the List Manager, you have several options to work with the lists that have been created. You can view and perform the following actions for lists that you created or that other users created and shared with you.

Running Lists
Click the list name to run it.
Reordering Lists
Use the grip icon to drag and drop the list into the preferred order.
Pinning Lists to the Menu Bar
Click the checkbox to pin a list in the Menu Bar under the My Lists subpanel in the Applicant Lists panel; this option provides you with quick access to run the list.
Editing Lists
Use the pencil icon to edit a list. Note that only list owners can make edits. If you'd like to edit or see the criteria of a list that you are not the owner of, you can create a copy of it instead.
Deleting Lists
Use the trash icon to delete a list. Note that only list owners and Institution Managers who are in the WebAdMIT Administrators Work Group can delete lists. If an export, report, or PDF template is using this list, then when the list is deleted, the templates will update to run on all applicants (i.e., Everyone) instead.
Exporting Lists
Use the export icon to export a list. Selecting this option will take you to the Export Manager with the desired list pre-selected.
Emailing Applicants in a List
Use the envelope icon to email the applicants in a list. This will take you to the email editor with the desired list pre-selected.
Copying Existing Lists
Use the duplicate icon to copy an existing list.