Managing Contacts
In Outcomes, Contacts allow you to collect and view the data and activities of any people or organizations your institution engages with. Contacts are organized into different Contact Types (e.g., applicants, advisors, colleges, etc.), so that you can work with each type of contact in different ways. You can review and work with your contacts from the Contacts Grid.
Creating Contact Types
Outcomes allows you to store as many Contact Types as needed to help you manage your interactions with recruits, applicants, students, and others.
To add new Contact Types:
- Navigate to the Settings menu and click Contact Types under Contacts.
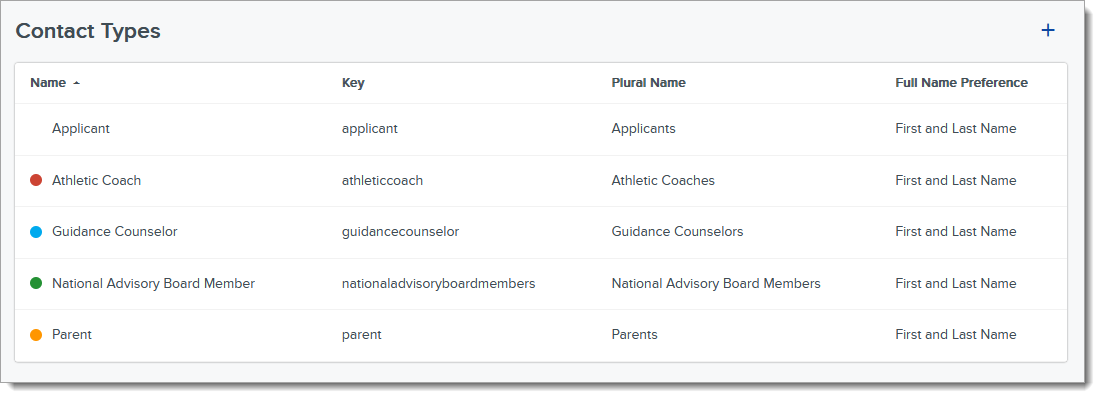
- From here, you can review your existing Contact Types. Click the plus icon to add a new type. Alternatively, you can start a new Contact Type using existing settings by going into an existing Contact Type and clicking Copy Contact Type.
- Add the information about your new Contact Type and select an Accent Color.
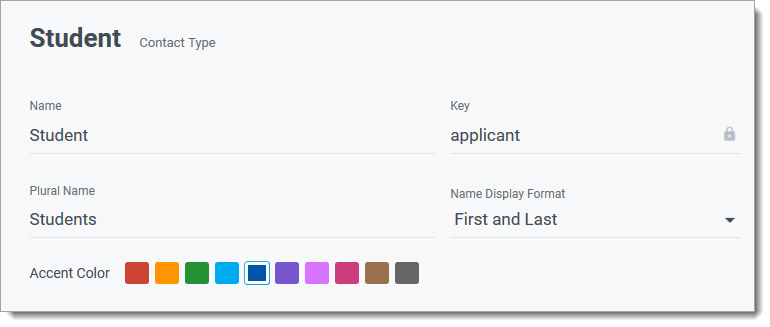
- Click Save Changes to keep the new Contact Type.
- Add Contact Properties to track information about your contacts, as desired.
Once your Contact Type is created, you can begin adding Contacts of this type.
Adding Contact Properties
Each Contact Type has its own Contact Properties, or fields that contain data relevant to that type of contact. For example, a Contact Type of Advisor may include properties for the advisor's email address, phone number, and school affiliation. After creating your Contact Type, you can edit its properties. To do so:
- From the Contact Types page, click the Contact Type you want to work with.
- Review its Contact Properties section.
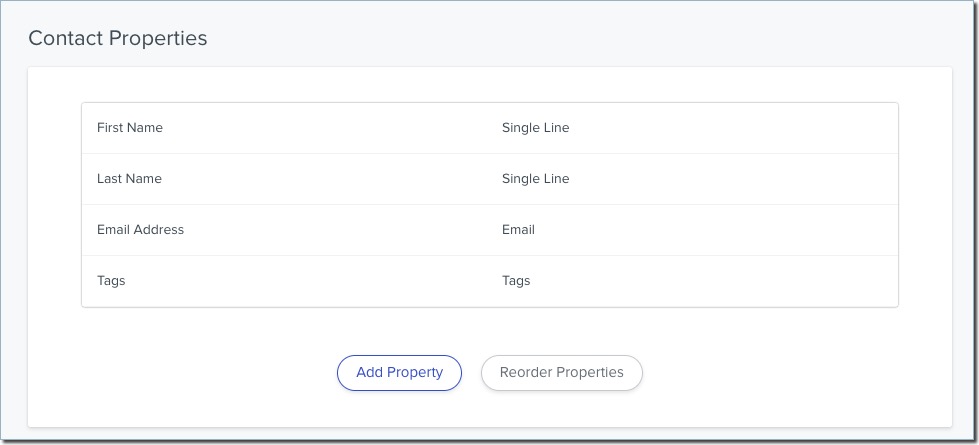
- Use the Add Property button to add data points to display for each Contact (e.g., Address, Phone Number, ID, Recruitment Stage, etc).
- When configuring your property, use the Identifier Mode setting to control whether this field should be used to match imported records to existing contacts.
- Click Add to add your new field, and click Save Changes when you're done editing this Contact Type.
Once these properties are created, you can view them or change their value from each contact record by clicking All Properties.

Working with Contact Identifiers
When you create or edit a Contact Property, the Identifier Mode option controls whether that field is used to match imported data to existing contacts or to create new contacts if no match is found. This setting is only used when contacts are imported from files or external data sources.

There are three Identifier mode options:
- Not an Identifier: This is the default and recommended setting for most fields. Use this for data like the contact's name, address, phone number, high school, and similar attributes. These fields should never be used as identifiers because they can change or be shared by multiple people.
- Identifies a contact across sources/integrations of the same type: Use this only for specific, advanced use cases when directed by the Liaison services team. With this option, the field can match contacts only within imports of the same integration type.
- Identifies a contact across all sources/integrations of all types: Use this for fields that truly and uniquely identify a person across all of your systems. As a best practice, you should have no more than three such identifiers on a contact. By default, the first field used for this is the contact's email address. This functions as a unique identifier at the Outcomes level. If you are a CAS-connected organization, another field with this setting should be the CAS ID, which uniquely identifies the CAS account delivered during implementation. You may also consider applying this setting to an SIS ID or another institutional identifier that uniquely identifies a person at your institution.
To avoid duplicate or incorrect records, limit the number of identifier fields and configure them only on fields that are guaranteed to be unique and stable over time. Fragmenting identifiers across many fields can lead to duplicate contacts, while applying identifiers too broadly can cause unrelated records to be merged together.
Working with Contact Funnels
One of the property types available to you when creating Contact Properties is Funnel. Funnels are a way of tracking your contacts as their relationship changes with your institution. For example, a contact may start off as a prospective student, then become an applicant, then become a matriculant, and eventually become an alumnus. As a contact progresses through these stages, you can use the Funnel property type to capture this information.
To create a funnel:
- From the Settings Menu, click Contact Types in the Contacts section.
- From the options on the Contact Types page, select your Applicant contact type.
- Click Add Property.
- Select the Funnel property type.
- Name the funnel (e.g., Recruitment Stage), and add your list of funnel stages.

- Click Add to keep the property.
Once you've created a funnel property type, you can access the funnel information to review or change it from each contact record. To do so, navigate to the record and select the All Properties option. Click the property to change its value.

You can also edit funnel properties in batch from the Contacts Grid by selecting the desired contacts, clicking Update Data, and selecting the property you'd like to edit.
Working with Contact Relationships
The Contacts section allows you to establish relationships between different types of contacts, or between contacts and Outcomes users at your institution. A Contact Relationship indicates how one contact is related to another contact, while a User Relationship indicates how a contact is related to one of your internal software users.
For example, if your Contact Types include Advisor, Student, Admissions Representative, and Recruiter, you may wish to create Contact Relationship fields within the Student Contact Type to link students to their advisors and admissions representatives. Meanwhile, you can use a User Relationship field to link students to their recruiters at your institution. Where applicable, a User Relationship also controls which of your internal users a contact's Conversation is auto-assigned to.

To add a relationship field:
- Navigate to the Settings menu and click Contact Types under Contacts.
- Click on the Contact Type you wish to link to other Contact Types.
- In the Contact Properties area, click Add Property.
- Enter a name for the field, and select Contact Relationship if you want to link this type of contact to another Contact Type. Select User Relationship if you're linking the contact to a user at your institution.
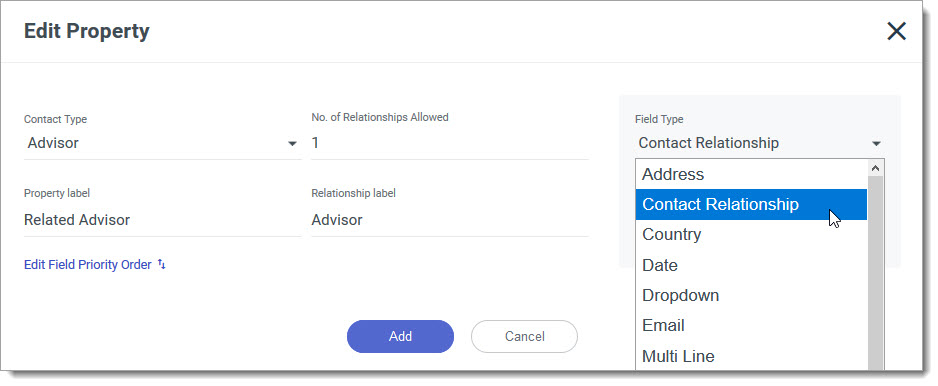
- Enter the Relationship label and decide how many of this relationship type each Contact is allowed to have using the No. of Relationships Allowed field.
- If desired, use the Edit Field Priority Order link to adjust which data sources take precedence when importing data into this field.
- Click Add when you're done working with this field.
Once your Contact Relationships are established, you can link individual Contacts to each other from the Relationships section of each contact record.
Working with User Relationships
Creating a User Relationship is similar to creating a Contact Relationship, except the User Relationship indicates how a contact is related to one of your internal software users, rather than to other contacts. For example, a User Relationship field can link students to your institution's recruiters. Where applicable, a User Relationship also controls which of your internal users a contact's Conversation is auto-assigned to.
To create a User Relationship:
- Follow the steps above to add a new property to your Contact Type.
- Under Field Type, select User Relationship.
- Select a Routing Table. If Conversations, Tasks, or other items are set to be assigned automatically, the Routing Tables set the priority order to determine which user should get the assignment.
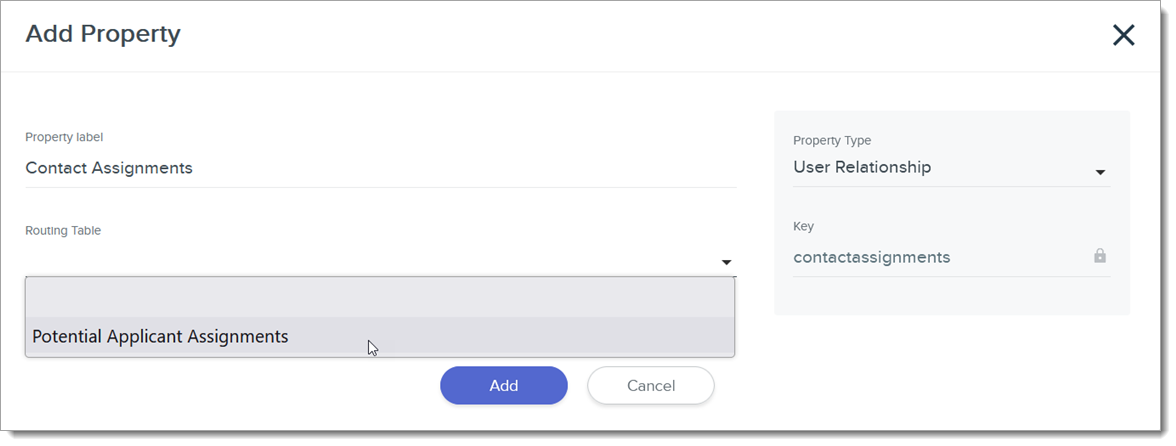
- Click Add.
Once your User Relationship is configured, any auto-assignments will follow the rules in your selected Routing Table. If you have multiple User Relationships under the same Contact Type, the relationship listed highest on the Contact Properties page takes priority.
Working with Contact Routing Tables
Contact Routing Tables allow you to automatically link Outcomes users to contacts based on your rules. For example, if you have recruiters that focus on specific regions, you can set a Routing Table that assigns contacts to your recruiters based on the contact's state or zip code. To create a Routing Table:
- Click Contact Routing Tables in the Contacts section of the Settings Menu.
- From here, you can review your existing Routing Tables. Click the plus icon at the top right to create a new Routing Table.
- On the New Contact Routing Table page, enter a name for your Routing Table and select which Contact Type it should be associated with.
- From the grid that appears, click the plus sign to select the property or condition that you'd like to base your routing on. For example, if you have a Contact Property for Preferred Address, you can select "Preferred Address State" as the property you'll base your routing on. Note that the items in the plus sign menu are only the properties that exist for your selected Contact Type.
- After selecting the property, click the top line to add a condition you want to link to an internal user. For example, where Preferred Address is an available Contact Property, you can set contacts with a Preferred Address State of NY to be assigned to one of your users. Note that for conditions to match, you'll need to type them exactly as they appear on the contact records. Consult the Field Dictionary to confirm that the format you're entering your condition in matches what you can expect for each related contact property. Click Done to add the condition.

- In the Route To column, select the internal user the contact should be assigned to if the condition you specified is met.
- If needed, you can further isolate contacts that meet this condition by clicking the plus sign again to add another condition. For example, if you want to assign specific zip codes within a state to one user, you could click the plus sign again, select Postal Code, and enter "11000 TO 12000" so that only contacts within these zip codes will be routed to the selected user.
- Continue adding conditions and associate them with users as needed. If multiple conditions can be routed to the same user, you can separate them by commas in the Edit Condition window. For instance, in the example above, your condition can be NY, MA, PA.
- If there are possible options that are unaccounted for (e.g., states that you didn't list as a condition), use the Assign any remaining contacts to... line to determine who the leftover contacts should be assigned to.

- Click Create Routing Table to save this Routing Table.
Once you've created a Routing Table, you can apply it where needed. For example, you can add a User Relationship property to your Contact Type that implements this Routing Table for assigning Conversations.
Working on the Contacts View
Overview
The Contacts area is where you can collect and view the data and activities of any people or organizations with whom your institution engages. From the Settings menu, you can add as many contact types as needed. Contacts may include recruits, applicants, students, and others.
Navigating the Contact Grid
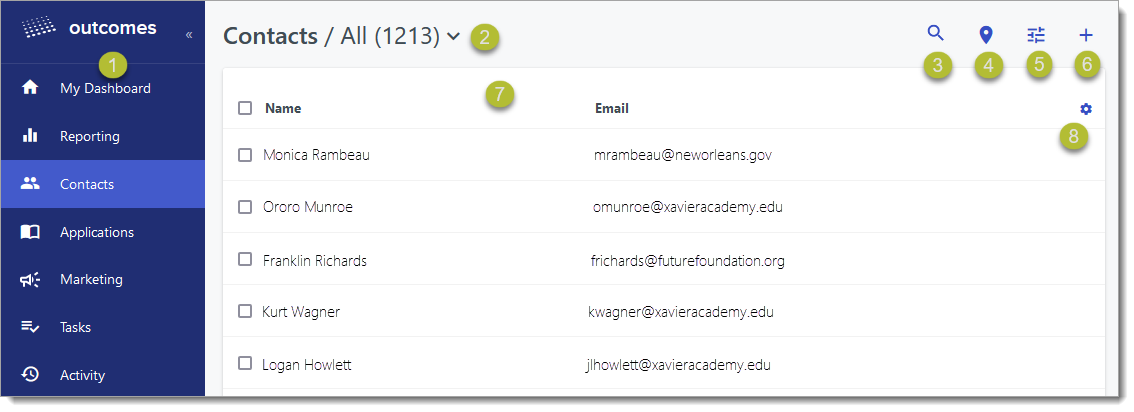
- Navigation Menu: use this menu to switch to different sections of the application. Click << to collapse the menu for a larger working area.
- Contact Type and Segment Selector: use this drop-down to filter the list by Contact Type or Segment.
- Search Button: use this to search for contacts using their name, email address, phone number, city, zip code, or other contact information.
- List View / Map View Toggle: use these buttons to toggle between viewing contacts in a list or a spatial map.
- Filters: use this button to filter your contact list. For example, you can filter by address to isolate all contacts from a specific city. Continue to add filters as needed, and save the filter as a Segment for later reuse.
- Add Contact Button: click this button to add an individual contact or to add contacts in batch using a CSV, JSON, or XML file.
- Contact List: click the desired column header to sort by that column. Use the checkboxes to select contacts to perform an action on. Click the checkbox at the top of the grid to select all the checkboxes.
- Edit Grid Button: click this icon to edit the columns included in the contact list grid.
Viewing and Filtering Contacts
Click any contact to review their Contact Information page.
When using filters to isolate contacts that meet the criteria of your choice, keep in mind that the contains filter only accepts whole words. For example, the querying for contacts from a State that contains "Texas" will work, but "Tex" will not.
Applying Batch Actions to Selected Contacts
In Outcomes, you can save time by performing actions on multiple contacts simultaneously. To perform a batch action:
- Go to the Contacts View and select your desired filters.
- Click the checkbox at the top of the list of Contacts to select all contact records on the page, or select individual contacts one at a time.
- If the list of contacts extends past the first page, you’re presented with an option to select the entire batch. Click Select all… to include all contacts.
- From the bottom of the list, select which batch action you’d like to perform. The actions available here are dependent on your permissions in the software.

Available batch actions may include:
- Email: this action allows you to send a standard email to the selected contacts.
- Marketing: this action allows you to send a marketing message to the selected contacts.
- Comment: this action allows you to add a comment to the selected contact records.
- Update Data: this action allows you to apply a change to a field for all the selected contacts at once.
- Add Tag: this action allows you to add or remove tags from the selected contacts.
- Export: this action allows you to generate export files for the selected contacts.
- Delete: this action allows you to delete the selected contacts.
- Merge: this action allows you to combine two contact records.
Managing Duplicate Contacts
There are several ways you can choose to handle duplicate contacts in Outcomes:
- Using duplicate email addresses
- Using duplicate names
- Using some other duplicate data point
Review the suggestions below to learn more about these options.
Finding Duplicate Contacts Using Email Addresses
One way of finding duplicate contacts is by identifying applicants with the same or similar email addresses. To do this:
- From the Contacts Grid, click the Email header to sort your contacts by their email address.
- Scan the contacts to find any that have the same or similar email addresses.
- Upon finding suspected duplicates, review their other information (i.e., name, address, etc.) to determine if they are in fact duplicates.
- Where necessary, use the Search bar to find other contacts who may match relevant criteria.
- Once you've identified a duplicate, use the Tags feature to add mark them as duplicates (e.g., create a tag called "Duplicate Contacts"). This can be done individually or in batch.
- Next, to ensure that these duplicate contacts don't appear in segments, add a Tag criterion to your segments that filters out the duplicate contacts (i.e., include None of the Following Tags: Duplicate Contacts).
Finding Duplicate Contacts Using Names
Another way of finding duplicate contacts is by identifying applicants with the same or similar names. To do this:
- From the Contacts Grid, ensure that the contacts are sorted by their name.
- Scan the grid to find any contacts that have the same or similar names.
- Upon finding suspected duplicates, review their other information (i.e., address, phone number, etc.) to determine if they are in fact duplicates.
- Where necessary, use the Search bar to find other contacts who may match relevant criteria.
- Once you've identified a duplicate, use the Tags feature to add mark them as duplicates (e.g., create a tag called "Duplicate Contacts"). This can be done individually or in batch.
- Next, to ensure that these duplicate contacts don't appear in segments, add a Tag criterion to your segments that filters out the duplicate contacts (i.e., include None of the Following Tags: Duplicate Contacts).
Finding Duplicate Contacts Using Other Data
You can also use other data points to identify potential duplicate contacts. To do this:
- From the Contacts Grid, click the gear icon to customize the grid. This allows you to add the data point that you'd like to use in your search for duplicates. For example, you can add Mailing Address, Birth Date, or a custom property to the grid.
- Click the column heading that you added to sort your contacts using that data point.
- Scan the grid to find any contacts that have matching information.
- Upon finding suspected duplicates, review their other information (i.e., name, email address, etc.) to determine if they are in fact duplicates.
- Where necessary, use the Search bar to find other contacts who may match relevant criteria.
- Once you've identified a duplicate, use the Tags feature to add mark them as duplicates (e.g., create a tag called "Duplicate Contacts"). This can be done individually or in batch.
- Next, to ensure that these duplicate contacts don't appear in segments, add a Tag criterion to your segments that filters out the duplicate contacts (i.e., include None of the Following Tags: Duplicate Contacts).
Adjusting Contacts Views
Your Contacts Views can be modified to provide users with the information you want to display.
To change the view:
- Navigate to the Settings menu and click Contact Views under Contacts.
- Click on the name of a Contact View to edit it.
- Next, edit the view as desired. To add new fields, click and drag them from the left to the appropriate area on the right.
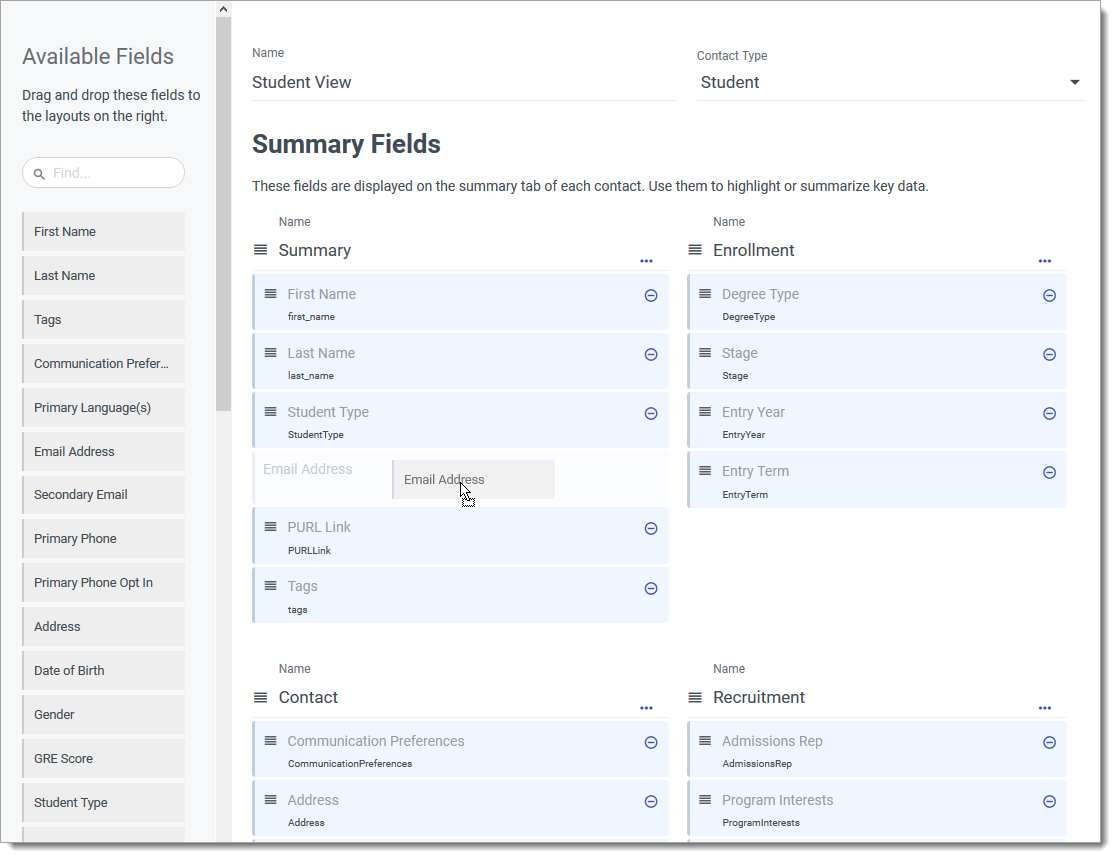
- Use the plus sign at the bottom of the page to add new columns.
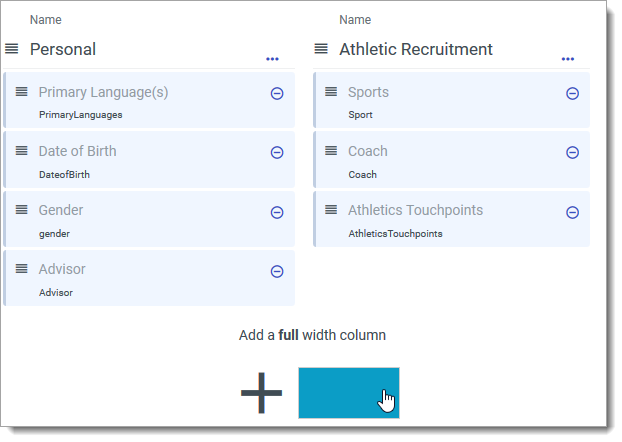
- Continue adding fields within your columns as desired.
- When ready, click Save Changes.
Working with Pending Contacts
Visitors to your Student Portal can create an account for themselves by establishing an email address and password. Outcomes then sends them an email allowing them to activate their account, and they appear on the Pending Accounts page (accessible from the Contacts section of the Settings Menu) until they are activated.

You can activate Outcomes Student Portal accounts directly from the Pending Accounts page. The option to resend activation emails is also available by clicking the envelope icon. After their account is activated, students can log in using their email address and password.
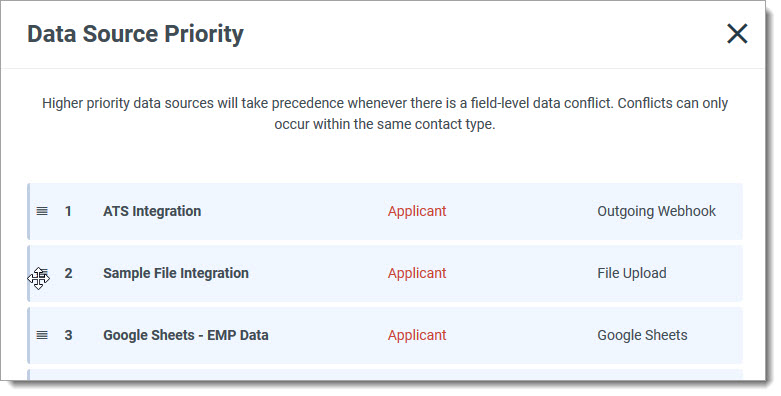
Working with Integration Priority for Imported Contacts
You can bring new Contacts into Outcomes using several methods. If you've configured several integrations, Outcomes needs to know which integration should take priority in the case of conflicting data. For example, if you've added SlideRoom, MailChimp, and File Uploads as possible data integrations, you may sometimes import the same contact from multiple sources. If your file upload had a phone number listed for one of your contacts, but your SlideRoom integration later imports the same contact with a different phone number, which phone number should be displayed? Setting your integration priority helps sort this out. Note that all imported data is saved, but setting the priority is what dictates which data should appear by default on a contact record.
To configure your integration priority:
- Click Data Sources in the Contacts section of the Settings menu.
- From the Current Integrations page, click Edit Priority Order.

- From the window that appears, adjust your data source priority by dragging and dropping the integrations in the order they should take precedence. Imports from different Contact Types won't impact each other. In the example below, once this order is saved, any time an applicant's contact information is imported using the Sample File Integration file upload, it takes precedence over any conflicting contact information that has been (or will be) imported by the Google Sheets import, or any other applicant imports listed below it.
- When you're done making changes, click Update.