Configure Question Rules
Overview
Some CASs allow users to add question rules. Question rules allow you to define how applicants interact with questions and answer options. Where available, rules can be configured once you've added questions.
Selection Options for Question Rules
Question rules can be built using program-specific (e.g., program-level, organization-level) and Extended Profile questions, if available in your CAS. As a reminder:
- Program-level questions: questions created for each of your individual programs in the CAS Configuration Portal.
- Organization-level questions: questions created for each of your organizations in the CAS Configuration Portal and applied to all the programs you offer in that organization. For example, if you have Organization 1 with Program A, B, and C, then your organization-level questions will be applied to all three programs.
- Extended Profile questions: questions included in the CAS application. Each CAS decides whether they include an Extended Profile section. You cannot create or edit Extended Profile questions.
Review the table below to see which options are available for each question rule.
|
Question Rule Type |
Program-level Questions |
Organization-level Questions |
Extended Profile Questions |
|---|---|---|---|
|
X |
X Note: these must be configured through the Organization Editor page. Additionally, you cannot create a Question Visibility rule that combines organization-level questions with program-level or Extended Profile questions. |
|
|
|
X |
X Note: these must be configured through the Organization Editor page. Additionally, you cannot create a Conditional Answer Options rule that combines organization-level questions with program-level or Extended Profile questions. |
|
|
|
X |
X |
X |
|
|
X |
X |
X |
|
|
X |
|
|
|
|
X |
X |
X |
|
|
X |
X |
X |
Configuring Question Rules
Question Visibility
The Question Visibility rule allows you to hide specific questions until an applicant enters an answer and/or meets specified conditions. You create conditions for a Trigger Question that displays additional questions, known as Affected Questions, based on the applicant's answers.
For example, if "Other" is an answer option for a "How did you hear about us?" question (Trigger Question), you can set a secondary question of "If Other, please explain" (Affected Question) to appear when an applicant selects "Other."
To configure question visibility:
- Click Rules Builder under Settings.
- Click Add Rule.
- Select Question Visibility from the Rule Type drop-down.
- Click Continue.
- Select the Affected Question or Question Block. This is the Question or Question Block that you want to hide until an applicant answers a separate Trigger Question. Question Blocks appear in bold text and Questions are listed under the Question Block they belong to. Use the Search bar to quickly locate a specific Question or Question block.

- Next, select Any or All from the operator drop-down.
- If you select Any, the Affected Question appears once the applicant meets any of the conditions you specify.
- If you select All, the Affected Question appears once the applicant meets all the specified conditions.
- Click Add Condition and select your Trigger Question from the drop-down. This is the question that the applicant must answer to show the Affected Question. All configured questions with selectable answers are available.
- Then, select your answer option from the next drop-down. This answer will trigger the display of the Affected Question.

- Click Add Condition to continue adding conditions, as needed.
- Click Save.
Conditional Answer Options
The Conditional Answer Options rule allows you to display different answer options based on an applicant's answer to a program-specific question. In other words, you can "link" questions together so that an applicant's answer to Question 1 (Linked Question) changes the answer options that appear for Question 2 (Affected Question).
For example, you want to ask applicants "What is your Major?" (Linked Question). You want the answer options to the subsequent question, "What is your Concentration?" (Affected Question) to change based on the applicant's answer to Question 1. So, if an applicant selects "Biology" for the Linked Question, the options for the Affected Question will be "Microbiology," "Cellular Biology," etc., and if an applicant selects "Chemistry" for the Linked Question, the options for the Affected Question will be "Inorganic Chemistry," "Organic Chemistry," etc.
Note that Linked and Affected questions must be part of the same Question Block.
To configure conditional answer options:
- Click Rules Builder under Settings.
- Click Add Rule.
- Select Conditional Answer Options from the Rule Type drop-down.
- Click Continue.
- Select the Affected Question. This is the question whose answer options will change based on the answer to a separate Linked Question.

- Select the Linked Question. This is the question that will be answered first and will change the answer options of the Affected Question selected in the previous step.
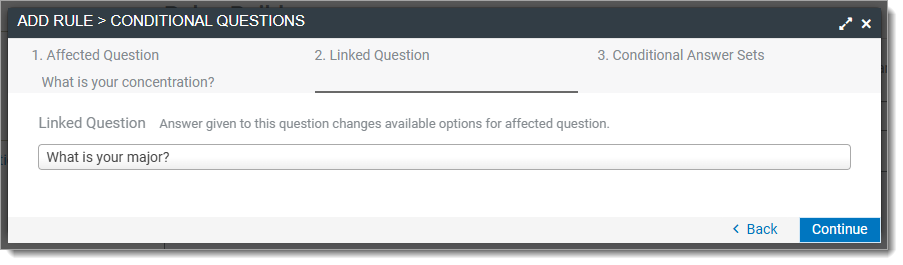
- Next, create Conditional Answer Sets for both the Linked Question and the Affected Question. Select the answer option for the Linked Question on the left, which will change the answer options available for the Affected Question on the right. You can use the search field and batch check/uncheck all to quickly find and select answer options.

- Click Add Answer Set to add more answer sets, as needed.
- Click Save.
Change Deadline
The Change Deadline rule allows you to create multiple deadlines per program and display the correct deadline based on an applicant's answer to a program-specific or Extended Profile question (if available in the CAS). This allows you to create fewer programs in the CAS Configuration Portal while still giving you the flexibility to establish different deadline dates.
For example, one program can be created with different deadlines based on an applicant's answer to a citizenship or military status question.
To configure change deadlines:
- Decide if you want to configure this question rule for individual programs or for all programs within your organization.
- If you want to configure it for individual programs, edit your program, click Editor at the top, and then click Rules Builder under Settings.
- If you want to configure it for most or all programs within your organization, from the Organization Details page, click Organization Rules at the top.
- Click Add Rule.
- Select Change Deadline from the Rule Type drop-down.
- Click Continue.
- Select if you're building a program-specific rule (i.e., Create Program Rule) or an organization-level rule (i.e., Organization Shared Rule). If you select Organization Shared Rule, you can activate an existing organization-level rule for your program.
- Click Continue.
- Under Name, enter an internal name for the deadline that only you and your program see (e.g., US applicant deadline).
- Under Conditions, select the alternate deadline and how it displays to applicants in the CAS Applicant Portal from the drop-down (e.g., same date, an earlier date, or as Rolling).
- Select if you want the alternate deadline to occur based on any or all of the conditions you establish.
- If you select Any, the deadline appears once the applicant meets any of the conditions you specify.
- If you select All, the deadline appears once the applicant meets all the specified conditions.
- Identify if the applicable question is a program-level, organization-level, or Extended Profile (if available in the CAS) question from the first drop-down.
- In the second drop-down, select the question.
- In the third drop-down, select the answer that changes the deadline for the applicant.

- Click Add Condition to add additional question triggers for this alternate deadline.
- If you're configuring this question rule for all programs within your organization, use the checkbox to apply the rule to all programs, or uncheck it and manually select the desired programs.
- Click Save.
You can add multiple alternate deadlines. If you do, you must place your deadline rules into a highest to lowest priority. Then, if an applicant selects answers that qualify them for multiple deadlines, the deadline that you select as the highest priority is displayed to them.
- From the Rules Builder page, click Prioritize Deadline Order.

- Click and drag the deadline rules into your preferred order.
- Click Save.
Your alternate deadlines can be reviewed from the Program Details page.

Change Fee
The Change Fee rule allows you to configure alternate program fees based on an applicant's response to a program-specific or Extended Profile question (if available in the CAS).
For example, you can choose to offer an adjusted fee if an applicant selects Yes to your program question "Are you a military dependent?"
To configure an adjusted fee:
- Decide if you want to configure this question rule for individual programs or for all programs within your organization.
- If you want to configure it for individual programs, edit your program, click Editor at the top, and then click Rules Builder under Settings.
- If you want to configure it for most or all programs within your organization, from the Organization Details page, click Organization Rules at the top.
- Click Add Rule.
- Select Change Fee from the Rule Type drop-down.
- Click Continue.
- Select if you're building a program-specific rule (i.e., Create Program Rule) or an organization-level rule (i.e., Organization Shared Rule). If you select Organization Shared Rule, you can activate an existing organization-level rule for your program.
- Click Continue.
- Enter a name for your alternate fee.
- Enter the amount of the alternate fee in the Change fee to field.
- Select if you want the alternate fee to apply based on any or all of the conditions you establish.
- If you select Any, the fee applies once the applicant meets any of the conditions you specify.
- If you select All, the fee applies once the applicant meets all the specified conditions.
- Identify if the applicable question is a program-level, organization-level, or Extended Profile (if available in the CAS) question from the first drop-down.
- In the second drop-down, select the applicable question.
- In the third drop-down, select the response that qualifies the applicant for an alternate fee.

- To add more conditions, click Add Condition.
- Click Save.
You can add multiple alternate fees. If you do, you must place your alternate fee rules into a highest to lowest priority. Then, if an applicant selects answers that qualify them for multiple adjusted fees, the fee that you select as the highest priority is displayed to them.
- From the Rules Builder page, click Prioritize Fee Order.

- Click and drag the alternate fee rules into your preferred order.
- Click Save.
Your alternate fees can be reviewed from the Program Details page.

Fee Waiver Qualification
The Fee Waiver Qualification rule allows you to configure an automatic program fee waiver based on an applicant's response to a program-level question.
For example, you can grant a fee waiver if an applicant selects Yes to your program question "Are you a US veteran?"
Note that you can have only one Fee Waiver Qualification rule per program.
To configure a fee waiver qualification:
- Click Rules Builder under Settings.
- Click Add Rule.
- Select Fee Waiver Qualification from the Rule Type drop-down.
- Click Continue.
- In the first drop-down, select the question.
- In the second drop-down, select the answer that qualifies the applicant for an automatic fee waiver.

- Click Add Condition to continue adding conditions, as needed. You can add as many questions and answers that qualify the applicant for a fee waiver. If you add multiple conditions, note that fee waivers are awarded if any of the conditions are met.
- Click Save.
Program Availability
The Program Availability rule allows you to choose to show or hide your programs based on an applicant's response to a program-specific or Extended Profile question (if available in the CAS).
For example, you can choose to only display a program if an applicant selects International to an Extended Profile citizenship question. By default, programs will display to all applicants unless a program has an availability question rule associated with it.
To configure program availability:
- Decide if you want to configure this question rule for individual programs or for all programs within your organization.
- If you want to configure it for individual programs, edit your program, click Editor at the top, and then click Rules Builder under Settings.
- If you want to configure it for most or all programs within your organization, from the Organization Details page, click Organization Rules at the top.
- Click Add Rule.
- Select Program Availability from the Rule Type drop-down.
- Click Continue.
- Select if you're building a program-specific rule (i.e., Create Program Rule) or an organization-level rule (i.e., Organization Shared Rule). If you select Organization Shared Rule, you can activate an existing organization-level rule for your program.
- Click Continue.
- Under Name, enter an internal name for the program availability only you and your program see (e.g., International Applicants program).
- Under Conditions, select if the program will or will not be available based on the conditions you establish.
- Select if you want the program availability to occur based on any or all of the conditions you establish.
- If you select Any, the program availability occurs once the applicant meets any of the conditions you specify.
- If you select All, the program availability occurs once the applicant meets all the specified conditions.
- Identify if the applicable question is a program-level, organization-level, or Extended Profile (if available in the CAS) question from the first drop-down.
- In the second drop-down, select the question.
- In the third drop-down, select the answer that changes the program availability for the applicant.

- Click Add Condition to add additional question triggers for this program availability.
- Click Continue.
- Enter an explanation for why a program may be removed from the applicant's application if they change their response to the triggered question. For example, if the applicant changes their citizenship status from International to US Citizen, this program is automatically removed from their application.

- If you're configuring this question rule for all programs within your organization, use the checkbox to apply the rule to all programs, or uncheck it and manually select the desired programs.
- Click Save.
Show Document
The Show Document rule allows you to choose to request or require a document upload based on an applicant's response to a program-specific or Extended Profile question (if available in the CAS).
For example, you can request that applicants upload a Shadowing Hours document type if they report in a program question that they completed more than 10 hours of shadowing experience.
When a program configures documents, all document types are displayed for applicants. However, if this question rule is activated for a document type, the document type will be hidden until the applicant's answer matches the question rule's configurations.
To configure document visibility:
- Click Rules Builder under Settings.
- Click Add Rule.
- Select Show Document from the Rule Type drop-down.
- Click Continue.
- Under Name, enter an internal name for the document visibility only you and your program see (e.g., Shadowing Hours).
- Under Conditions, select the document type you are requesting or requiring.
- Select if you want the document visibility to occur based on any or all of the conditions you establish.
- If you select Any, the document appears once the applicant meets any of the conditions you specify.
- If you select All, the document appears occurs once the applicant meets all the specified conditions.
- Identify if the applicable question is a program-level or Extended Profile (if available in the CAS) question from the first drop-down.
- In the second drop-down, select the question.
- In the third drop-down, select the answer that changes the document visibility for the applicant.

- Click Add Condition to add additional question triggers for this document visibility.
- Click Save.
Managing Question Rules
You can update question rules on the Rules Builder and/or Organization Rules pages.

Editing Question Rules
Click the pencil icon to update an existing question rule.
Deleting Question Rules
Click the trash icon to delete a question rule.
If you configured a question rule for all programs within your organization, you can delete it from the Organizations Rules page or from the individual programs on the program's Rules Builder page.
Deleting Questions Associated with Question Rules
Note that deleting a question associated with a configured question rule will also delete the question rule.
If, instead, you want to remove a condition from an existing question rule, then edit the question rule.