Emailing through EMP
Overview
You have several options to send emails:
Creating Emails in a Campaign
In Nurture, Blast, and Event campaigns, you can send emails to communicate with your students. To do this:
- Build your campaign.
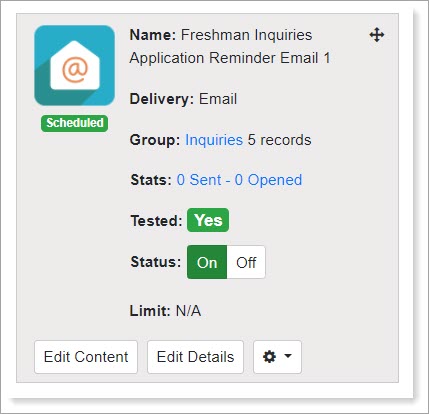
- Once the campaign has been created, click Add Item and select Email from the drop-down.
- You'll be prompted to complete additional information to customize the email operational details.
- Click Edit Content to begin crafting the email.
- Choose an email template or create a new one.
- Save your work before testing or downloading your email.
- Note: the Download function allows you to download the HTML code of the email to use in another system.
Previewing and Testing Emails in a Campaign
Before you send or schedule your email, you can preview what it will look like to your recipients on different device types. You can also send a test email to yourself or another user in your EMP instance.
Previewing a Dynamic Email Template
In the Dynamic Email Template Builder, use the desktop and mobile buttons to toggle between views to preview your email.

Testing Emails
You can send a test email to verify that the contents appear as expected in a recipient's inbox. To do this:
- Click Test at the bottom of the page.
- Select a Test Student from the drop-down or click Select Random Student to randomize the test student.
- Note: No email is sent to the selected test student. The test student's data populates the test email in your and any other recipients' inbox.
- Select the recipients of the test email. EMP defaults to selecting only you. If you want others to receive the test email, click Show additional users and click the checkbox next to their name.
- You have the option to add an email address not in your EMP instance to allow you to test emails to various email clients such as Outlook, Google, iCloud, etc. You can add those email addresses in Other.
Sending Emails
Emails will only send to the intended recipients once they are turned on. To turn on the email, toggle the status to On.

After turning the status to On, you can set your desired send dates and times.
Note: even if a campaign's rules are met or you've scheduled the email to send, an email won't send unless it is turned on and saved.
Sending Emails in a Blast Campaign
To set dates and times for emails:
- Select the send date for the email.
- Select the send time for the email.
- Select a repeat option if applicable. EMP defaults to Don't Repeat.
- Click Save.
Sending Emails in a Nurture Campaign
To set dates and times for emails:
- Choose the number of days after the student has entered the selected stage or after the previous tier. For example, if you are sending emails for a new inquiry campaign, you can set this date to one day after the student enters the Inquiry stage. Then, you can set the emails and each tier to be sent every 14 days, spacing out your communication every two weeks.
- Click Save.
Sending Emails in a Event Campaign:
To set dates and times for emails:
- Invitations: select the send date and time for the email and Save.
- Signup Reminders: choose the number of days before the event to send the email and Save.
- Thanks for Attending: choose the number of days after the event to send the email and Save.
- Did not Attend: choose the number of days after the event to send the email and Save.
Sending Emails to an Individual Student
You have the option to send emails to individual students in addition to campaign emails. To do this:
- Navigate to the student record.
- Click Communications.

- Click Send Media and select Email from the drop-down.
- Craft your email and Save.
Testing Emails for an Individual Student
You can send a test email to verify that the contents appear as expected in a recipient's inbox. To do this:
- Click Test at the bottom of the page.
- Select the recipients of the test email.
- You have the option to add an email address not in your EMP instance to allow you to test emails to various email clients such as Outlook, Google, iCloud, etc. You can add those email addresses in Other.
- Click Send.
