Forms
Form Overview
SEM Forms
You can create a custom web ad campaign and monitor its response rate by connecting the ad to an SEM Form in EMP. When a student fills out the form, they'll be added to the EMP database with the specific form noted as the source for that student.
You can maximize your SEM investment by creating an SEM form in EMP to use as the landing page from the link within the search results. The data collected on the forms are based on your Inquiry Form, but each SEM form has a unique web address. The unique form address can be used as a source when building Groups to track the effectiveness of the SEM.
Graphics, text, and the information collected on the SEM form are customized for the audience using their particular search words/phrases. SEM forms are not only useful in search engine marketing but can be generated for outdoor, print, broadcast, or online promotion. SEM forms can also be used for event marketing and can include registration for an event.
Custom Forms
When additional information is required from a student, a custom form provides a means to collect specific data on the PURL. For example, while Art is identified as a major of interest on the inquiry form, details about the specific art program a student wishes to explore further may be needed. Build a custom form that lists each art program, allowing students to make selections through their PURL. This customization enables the creation of groups or fields based on individual responses, ensuring a tailored approach to gathering pertinent information. Note: a custom form can only be used on the PURL and is the only form type that is added to the PURL.
Creating a Custom and SEM Form
- Click Content in the top navigation bar and select Forms from the drop-down menu.
- Click New Forms and select either New Custom Form or New SEM Form.
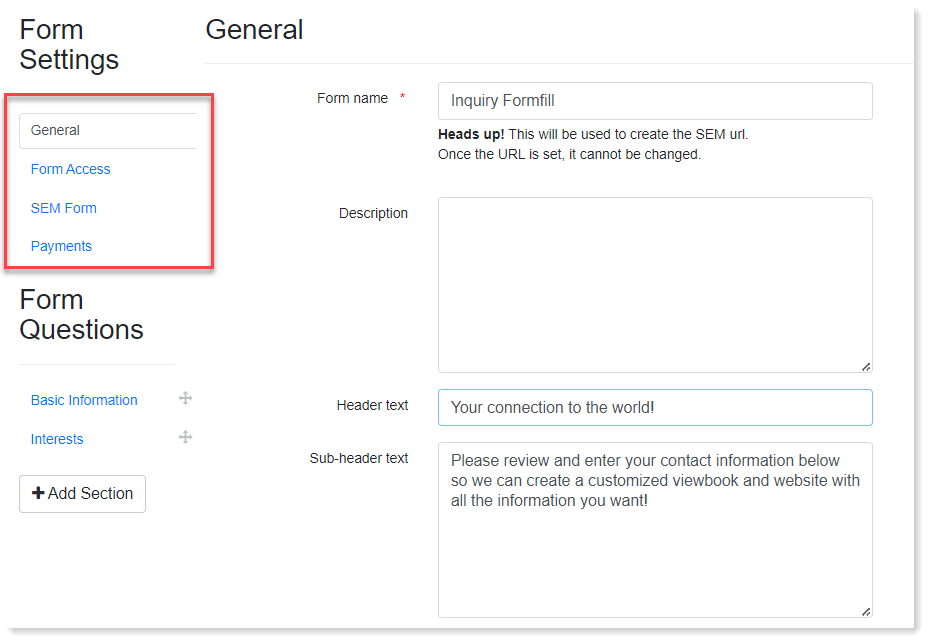
- Input the General information.
- Click Form Access to choose which permission groups can access the form by checking the boxes.
- Click Payments to set up the payment gateway if there are any items for sale.
- SEM Forms have additional customization options:
- Click SEM Form to enter the Page title, Meta description, Image, and Image Description.
- If you are using the form for an event, choose the event from the drop-down menu.
- Under Form Questions, click the edit pencil to name the section or click the plus sign to add additional fields.
- Click Add Section to create a new section of questions. Click the edit pencil to change the name of the section, trash can to delete the section, and plus sign to add fields.
Once you've created the form, click View form here to review it.
If you created an SEM form, connect the form link to your ad campaign to track the response rate and gauge the effectiveness of your campaign. This can be done via adding the SEM form URL to an email, on your website, to an advertisement, etc.

Editing an SEM Form
Click the edit pencil next to the SEM form to make your changes.
Copying an SEM Form
Click the copy icon to duplicate the form. Then, click the edit pencil to make changes to the form.
Deactivating an SEM Form
Click the delete icon to remove the SEM form from the list. A deactivated SEM Form link will redirect to your general Inquiry Form.
Managing Form Access
You may want to restrict certain users from accessing a student's form information.
- Click Account in the top navigation bar and select EMP Settings from the drop-down menu.
- Click Form Access.
- Locate the form you want to manage the access on, and click the Show/Hide icon.
- Select the appropriate users who can access the form, then Save your changes.
