Using Groups to Segment Your Students
Groups Overview
Groups allow you to segment your student audiences so you can send them customized content. You can create groups based on data that’s collected from the inquiry form, like contact information or major of interest, or your import source name. You can also make groups based on campaign interaction.
Apply groups to your text, email or print, campaigns, PURL pages, exports, goals, or to-do’s to reach the right students with automated, relevant information.
Using the Group Builder
The Group Builder is your query tool that retrieves specific fields from EMP based on your criteria, generating a list of students meeting those conditions. You can create lists of students defined by attributes, interactions, and time frames.
The Group Builder logic uses a combination of filters and operators. Filters are applied based on a range of factors, including demographics, engagement levels, location, and other relevant data, allowing for precise segmentation. Operators such as "Any" or "All" connect these filters together, enabling you to create finely-grained groups that meet specific criteria.
Nesting
Nesting allows you to create more complex and precise segmentation of students based on multiple levels of criteria. It involves organizing filters within other filters, forming a hierarchical structure of criteria.
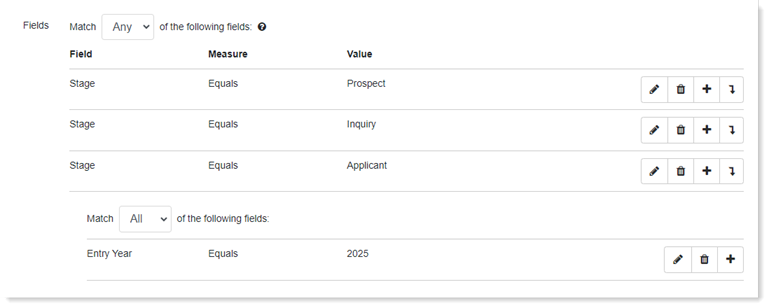
You'll use Nesting to create Groups that use both the "Any" and "All" operators to define a specific student population. For example, suppose you're building a Group of Fall 2025 Prospects, Inquiries, and Applicants. Since you're looking for Prospects or Inquiries or Applicants, use the "Any" operator to query the stages. Then, nest Entry Year Fall 2025 with the stages using the "All" operator. Now, the Group will show students in any of the indicated stages, but only with a Fall 2025 entry year.
Building a New Group - Basic
- Click Students in the top navigation.
- Select Groups from the drop-down menu.
- Click New Group.
- Name the Group and add a Description so it's easily recognizable.
- Select a Rep if you want the students returned in the Group to only apply to a particular rep. By default, EMP will display All Reps. Indicate if the list should appear in the Menu Bar under the My Lists subpanel in the Applicant Lists panel. This option provides you with quick access to run the list.
- Create a query by selecting a Field Filter or Interaction Filter.
- Select if you want your query to match all (i.e., and Boolean logic) or any (i.e., or Boolean logic) of the rules you subsequently establish.
- Click Save to run the query.
The group will display the list of students who meet the criteria. You can choose to export the group list, change the columns of the data displayed, or edit the group.
If you export the group from the display screen, only the data from the visible columns will be included. To include additional data and apply more filters, create a new export and add the group to it.
To customize the columns displayed, click Change Columns to select the desired information. You can also modify the default columns in My Preferences. If you want the changed columns to appear every time you view the group, check the box next to Show these columns every time I view this list.
If you need to edit the group, click Edit Group.
Building a New Group - Advanced
- Click Students in the top navigation.
- Select Groups from the drop-down menu.
- Click New Group.
- Toggle to Advanced.
- Name the Group and add a Description so it's easily recognizable.
- Select a Rep if you want the students returned in the Group only apply to a particular rep. By default, EMP will display All Reps. Indicate if the list should appear in the Menu Bar under the My Lists subpanel in the Applicant Lists panel. This option provides you with quick access to run the list.
- Create a query by selecting a Field Filter, Interaction Filter, or Event.
- Add a Payment.
- Automatically filter students by choosing an Outreach Status.
- Include Active and/or Inactive students in the query. Not selecting active or inactive will result in no students.
- Select if you want your query to match all (i.e., and Boolean logic) or any (i.e., or Boolean logic) of the rules you subsequently establish.
- Click Save to run the query.
Managing Groups
From the group list, you have several options to work with the groups that have been created. You can view and perform the following actions for groups.
Editing Groups
Use the pencil icon to edit a group.
Copying Existing Groups
Use the duplicate icon to copy an existing group.
Deleting Groups
Use the trash icon to delete a group.
Group Expiration
As your list of groups expands over time, you may have to navigate large selection lists when attaching a group to an email, export, etc. To prevent groups from indefinitely cluttering your EMP instance, groups are automatically removed unless they meet all of the following criteria:
- The group is not "In Use By" any other system feature (e.g., exports, emails, viewbook pages, etc.).
- The group settings have not been saved (updated) in the past 60 days.
- The group has not been "Favorited."
- To keep your group from being automatically removed, click the star action icon next to the group. While favorited, that group will be retained in the account indefinitely, regardless of whether it's in use by other system features or how often it's updated.
Applying a Group to EMP functionality
Groups allow for customized content to be sent only to specific audiences and can be applied to campaigns, to-do’s, PURL pages, and exports.
Campaigns
Campaigns refer to the automated process of sending targeted emails, texts, or voice messages to a specific student population. These campaigns are designed to engage, nurture, and convert prospective students into matriculated students, as well as to maintain relationships with current students.
You can segment your students into different groups based on various criteria such as demographics, major/program, extracurricular activities or interests, or any other relevant data. This segmentation helps you tailor your email, text, or voice campaigns to specific target audiences.
When you create a campaign, you’ll build out your communication tracks. You can apply your group to the entire track, or to the unique outreach types within the track.
To-do's
To-do’s are tasks or reminders you can set for yourself or other reps directly in EMP.
To-do's can be integrated into a campaign to ensure that tasks are automatically generated and assigned when necessary, reducing the reliance on manual intervention and minimizing the risk of oversight or delay.
Groups can be applied to to-do's so they're triggered only for students within that Group.
Personalized URL (PURL)
The personalized URL or PURL is the online viewbook specific to an individual student. You can use groups to define student populations for specific PURL pages (e.g., major). For example, students interested in chemistry will only see a PURL page with chemistry information.
Exports
With the Exports feature, you can view additional student information beyond the initial five columns available once your Group has been created. Simply select the desired fields, filters, and criteria to define the specific data you want to export. This includes a wide range of data such as contact information, event registration details, interactions, and any other relevant information stored within EMP.