Migrating Review Form Responses to Custom Properties
Outcomes allows you to create Evaluation Forms to capture the results of your reviews. This article helps with the following questions:
- How do I include Evaluation Form responses in Exports?
- How can I make my reviewer's results easier to find?
- How can I use my reviewer's responses in reports or other areas of Outcomes?
Using JavaScript, you can build an enhancement in Outcomes that accomplishes all these things. This advanced configuration allows you to make fields from your Evaluation Forms available in Exports, Reports, Filters, and other areas. This is done by:
- Building Custom Properties and populating them with fields from your Evaluation Forms.
- Displaying the Application Properties where needed (e.g., in the Application Summary, Sidebar, or Exports).

Building the Custom Properties
For this code to work, you'll need to build a Custom Property for each response you want to capture. For example, if your Evaluation Form has three questions, and you have two reviewers that will complete it, and you want to capture each response to each question, you'll need to add six of these Custom Properties. You'll add JavaScript code that instructs the Custom Property to pull in your reviewers' Evaluation Form responses.
- When configuring your Custom Property, enter a Label that will describe which form, question, and reviewer number you want to target. For example, use the Label "Initial Review - Personal Statement Rating - 2" to capture the second reviewer's response to the Personal Statement question on your "Initial Review" Evaluation Form.
- Select a Data Type that matches the output you expect to get from your Evaluation Form response.
- In the Expression area, add the following code. (Use the view source icon at the top right to copy the code.)
{
  /* * * * * * * * * * * * *
   * * USER INPUT SECTION * *
   * * * * * * * * * * * * */

  // use this field to add the phase key
  let phaseId = "ready_for_faculty_review";

  // use this field to add the evaluation form key
  let evaluationForm = "faculty_review_form";

  // use this field to determine the number recommendation you want to output.
  let evaluationNumber = 1;

  // use this field to add the evaluation question key
  let evaluationQuestion = "short_comment";

  // use this field to define the question type (as defined on the evaluation form) so the correct output is processed
  // type1: scale, text, paragraph text, drop down, number, multiple choice, date, email address, phone number, url
  // type2: check boxes, table
  // type3: scale group, address, name
  let questionType = "type1";

  /* * * * * * * * * * * * * * * * * * * * * * * * * * * * * * * * * * * * * * * * * * * * * * *
  This function takes five inputs to return a single question response from the Outcomes Evaluation Data Object.
  NOTE: phases variable is available globally, does not need to be defined.
  * * * * * * * * * * * * * * * * * * * * * * * * * * * * * * * * * * * * * * * * * * * * * * * */

  function getEvaluationData(phases, phaseId, evaluationForm, evaluationNumber, evaluationQuestion, questionType) {

      let evals;

      // NOTE: Sort evaluations by created date in descending order (oldest to newest)
      if ((phases) &&
          (phases[evaluationForm]) &&
          (phases[evaluationForm].evaluations) &&
          (phases[evaluationForm].evaluations.length)) {

          evals = phases[evaluationForm].evaluations.sort((evalA, evalB) => {
              let evalACreatedDate = new Date(evalA.dateCreated).getTime();
              let evalBCreatedDate = new Date(evalB.dateCreated).getTime();
              return evalACreatedDate - evalBCreatedDate;
          });
      } else if ((phases) &&
          (phases[phaseId]) &&
          (phases[phaseId].evaluations) &&
          (phases[phaseId].evaluations.length)) {

          evals = phases[phaseId].evaluations.sort((evalA, evalB) => {
              let evalACreatedDate = new Date(evalA.dateCreated).getTime();
              let evalBCreatedDate = new Date(evalB.dateCreated).getTime();
              return evalACreatedDate - evalBCreatedDate;
          });
      }

      // NOTE: Evaluation Export Business Logic
      if ((evals) &&
          (evals[evaluationNumber - 1]) &&
          (evals[evaluationNumber - 1].form) &&
          (evals[evaluationNumber - 1].form[evaluationQuestion])) {

          let returnObject = evals[evaluationNumber - 1].form[evaluationQuestion];

          if (questionType == "type1") {
              return returnObject;
          } else if (questionType == "type2") {
              return returnObject.toString();
          } else if (questionType == "type3") {
              return Object.keys(returnObject).map((key) => { return key + ": " + returnObject[key] }).reduce((accumulator, currentValue) => { return accumulator + currentValue + ",  " }, "");
          } else {
              return;
          };

      } else if ((evals) &&
          (evals[evaluationNumber - 1]) &&
          (evals[evaluationNumber - 1].form) &&
          (evals[evaluationNumber - 1].form[evaluationQuestion])) {

          let returnObject = evals[evaluationNumber - 1].form[evaluationQuestion];

          if (questionType == "type1") {
              return returnObject;
          } else if (questionType == "type2") {
              return returnObject.toString();
          } else if (questionType == "type3") {
              return Object.keys(returnObject).map((key) => { return key + ": " + returnObject[key] }).reduce((accumulator, currentValue) => { return accumulator + currentValue + ",  " }, "");
          } else {
              return;
          };
      } else {
          return;
      }
  }
}
- Make these adjustments so that the Custom Property works with your data:
- Replace the phaseid "ready_for_faculty_review" with the key used in the Phase your Evaluation Form is associated with.
- Replace "faculty_review" with the key used in your Evaluation Form.
- Replace "review_question" with the key used in the question you're working with.
- Replace evaluationNumber=1 with the reviewer you want to target. For example, use evaluationNumber=3 to capture the 3rd reviewer's response to this question.
- Update the questionType variable based on the type of question you are working with:
- Leave the default, type1, if your question is any of the following types: scale, text, paragraph text, drop down, number, multiple choice, date, email address, phone number, or url.
- Change the questionType variable to type2 if your question type is check boxes or table.
- Change the questionType variable to type3 if your question type is scale group, address, or name.
- Save your Custom Property and repeat these steps for each form, question, and response you need to migrate.
Finding the Keys to Use
To make this code work in your environment, you'll need to replace the keys in the example above with the appropriate keys from your Evaluation Forms. To find these keys:
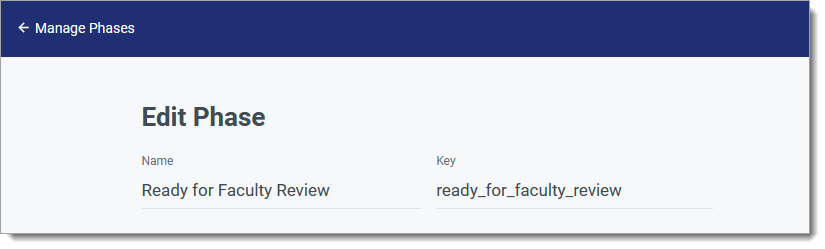
- First, find the key to use for the phaseid variable. To do this, Navigate to Phases in the Application Review section of the Settings menu.
- Click Manage.

- Click the Phase that your Evaluation Form is associated with. Find the key at the top of the page. This is what you'll use in your JavaScript expression.
- Next, find the keys for your Evaluation Form. To do this, go to Evaluation Forms in the Application Review section of the Settings menu.
- Click the Evaluation Form you want to work with.
- At the top of the page, you'll find the key for the Evaluation Form, and each question on the Evaluation Form has its key listed underneath it.

- In the example above, the key for the Evaluation Form is committee_review. The key for the first question is committee_decision, and the key for the second question is personal_statement_1. As seen in step 3, the key for the Phase was ready_for_faculty_review. As a result, the code to use at the beginning of your JavaScript expression looks like this:
let phaseId = "ready_for_faculty_review";
// Here, you're telling Outcomes to look at the Ready for Faculty Review Phase.
let evaluationForm="committee_review";
// Here, you're telling Outcomes to look at the Committee Review Evaluation Form.
let evaluationNumber=1;
// Here, you're indicating which evaluator's results should be pulled in. Use 1 to pull in the response from the first evaluator.
let evaluationQuestion="committee_decision";
// Here, you're telling Outcomes to look at the Committee Decision question.
Finding Your Question Type
For the code to work with your question, you'll need to indicate which type of question you're working with. To find your question type:
- Navigate to Evaluation Forms in the Application Review section of the Settings menu.
- Click the Evaluation Form you're working with.
- Click the pencil near the question you're targeting.

- Find the Question Type at the top right. Use this to complete step 5 of Building the Custom Properties. Note that Question Types not listed are unavailable to use for this configuration.

Displaying the Form Responses
Once you've added the JavaScript to capture these Review Form responses in Custom Properties, you can then display the responses in several areas.
Adding Form Responses to Application Summary or Sidebar
In Outcomes, you can move fields to the Application Summary or to the Application Sidebar. This allows you to quickly locate key information on an application. To move Form Responses to one of these areas:
- Navigate to Settings and click Application Summary View in the Application Review section. From here, you can review which fields are currently placed in the Summary or Sidebar.

- Click Manage to make changes.
- From here, locate the form responses you'd like to add by searching for your Custom Properties on the left under Available Fields. Click and drag to place them along with the Summary Fields or Sidebar Fields.

- The fields now appear accordingly on each application, allowing you to quickly locate them.
Exporting Form Responses to a Spreadsheet File
Once Form Responses have been stored as Custom Properties, they can be extracted from Outcomes using the Export feature. To include Custom Properties in an export:
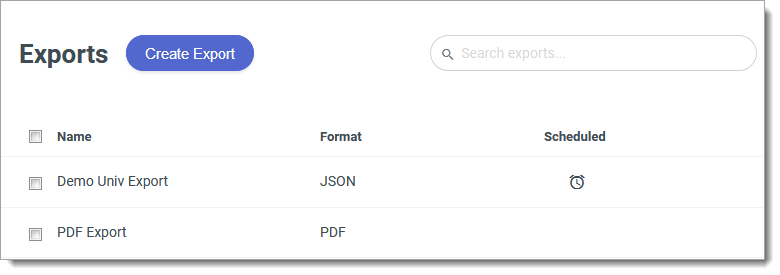
- Navigate to the Exports menu in the Import/Export section of your Settings.
- Click Create Export.
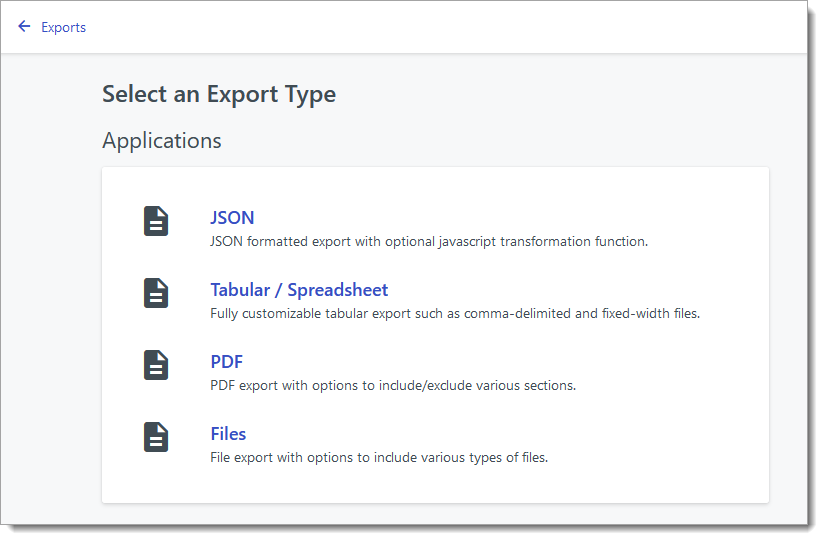
- Select Tabular/Spreadsheet as your export type.
- Begin configuring your export. In the Available Fields area, search for the form responses you'd like to include and drag them to the Columns area.

- Finish configuring the file, and click Create Export.
Including Form Responses in a PDF Export
Form responses that have been migrated to Custom Properties can also be included in PDF Exports. To do this, you'll first need to add the Custom Property to your Application Summary. Then, create a PDF export that includes the fields of your choice. To create the PDF export:
- Navigate to the Exports menu in the Import/Export section of your Settings.
- Click Create Export. Select PDF to begin configuring your PDF export.

- Enable the Customize Contents option and check Summary Page to add your summary fields to the PDF export.

- Continue configuring your export as desired, then click Create Export.
- You can now generate your export including the applications of your choice.