Quick Start Guide for Reviewing Applications in Outcomes
Overview
Your institution's admissions team uses Outcomes to streamline their application review process. This page provides key information you need to get up and running so you can review applications as instructed by your admissions team. Keep in mind, Outcomes is very customizable, so each institution may implement different features and processes.
Note that the video above refers to the software by its former name, Admissions by Liaison.
Resetting Your Password
Navigating the Dashboard
Depending on how your institution's Outcomes administrator configured the system, your Dashboard may not contain all of the elements outlined below. Additionally, you may have access to rearrange your own Dashboard. If so, some images within this Help Center may not exactly match your view, but the functionality remains the same.
Working with the Applications Grid
To view the Applications Grid, select Applications from the Navigation Menu.

- Current and Archived Programs Selector: use this dropdown to isolate applications to current (active) programs, archived programs, or both. By default, current applications are displayed.
- Program and Segments Selector: use this dropdown to select which sets of applications you want to view, either by program or Segment. By default, all applications are displayed.
- Search bar: use the search field to find applications. You can perform a standard keyword search or an advanced search with Lucene syntax. Standard searches can be 2-10 characters long, using properties like:
- Applicant names
- Applicant E-mail addresses
- Application IDs
- Program Name
- Current Stage
- Current Phase
- Current Decision
- List View / Map View: use these buttons to switch between the view options:
- List View: this is the default view of the Applications Grid, allowing you to see a paginated list of your entire applicant pool, along with some information about each one.
- Map View: this option provides a visualization of your applicants' locations. Use the Map applications by... toggle to switch between options, including birth location and current address.
- Segments: use the filters to query your application pool and isolate the subset of your choice. You can also use this menu use to create a new Segment of your application pool.
- Phase Pipeline: this area gives you a quick snapshot of your applicant pool, allowing you to see how many applications you have in each phase you've established. Click on any phase to isolate the applications within it.
- Application List: this area lists all applications or those that meet the filters you've established.
- Click on any column header to sort by that column.
- Click and drag the column separators to make the columns more wide or narrow.
- Click on any application record to open the application preview. Click View Full Application or the arrow on the grid to see all of the application's details.
- Click on the checkboxes to select applications to complete one of the available actions.
- Grid Settings: this menu allows you to customize the columns that appear in the list view, to switch back to the default columns, to set your column configuration as default for all users, to refresh the data on the grid, or to reset back to the default column widths.
- Pagination: use this to navigate through your application list.
- Application Preview: this pane provides a preview of the selected application. From the preview, you can see key information, download or export the application, change its phase or decision, or click View Full Application to see all of its details.
- View Full Application Button: click this button to open the application to see all of its details or conduct a review.
To perform a bulk action from the Applications Grid, click the checkbox next to the applicants’ names.
Customizing the Applications Grid
When you click the gear icon on the Applications Grid, the Grid Customizer opens. Here you're presented with a list of all available fields. To add a field to use as a header on the Applications Grid, click and drag it from the Available Fields section to the Shown on Grid section. You can rename fields in the Shown on Grid section by clicking the existing name and typing the name of your choice. If you've added many columns, consider checking the Pin First Column checkbox to keep the first column in place when scrolling to the right on the Applications Grid. Click Save to keep your changes.
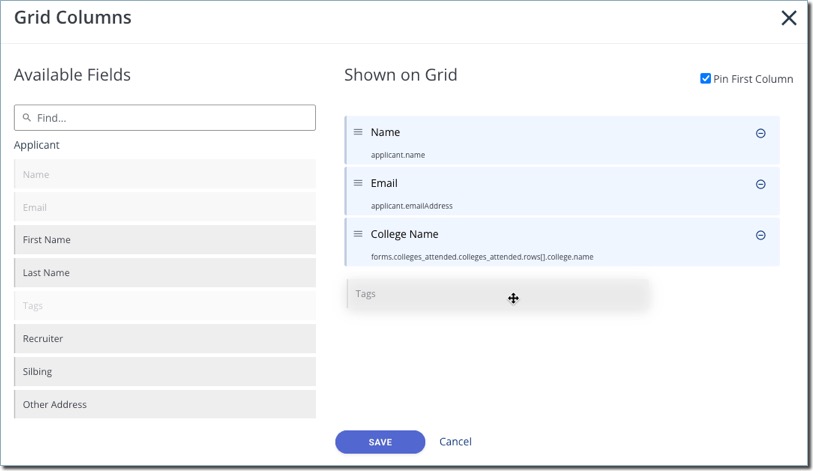
To make your changes apply to other users, click the Grid Settings icon on the Applications Grid then click Set as Default for All Users.
Working with the Map View
If you switch to the Map View, you'll be presented with a map that indicates the location of each of your applicants. To establish what data point is used for the applicant locations, click Map applications by... and select from the available options.

From the Map View, you can:
- Click any point on the map to see how many applicants are located there.
- Zoom in or out using the + and - buttons.
- Click Map, Terrain, or Satellite to select your desired view.
- Switch to a full-screen view using the button in the upper-right corner.
Using Phases on the Applications Grid
Phases are the different periods during the application cycle, so the Phase Pipeline is a summary of your applicant pool that allows you to see where applications are in the application process. Typically, the first phase listed in your Phase Pipeline is a default phase that contains all applications that have not yet progressed to another phase.

Click the number under the phase heading to filter the applications and display only those in the selected phase. You can clear this phase selection by clicking the X near the selected phase.
You can change an application's phase individually, or use batch actions to change the phase for multiple applications at once. The numbers displayed on the Phase Pipeline update to show the current count of applications in each phase. If your permissions allow, you can add phases as desired.
Using Filters on the Applications Grid
You can add filters to view specific sets of applications. For example, you can filter for all applications to a specific term, all applications within one of the Segments you’ve created, or all applications that meet a specific set of academic criteria. You may also wish to use filters to find applications that are ready to be reviewed or moved into another Phase.
To add a filter:
- Click Segment.
- Select the type of filter you want to use (e.g., Form, Application Property, Phase). The Form filter type contains many relevant fields, as the applicant's responses to questions on the application are stored here. The Keyword filter searches the first name, last name, and email address fields for whatever criteria you enter.
- Select or enter the applicable data that you want the applications to match. When using the contains filter in a query, be aware that only whole words are used to find applicants. For example, the query Program Property --> Program Level --> contains --> Masters will be successful, while Program Property --> Program Level --> contains --> Mas will not.
- Click Apply. The Application Grid refreshes, revealing the matching applications.
- You can add more filters as needed. Once two or more filters have been added, you can change the list operator from AND to OR by clicking the operator.

To remove a filter, hover your mouse over the filter and click the minus sign that appears.
Working with Group Filters
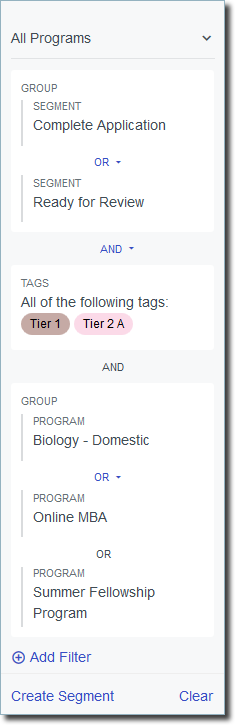
When adding filters from the Applications grid, you can create more advanced queries by using the Group Filter option. Grouped Filters allow you to nest groups of filters together within a series of filters. For example, with Group Filters, you can create a query that finds all applications that meet the following criteria:
- (Applicant's Legal State of Residence is NY) OR
- (US Residency = Non Resident) AND (Foreign Transcripts = Yes) OR
- (Program = Management) OR (Program = Business)
In the above example, #2 and #3 are Group Filters, allowing you to isolate a combination of filters inside the larger query. With this, you can create a single query that finds anyone who matches any of the filters in either #1, #2, or #3.

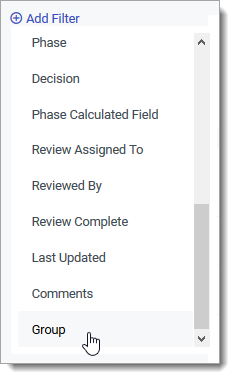
To add a Group Filter:
- Click Add Filter and select Group.
- Under Editing Group, click Add Filter to begin adding filters to the Group.
- After applying the first filter, click Add Filter again to form the Group. Continue adding and applying filters to this Group as desired.

- Click the AND / OR toggle to adjust whether the filter should include applications that match all or any of the selected criteria.
- Click <-- Back to save the Group Filter and return to the main filters.
- Continue adding filters or additional Group Filters as desired.
Completing Batch Actions on the Applications Grid
Using the checkboxes on the Applications Grid, you can select one or more applications to perform a batch action on. For example, you can send the selected applicants an email or decision letter, change their Phase, or create an export file including them.
To complete a batch action, select the appropriate applications and choose an option from the menu at the bottom of the page.

Viewing Application Information
Note: the application information that appears for you is dependent on how your institution's administrator configured the system, so you may not have access to all of the sections described here.
From the Applications Grid, you can select an application to review by clicking on an applicant's name. Note that the configuration here is customizable, so the options you see in your environment may be slightly different. You can edit the layout of this page by going to App Review in the Application Review section of the Settings menu and clicking Manage.

- Application Search: use this field to search the application.
- Application Header: use this area to review the applicant's name and contact information, or edit their tags.
- Application Navigation: use these tabs to open different sections of the application.
- Next/Previous Application: use these arrows to navigate to the previous or next application within the segment you're viewing.
- Application Panes: use these buttons to open the Information Pane, Review Pane, or Comments Pane.
- More Options Menu: click the More Options (3-dots) button to perform several other actions on an application.
- Bookmarks Menu: use this button to access your bookmarks, allowing you to quickly jump back to different sections of the application.
- Application Sidebar: use this collapsible area to see the Information Pane, Review Pane, or Comments Pane.
- Application Timeline Summary: if enabled, this section gives you a a visual overview of an applicant’s journey, including education, work experience, and other relevant activities.
- Application Summary: this section gives you a summary of the application you're viewing, with information such as the applicant's Demographics, Contact Information, or other information of your choice.
Application Sidebar
The application sidebar a collapsible pane found on each application record.

Click the appropriate button to open the pane and complete several actions, described below.
Information Pane
Review this pane to see the applicant's phase, interview status, tags, and other relevant information. Where applicable, you can customize what appears in this area of the sidebar.

Review Pane
Use this pane to enter your responses to the current review form. A review form appears here if the applicant is in a phase currently associated with a review. Where applicable, click All Reviews to see already completed reviews of the application.

Comments Pane
Use this pane to enter and review comments regarding the application, if your permissions allow. All users who have access to view comments can see the comments left here. Any user who adds a comment can also edit it, even if their permission to add comments is later removed.

More Options Menu
Use the More Options (3-dots) button to perform several other actions on an application.

Some options available to you may include:
- Activity History: allows you to review the history of updates made to this application.
- Workflows: allows you to review and manage workflows associated with this application.
- Add Attachment: allows you to upload a file to associate with this application.
- Application Properties: allows you to review or edit your application properties for this application.
- Copy: allows you to manually assign the application to another program at your institution. This doesn't impact the existing application, and applicants do not receive any notification that you have done this.
- Show PDF: allows you to review the application in PDF format.
- Export: allows you to use one of your existing export templates to generate an export file for this application.
- Assign: allows you to assign the application to a reviewer.
- Generate Decision Letter: produces a decision letter for the application.
- Impersonate: where applicable, allows you to impersonate the applicant to see their view of the Student Portal.
- Email: allows you to email the applicant.
- Reading Options: allows you to change your view of the application.
Editing Application Information
As described above, applications are divided into several sections. In some instances, you may have an option to modify the contents of some sections using the Edit Pencil.

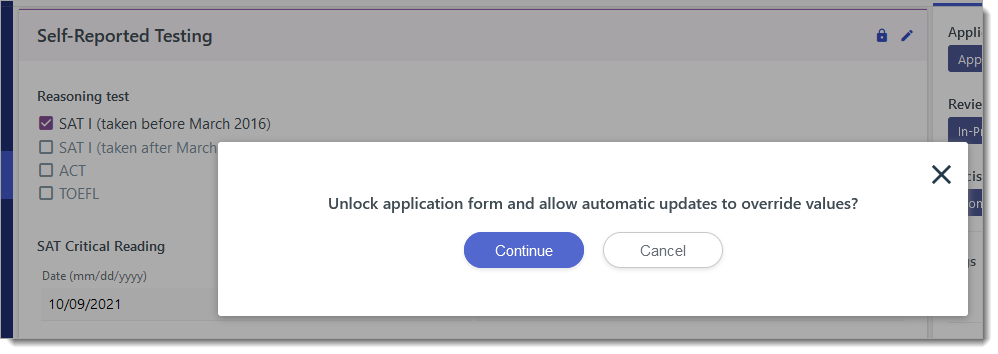
If your application data is imported from a Centralized Application Service (CAS), any modifications you made through the edit pencil, including document uploads, are subject to be overwritten the next time data is imported from the CAS. However, some sections of the application can be locked to prevent overwritten data. This allows you to make manual changes to things like test scores, citizenship information, or contact information without having your edits overwritten by updated information from CAS. It also allows you to add documents like transcripts or personal statements.
Where applicable, after you click the Edit Pencil, a message asks you to confirm you'd like to prevent automatic CAS updates from overwriting your changes.

After locking a section of the application, you can choose to allow updates again by clicking the lock icon.
When adding documents to the application using this method, we recommend making it clear in the document name that this is an internally added document, or that it is the one to be reviewed (where applicable). To add documents to applications without the possibility of them being overwritten by CAS updates, you can also use the Add Attachment option in the More Options menu seen above.
Bookmarking Application Sections
Click the bookmark icon on any application panel to add it to your bookmarks, making it easier to revisit that section. To see your bookmarks, click the bookmark icon at the top right of each application.
Completing Your Assignments
Your Outcomes administrator may assign applications to you for review.
Once review forms have been created by an administrator and assigned to you, you can begin completing them.
To begin completing a review form:
- Navigate to the desired applicant from the Applications Grid.
- From the pane on the right, click the star icon.
- This opens the review pane.
- The review form that appears is the one established for the current Phase the application is in. Fill in your responses and click Save.

Review forms are completely customizable, so can require several different response types. These include:
- Text: allows you to type in a short text response.
- Paragraph Text: allows you to type a paragraph-length reply.
- Multiple Choice: presents you with multiple options to select from, and may also allow you to write in your own response.
- Drop Down: allows you to select the appropriate response from a drop-down menu.
- Checkboxes: allows you to check as many appropriate answers as necessary.
- File Attachment: allows you to upload a file in response to the question.
- Date: allows you to enter a date in response to the question.
- Email Address: allows you to respond with an email address.
- Phone Number: allows you to respond with a phone number.
- Web URL: allows you to respond with a URL.
- Number: allows you to enter a numeric response.
- Scale: allows you to rate the applicants on a given scale.
- Table: allows you to respond by filling answers into a table.
- Address: allows you to respond with an address.
- Name: allows you to respond with a name.