Navigating a Contact Record
The Contacts area is where you can collect and view the data and activities of any people or organizations with whom your institution engages. Review the Managing Contacts section for information on working as an administrator with your contacts.
Working with Contacts Records
From a contact record, you can review the details of your contact.

At the top right, click the bell icon to see any recent notifications associated with this contact. Click the plus sign to complete other actions, including leaving comments, adding tasks, adding relationships, running workflows, adding files, or adding applications. From the menu at the bottom left, you can switch to different tabs.
Contact Header
From the Contact header at the top left, you can review the contact's address information and Tags. Click the More Options icon to upload a profile picture, delete the contact, or impersonate the contact in their associated portals, where applicable. The Engagement score indicates how much activity has occurred in relation to this Contact. View the Activity tab for more details.

There are other actions available to you:
- Clicking the contact's email address opens your default email client and addresses a new email to the contact.
- Clicking the contact's address opens Google Maps with the contact's geolocation loaded.
- Clicking the email icon starts a new email to the contact using Quick Messages in the Marketing module.
- Clicking the text message icon starts a new text message to the contact using Quick Messages in the Marketing module. Sending a text message via this method starts a conversation in the Conversations tab. From there, you can send additional text messages and review the contact's responses.
- Clicking the cellphone icon starts a new voice message to the contact using Quick Messages in the Marketing module.
Information Tab
By default, contact records open to the Information tab. From here, you can review the contact's name, phone number, mailing address, and email address. Click the arrow to the right of any field to view information about that field, including its field key, import source, and change history.
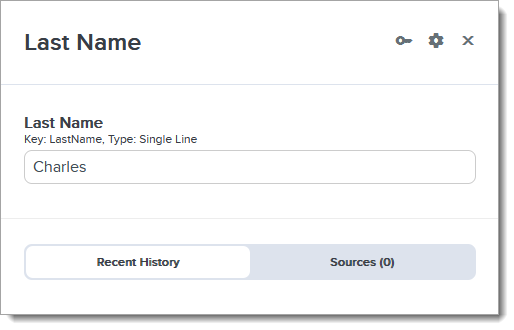
Where applicable, you can edit the field from this view. Click the gear icon to review more information about the field, including its property type.
Relationships Tab
From the Relationships tab, you can review the contact's existing relationships. You can also edit and create new relationships.

Activity Tab
From the Activity tab, you can review a complete, chronological view of how a student has interacted with your institution. By listing these touchpoints, or recorded interactions, this tab provides a visual representation of the student's journey through your process.

Here you can review outreach history, engagement, and other key activities. The touchpoints recorded on this tab include:
- Email, SMS, and voice message activity (including detail on campaign-based messages)
- Event registrations and check-ins
- Inquiry form submissions
- Contact data source updates and imports
- Application related updates (e.g., when an application is started)
Most activity entries can be clicked for additional detail. The Activity tab also allows you to filter for specific activity types, date ranges, and keywords.
Comments Tab
From the Comments tab, you can add new comments and review all existing comments for this contact record.
Tasks Tab
From the Tasks tab, you can review all tasks associated with this contact. Use the filters at the top of the page to isolate different tasks. Click the edit pencil to edit a task.

Applications Tab
From the Applications tab, you can review any applications associated with this contact.

Inquiry Forms Tab
From the Inquiry Forms tab, you can review any inquiry forms the contact has completed.
Messaging Tab
From the Messaging tab, you can review any messages you've sent to the contact. This includes emails, event reminders, application messages, and more.
Events Tab
From the Events tab, you can review the events the contact registered for on your Student Portal.

Files Tab
From the Files tab, you can review the existing files you've uploaded. Add new files by clicking the plus icon at the top right, and then Add File.

Conversations Tab
From the Conversations tab, you can review your history of text messages with this contact and send new text messages. To send an initial message, use the text message icon in the Contact Header, or send a message directly from the Quick Messages feature in the Marketing module. Once the contact responds, a Conversation is started.
Workflows Tab
From the Workflows tab, you'll see the progress of any workflows that have started in relation to this contact. You can manually run a workflow by clicking the plus icon at the top right, and then Run Workflow.
