Managing Application Requirements
Setting up Application Requirements
Note: the Application Type field on the Requirement Rules object is independent of the Relevant Field (as defined in the custom settings) on the Application Object. It is important to update both objects' fields accordingly (if using picklists) when making changes.
Step 1 - Create a Requirement Rule
- Click on the "+" to access All Tabs.
- Select Requirement Rules (v2).
- Click New.
- Select the Application Type to which this rule applies.
- Indicate if the checklist items will be visible to the public via App Tracker by selecting the appropriate checkboxes:
- App Public
- Essay Public
- Recommendation Public
- Test Public
- Transcript_Public
- Click Save.
To remove Application Requirements from a Requirement Rule:
- Click on the Requirement Rules tab.
- Click on the Requirement Rule you want to update.
- Click on the Related tab.
- For the requirement you wish to remove, click the
 and select Delete.
 - Confirm that you wish to delete the record.
Step 2 - Define Individual Requirements
-
On the Requirement Rules record, click New App Requirement and select the record type for the requirement:
- Enrollment History Requirement
- Essay Requirement
- Recommendation Requirement
- Test Requirement
- Miscellaneous (Checkbox) Requirement
Note: Miscellaneous Requirements require a boolean or checkbox field to be created on the Application record before creating the rule. The API name of this field will be used when creating the requirement.
-
For each new App Requirement (except Miscellaneous ones), enter the following information:
- Public Comment: description to display on App Tracker.
- Public Long Comment: long Description to display on App Tracker.
- Label: name of the requirement item shown in the Checklist Items list, and in turn, to applicants via the App Tracker. For example, "Personal Statement Requirement".
- Note: label values must be 80 characters or less since the Checklist Item Name field is limited to 80 characters.
- Requirement Met By: this value indicates the criteria that must be met to complete the requirement. This value must match those in the associated object's matching field (as outlined in the table below), as well as the Checklist Item object's "Requirement Met By" picklist.
|
Requirement Type |
Matching Object |
Matching Object's Field |
|---|---|---|
|
Test |
Test |
Test |
|
Recommendation |
Recommendation |
Type |
|
Essay |
Essay |
Type or Record Type |
|
Enrollment History (Transcript) |
Transcript |
School Level |
|
Miscellaneous (Checkbox) |
Application |
Custom Field defined by the user |
-
Once complete, click Save and continue to add requirements as needed.
Managing Application Requirement Completeness
These Checklist Items are displayed in a related list on the Application Object and include one of the following statuses:
- Not Started: shown when no related records are associated with the contact or application, or associated records are not marked as Applies to requirement.
- In Progress: shown when associated records are marked Applies to requirement but not Completes requirement.
- Complete: shown when associated records are marked Applies to requirement and Completes requirement.
Note: users should not manually update these statuses on the Checklist Items record. Application Requirements Manager has code that automatically updates the status based on whether related records apply to or complete the requirement, as outlined in the section below.
In addition to the above status values, checklist items include a priority of either "Checklist Private" or "Checklist Public". Items marked as private will not display to applicants on the App Tracker page.
How to Apply and Complete Requirements
Each object associated with Application Requirements Manager (Test, Essay, Recommendation, Enrollment History) contains two custom checkbox fields. They are:
- Applies to Requirement
- Completes Requirement
When a relevant record is created, such as a new essay record, the Applies to requirement Field must be checked. Doing so will update the corresponding Checklist Item status to "In Progress". This change can be completed manually, via workflow field update, or as part of data integration tasks.
If the relevant record fully satisfies the requirement, the Completes requirement Field should be checked, updating the Checklist Item status to Complete.
Notes:
- The ability to distinguish between a record applying to a requirement vs. completing a requirement allows institutions to track incremental data being received. For example, an applicant may self-report a test score, thereby creating a test record that meets the requirement, but it is not until the official scores are received that the test completes the requirement.
- Waived requirements: the waived status will waive a requirement on the applicant's Dashboard and show to the student as complete. However, when an edit occurs to the relevant record (such as a recommendation record), ARM will re-evaluate completeness, as it considers the Applies to and Completes requirement statuses when adjusting the checklist item status. Any checklist items set to Waived will be adjusted to In Progress or Completed.
- Any status other than In Progress or Complete will be updated with any edits to the corresponding record.
- The Type (or Test) field must be set before the Applies to Requirement field is checked. Otherwise, the record will not be associated with an Application Requirement.
- Test and Enrollment History records will update the associated Requirements on all applications for an applicant.
Overriding Application Requirements Manager Logic manually
- Example 1: a submitted transcript may have been marked Completes Requirement upon receipt, automatically marking the Requirement Complete. Upon further review, you learn that the transcript lacks the official seal and want to change the status from Complete by unchecking the Completes Requirements checkbox.
- Example 2: a Recommendation arrives from a coach and is initially marked as Applies to Requirement and Completes Requirement. Upon further review, a coach’s recommendation is not relevant to this application type. By unchecking both Applies to Requirement and Completes Requirement, the association is removed, and the Requirement status is updated to Not Started.
Note: Test and Enrollment History records will update the associated Requirements on all applications for an applicant.
Important Considerations 
- Test and Enrollment History records will apply and update Checklist Items on all applications for a given applicant.
- Miscellaneous (Checkbox) Requirements are completed when the boolean field on the Application record is checked. Note: your Administrator must create a checkbox field on the Application object for the requirement. For additional details, see the article How do I use Miscellaneous Requirements?
Using the Dynamic Transcript requirement feature
If you enable Dynamic Transcript creation in the Custom Settings, when an applicant has more than one enrollment history record associated with their contact or application record that meets the requirements, additional checklist items are created.
The naming convention for the checklist item is the school level, followed by the text entered in the Dynamic Transcript Text field in the custom setting.
Note: If using this feature, enrollment histories must be created at the school level. Errors will occur if the enrollment history record is created without a level and updated later by workflow or manual entry.
Managing Ad-hoc Requirements
On occasion, individual applicants may be required to submit additional information beyond what is necessary for a particular application type. An example may be a state school requiring residency certification for in-state applicants only. Rather than create separate application types for these scenarios, the Application Requirements Manager supports this functionality.
Creating Ad-hoc Requirements
You must create an ad-hoc application type on the Requirement Rules object only. This will be used for all individual requirements and can be named as desired. Possible naming conventions include Ad-hoc, Individual Requirement, or Other.
- Navigate to Setup and select Object Manager.
- Select the Requirement Rules (v2) object.
- Under Custom Fields & Relationships, select Application Type.
- Under Picklist Values, click New.
- Add a value for your new application type.
- Click Save.
- After adding the application type, follow the instructions to create a Requirement Rule for this ad-hoc application type. Remember that this rule will apply to any ad hoc requirements in the CRM.
- Add the individual Application Requirements one at a time to this rule.
Once the ad-hoc requirements are created, they can be added to an Application.
Adding Ad-hoc Requirements to an Application
Manually
- Ensure that the NewRequirement field is visible on the Application page layout.
- In this field, enter the Salesforce ID of the relevant Application Requirement record if you wish to add multiple IDs simultaneously, separate using a semi-colon.
- Once saved, this will trigger code that creates a Checklist Item for the requirement, and the "New Requirement" field will return to null.
Reporting on Checklist Items
You can build a report type and report to track checklist items and allow recruiters to better track their applicants and where they are in the application cycle.
Create a Report Type
- Navigate to Setup and search for Report Types.
- Click New Custom Report Type.
- Select Contacts as the Primary Object.
- Enter "Students with Applications and Checklist Items" in the Report Type Label.
- Hit the Tab button in order to generate the Report Type Name.
- Enter a Description, such as: "This report type gives the ability to view Contact record information, application record information, and any checklist item attached to the application record."
- Select the Store in Category.
- Select Deployed.
- Click Next.
- Click the Click to relate another object link.
- Select Applications for section B.
- Select "Each "A" record must have at least one related "B" record."
- Click the Click to relate another object link below the B section.
- Select Checklist Items (v2) for section C.
- Select "Each "B" record must have at least one related "C" record."
- Click Save.
Create the Report
- Navigate to your Reports tab.
- Click the New Report button.
- Select the Students with Applications and Checklist Items report type and select Create.
- Select a Report Format and Columns you wish to display.
- Suggested fields:
- Checklist Item
- First Name
- Last Name
- Application Number
- Application Status
- Status
-
Suggested filters:
- Start Term = (client's preference)
- Start Year = (client's preference)
- Application Stage = Submitted
- Application Status = Incomplete
- Status (of the checklist item) = Not Started
- Run your report to preview and make any adjustments as needed.
- Save your report.
Understanding the Enrollment History checklist item creation process
When an application is started, as soon as the student clicks the Save and Continue button on the first section, an application record is created as well as a skeleton set of child records that correspond with the remaining sections on the application. This includes an Enrollment History (EH) record.
When a record is created, but a value is not supplied to the Name field (as in the save operation noted above), the record ID is populated in the Name field by default (this is standard Salesforce behavior). A workflow rule on EH (standard TargetX functionality) Enrollment History Name Auto-Update then engages and either sets the Name field equal to the name of the School (Account) associated with the EH, or Unknown School if a School (Account) has not been populated.
At this stage, if the record does not have the Applies to Requirement box checked and a value in the School Level field, a Checklist Item record is NOT created. If the section/card is configured to pass these values statically via default values, hidden field values, or as the result of filter criteria, a Checklist Item record IS created.
The TargetX Application Requirements logic is designed to populate the Related To field of the Checklist Item equal to the Enrollment History Name field:
- If this occurs at the same time the EH record is being inserted, the EH Name field contains the EH record ID and therefore, the Related To field will also capture this value.
- If this occurs during an update to the EH record, as is the case when a student finally reaches the EH-related section of the app, the EH Name field would have already been populated via the aforementioned workflow field update, and therefore the Checklist Item Related To field would also be equal to the workflow supplied value, likely Unknown School.
For configurations where the student is adding additional EH records, skeleton records are not created like they are for the first EH record, and therefore all of the information collected for each additional EH is saved to Salesforce in a single operation. This means that a name value would generally not be present and the EH record would be created with the Name field equal to the EH record ID. Assuming this record also meets the criteria for generating a Checklist Item record, the Related To field for these records will therefore also contain the EH record ID.
Even though the EH Name field might change as the result of a workflow, or the School field being populated or changed, the current architecture does not perform an update on the Related To field once the Checklist Item has been created and linked to an EH record.
Updating the Application Status to Complete when all items are received
When all required checklist items are received, you may wish to have the Application Status changed to Complete, Ready for Review, or another desired value. This can be accomplished using a combination of Roll-Up Summary fields, Formula fields, and Flow automation configured for your specific business logic.
Create Roll-Up Summary Fields
The first step in automating the process of marking an application status as complete is to define at what point this occurs. As each institution's requirements vary, this is best accomplished using custom-defined Roll-Up Summary fields in the CRM. Two custom fields should be added to the Application object:
- Total required items
- Total submitted items
Create Custom Roll-Up Summary Field for Total Items
- Navigate to Setup > Object Manager > Application
- In the Custom Fields & Relationships section click the New button
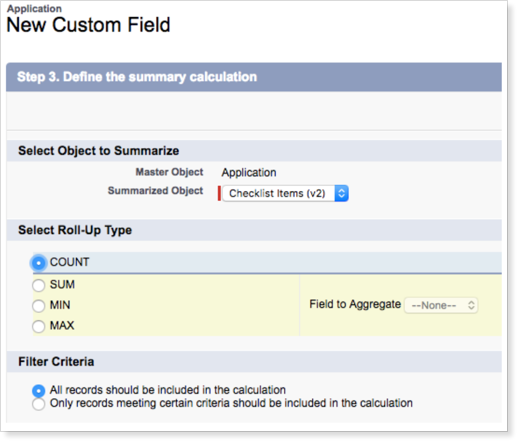
- Select Roll-Up Summary as the Data Type
- Enter a name for your field, such as Total Required Items and continue to the next step
- Choose Checklist Items (v2) as the object to summarize, selecting a COUNT of all records if you require all items to be submitted prior to the application being considered "complete". If you only require select checklist items to consider an application "complete", you can opt to add filter criteria.
- Determine which profiles will have access to the field and on which layouts it will display.
- Save your new field
Create Custom Roll-Up Summary Field for Submitted Items
- Complete steps 1 - 3 from above.
- Enter a field name such as Total Submitted Items and continue to the next step.
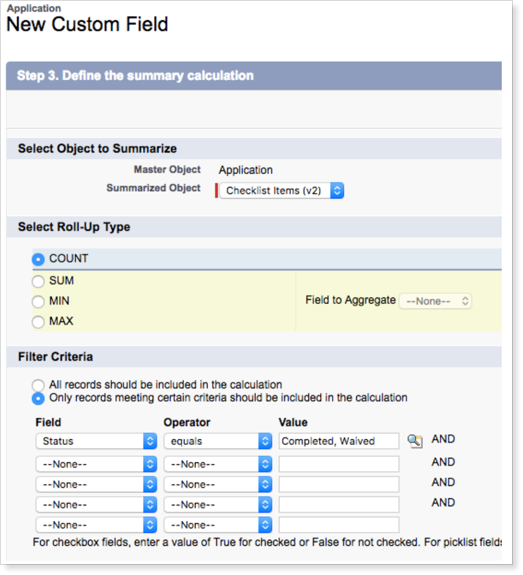
- Choose Checklist Items (v2) as the object to summarize, selecting a COUNT of all records.
- Add filter criteria to count only those items with a Complete status or optionally with a Waived status. You may add additional filter criteria if desired.
- Determine which profiles will have access to the field and on which layouts it will display
- Save your new field
Create Formula Field to Compare Roll-Up Summary Fields
A formula field is used to compare the values in the two roll-up summary fields and determine if all required items have been submitted. The logic is subtracting the Completed Items from the Required Items, populating a "Yes" or "No" value for application completeness.
- Navigate to Setup > Create > Object Manager > Application.
- In the Custom Fields & Relationships section, click New.
- Select Formula as the Data Type.
- Enter a field name such as Application Complete and choose a Formula Return Type of Text.
- In the formula editor enter:
IF(( FIELD NAME FOR TOTAL ITEMS = FIELD NAME FOR SUBMITTED ITEMS ), "Yes", "No" )
- Click Next and determine which profiles will have access to the field, and on which layouts it will display
- Save your new field.