Configuring Student Success Center (SSC)
Configure SSC Dashboard Reports
- Navigate to Reports.
- Create a New Report Folder.
Note: The Report Folder Name MUST be prefaced with SSC in order to display in the Configuration window.
- Name the folder with a Prefix of SSC.
- Create 3 different reports with report charts.
Note: Report must be configured with a Report Chart or they will not render correctly.
-
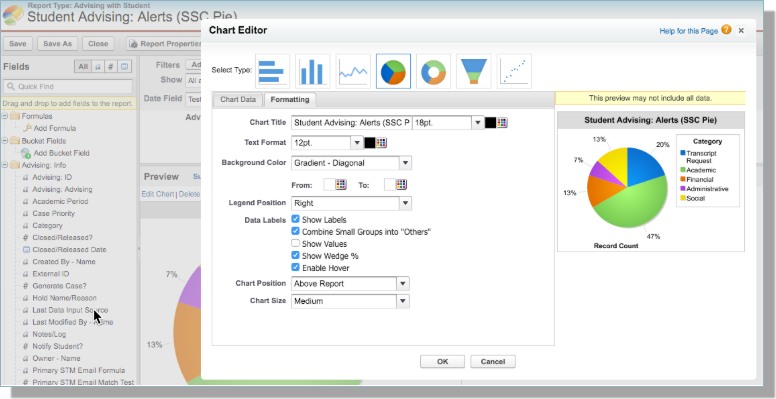
To set a Report Title or any other Report Chart Options that you would like to appear for each chart in the Student Success Center:
- Customize your SSC Report
- Select Edit Chart just above the Report Chart (in the top right)
- Select the Formatting tab
- Add Chart Title and other options - such as Data Labels
For more information on Adding a Report Chart to a Report, see Salesforce's Help and Training: Add a Chart to a Report.
Configure SSC Settings
The Student Success Center (SSC) Settings window allows you to define the Dashboard, Scores and control the fields and information that will display in the SSC.
Notes:
- Only Admins can edit Settings in the Student Success Center.
- All configurations entered here will be Global (at this time).
When accessing SSC for the first-time:
- Select the Student Success Center app or tab
- Navigate to your SSC Dashboard page
- The first time you come to this tab you will be prompted to Configure Now.
For subsequent visits to the SSC and Settings page:
- When in the Student Success Center (SSC), select the Settings option (in the bottom navigation bar)
- Select Settings.
SSC Preferences configurations options:
Dashboard
- Dashboard Definitions define the reports that will display on the User's Dashboard page. Select three (3) of the reports created and stored in the SSC (see prior step above)
Success Scores
- Success Scores enable you to configure how scores will display on the Student List. If you are using Cohort-based Success Scores, you can enable them by selecting the Enable Cohort Scoring toggle.
- Note: When using Cohort Scores, the At Risk rollup is based on students with a Cohort Score lower than 75.
Note: Cohort-based Success Scores are managed in TargetX Builder
To implement Cohort-based Success Scores, see the article How to implement Cohort-Based Success Scores in Retention.
- If you choose to NOT use Cohort-based Success Scores, you can select the following Score fields delivered by the TargetX Retention Toolkit package:
Note: Currently, new implementations of SSC MUST include the set up of Score Fields even if you opt to enable Cohort Success Scores.
- Academic Score (Contact.Academic_Score__c)
- Engagement Score (Contact.Engagement_Score__c)
- Financial Score (Contact.Financial_Score__c)
Select the Lower Threshold and Upper Threshold for each:
- The Lower Threshold defines the number that the score must equal to or greater then in order to display as Yellow.
- The Upper Threshold defines the number that the score must be equal to or greater than in order to display Green.
Note: Threshold values are numeric and define the breakpoints for showing scores as red, yellow, green. Example: Performance Scores on a scale of 1-10, with lower threshold of 4 and upper threshold of 7: 0-3 = red, 4-6 = yellow, 7-10 = green.
Student List
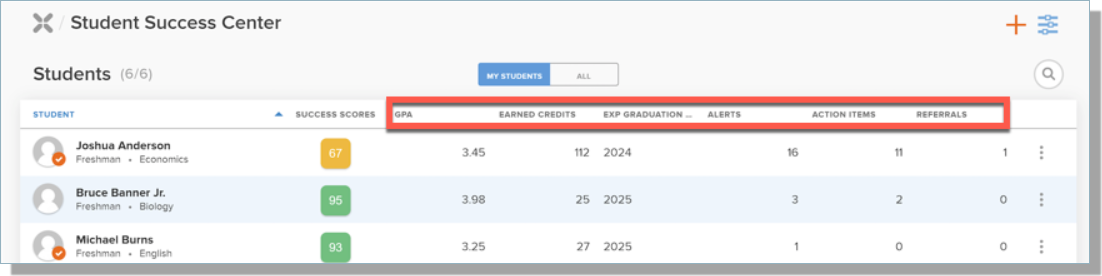
The Student List tab allows you to define the columns that display on the Student List.
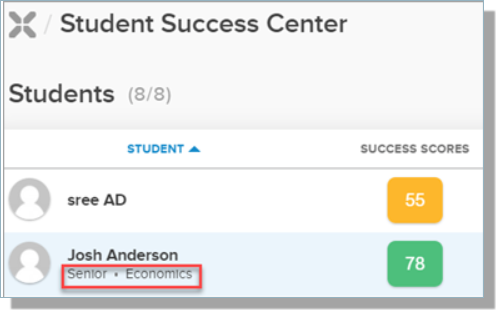
- The Student Header section allows a maximum of 2 fields that display beneath the Student's name in the Student List:
- The Student List Fields section defines the Columns that display on the Student List (maximum of 6):
Note: Formula fields with a Formula Return Type set to Checkbox that result in a Null value are not supported.
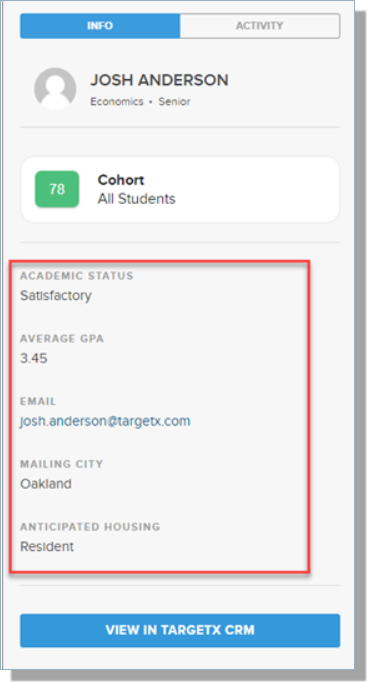
Student Profile
The Student Profile tab allows you to select Contact fields to display additional information on the Student Profile panel.
Note: If a Student has no information in one/any of the fields, the field(s) will NOT display in the Profile panel.
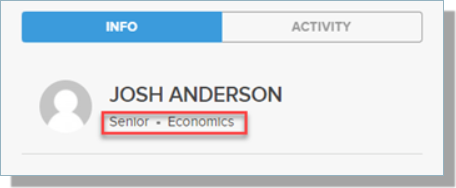
- The Profile Header section defines the fields that will display in the Header of the Student Profile panel (maximum of 2):
- The Profile Fields section defines the fields that display in the panel (maximum of 25):
Note: Drag/drop the fields into the order you wish them to display. The fields will display in the panel in the same order they display in the Setup window.
Note: Formula fields with a Formula Return Type set to Checkbox that result in a Null value are not supported.
Roles
- Staff Role(s) define who appears in Staff related picklists in the SSC (Point of Contact related to Action Plans, Related Staff related to Referrals).
- Student Role(s) define the roles that are considered ‘Student’ in the Student Success Center.
Note: The Phone field in Salesforce corresponds to the Business Phone in the Preferences window.
- Under the Dashboard section, select the reports you configured previously.
- Under the Success Scores section, select the appropriate fields for Academic, Engagement and Financial scores along with Lower and Upper Thresholds.
Note: You should only select NUMERIC fields for Score Definitions.
-
In the Student Fields section, select the Fields/Label you want to display on the Student List and Student Profile sections.
Note: Certain fields can NOT be selected for use as Student Fields, as they are already ‘in use’ by the system ‘base query’. Do NOT use the following: Id, Name, FirstName, LastName, MailingStreet, MailingCity, MailingState, MailingPostalCode, MailingCountry, Email, Total_Alerts__c, Total_Holds__c, Total_Accolades_Kudos__c or Total_Referrals__c.
- Select Add Field, to add additional Student Fields. You can add up to TEN fields.
- Once you have entered all required fields, Save your configuration.
- You can now navigate to the Students section of the dashboard.
Picklists
-
The Picklists option enables you to Refresh Picklist Definitions. If new picklist values are added to the advising object, or record type/picklist dependencies have been changed, use Refresh Picklist Definitions to update the picklist definitions within SSC.
When Settings are updated and Saved, users will receive a message alerting them that the changes will apply to ALL users with the option to Confirm or Cancel.