Transfer Settings Guide
- Last updated
- Save as PDF
Overview
WebAdMIT for AMCAS's Transfer Settings feature allows you to transfer templates from a previous cycle to a current cycle. The feature is typically available within the first week of the CAS application launch.
In this guide, we provide information on:
- How programs are carried forward each cycle in the CAS Configuration Portal.
- What templates (also referred to as items in this document) are carried forward each cycle in WebAdMIT for AMCAS.
Important note!
The Transfer Settings feature is an advanced feature in WebAdMIT for AMCAS and can be used by a single user once per cycle for each organization. Review this document in its entirety before using this feature.
Note that this document may not apply to your CAS; if you have any questions, contact a member of your account team.
Why run a Transfer Settings?
Transferring your settings can make starting a new cycle easier for you. Instead of rebuilding templates cycle to cycle, you can use a simple 3-step process to pull forward templates from one cycle to the next. Once your templates are in the new cycle, you must review and edit them to reflect any updated processes.
Who can run a Transfer Settings?
Institution Managers who are in the WebAdMIT Administrators Work Group for the new and previous cycles can initiate a Transfer Settings.
What gets transferred?
Active templates from the following WebAdMIT for AMCAS features are included in the transfer (deactivated templates are excluded from the transfer):
Applicant Lists and Reports & Exports panels:
- List Manager
- Export Manager
- Report Manager
- PDF Manager
- Destination Manager
- Cycle-specific fields, such as program custom questions in Exports and Lists
Management panel:
- Work Groups
- Custom Fields
- Local Status
- Local GPAs
- Prerequisite GPAs
- Requirements
- Scoring
- Assignments
- Interviewing
- Email Templates* (attachments are also carried forward)
- Email Addresses
- Schedule Manager (all schedules will be disabled; schedules for the partial view report for In Progress applicants are not carried forward)
*If you include images in your email templates, ensure the image URLs don't include spaces (which appear in the URL as %20), as this can prevent the email template from carrying forward during transfer settings.
- Example of an acceptable URL: https://sample.com/school_logo.png
- Example of an unacceptable URL: https://sample.com/school%20logo.png
What doesn't get transferred?
The following WebAdMIT for AMCAS features are excluded from the transfer and need to be rebuilt in the new cycle:
- Applicant Header
- Holistic Review program-set percentages/weights
- Cycle-specific fields, such as applicant-facing prerequisites built in the CAS Configuration Portal or Applicant Gateway questions
How do users get transferred?
When a new cycle opens, users in the WebAdMIT Administrators Work Group are automatically added to the new cycle by Liaison. Users who are not WebAdMIT Administrators are added to the new cycle through the Transfer Settings process and their previous Work Groups and programs are re-assigned. Note that anyone who has already been created in the new cycle will not be re-added during the Transfer Settings process.
As a best practice, review your users' accounts to ensure everyone is placed in a Work Group and has the appropriate programs selected. Contact a member of your account team with questions regarding this.
Important Considerations and Recommendations
Before initiating the Transfer Settings feature, consider the following:
|
Consideration |
Recommendation |
|---|---|
For example, you can transfer settings from CSDCAS 2023-2024 into CSDCAS 2024-2025, but you cannot transfer settings from CSDCAS 2023-2024 into PharmCAS 2024-2025. |
Decide who will initiate the transfer for your organization. Ensure that they are listed as an Institution Manager and placed in the WebAdMIT Administrators Work Group for the previous and new cycles. Also, ensure that they have access to all programs in the previous and new cycles. |
|
When transferring your settings, first review templates in your previous cycle to confirm that you'll want to carry them forward in the new cycle. If you don't want to carry a template forward, simply deactivate or delete it in the old cycle before carrying it forward. You can deactivate, delete, or repurpose templates in the new cycle if you later decide you don't want to use them. |
If this link is not established, then templates associated with a program in the previous cycle will not automatically be activated for the same program in the new cycle. |
Be sure to use the already-established program transfer methods (e.g., the Liaison team transferring programs or the Import Program feature) to bring programs forward into the new cycle. If your program is new, contact a member of your account team to set up this link. |
|
By default, the original owner/creator for these templates remains the owner after the Transfer Settings is run, and can continue to make edits in the new cycle. If the original owner does not exist or is not active in the new cycle, the user who runs the Transfer Settings feature will become the owner of these templates in the new cycle. Discuss with your team which user should run the Transfer Settings and will be the point person for any future template edits. |
|
For example, if the template is active for program A and you have access to programs A and B, then the template will automatically be activated for program A. However, if the template is active for program A and you have access to program B, then the template will not automatically be activated for program A. Ensure that the user who initiates the transfer has access to all programs in the previous and new cycles to avoid any discrepancies. Also, review all templates after the transfer to ensure that they are assigned to the correct program(s). Note these additional behaviors:
|
|
For example, if an admissions user's account has program A selected under Program Assignments, and you have access to programs A and B, then the admissions user's account will automatically have program A selected after you run the Transfer Settings. However, if an admissions user's account has program A selected under Program Assignments, and you only have access to program B, then the admissions user's account will not automatically have program A selected. Ensure that the user who initiates the transfer has access to all programs in the previous and new cycles to avoid any discrepancies. Also, review your users' accounts and select any programs that they need access to under Program Assignments. |
For example, question A in the CSDCAS 2023-2024 cycle is included in a List and Export in WebAdMIT for AMCAS. Question A will carry forward in your Lists and Exports in the CSDCAS 2024-2025 cycle in WebAdMIT for AMCAS. |
New CAS custom questions will need to be added to Lists and Exports. For Work Group and PDF Manager templates specifically, you can select a checkbox to confirm if you want CAS question blocks added mid-cycle to automatically be added to the applicable templates. Using this will save you time, as you don't need to manually update your templates when changes occur, such as mid-cycle or during the Transfer Settings process for a new cycle, when new question blocks may be added. |
For example, you built question A for your program in the CAS Configuration Portal for the CSDCAS 2023-2024 cycle and included question A field in a List and Export in WebAdMIT for AMCAS. Question A will carry forward in your Lists and Exports in the CSDCAS 2024-2025 cycle in WebAdMIT for AMCAS. |
Your questions must remain from cycle to cycle in order to transfer (i.e., you cannot delete the question). If you delete the question and re-add it in the CAS Configuration Portal, the question field will not be included in Lists and Exports because it is considered a new question. |
For example, you built prerequisite A for your program in the CAS Configuration Portal for the CSDCAS 2023-2024 cycle and included prerequisite A field in a List and Export in WebAdMIT for AMCAS. Prerequisite A is cycle-specific, and therefore doesn't carry forward into the CSDCAS 2024-2025 cycle in WebAdMIT for AMCAS. |
If you choose to include the same prerequisite in the CAS Configuration Portal or Applicant Gateway question for the new cycle, you will need to edit your List and Export and re-add that same field. |
Review the Deferring Applicants via Transfer Settings guide for more information on deferring applicants. |
For example, suppose an applicant applied to Program A in the previous cycle. To ensure the applicant carries forward into the new cycle, Program A must be linked across the previous and new cycles. Note that for deferred applicants in the new cycle, only the Applicant Header, Contact Information, and Designations panels will contain data. |
|
After transferring your templates, be sure to review them to ensure they transferred correctly. Note the following:
|
Initiating the Transfer Settings Process
To initiate the Transfer Settings:
- Locate the Transfer Settings from Previous Setup panel in the center section of the Dashboard. This feature is available at the beginning of a new cycle and accessible to only Institution Managers who are in the WebAdMIT Administrators Work Group.
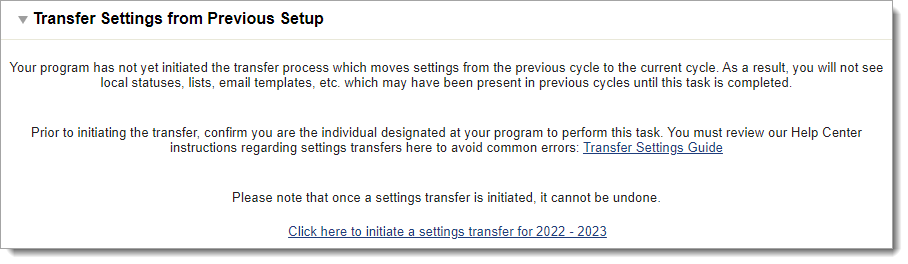
- Click Click here to initiate a settings transfer..., then review the templates that will be carried over.
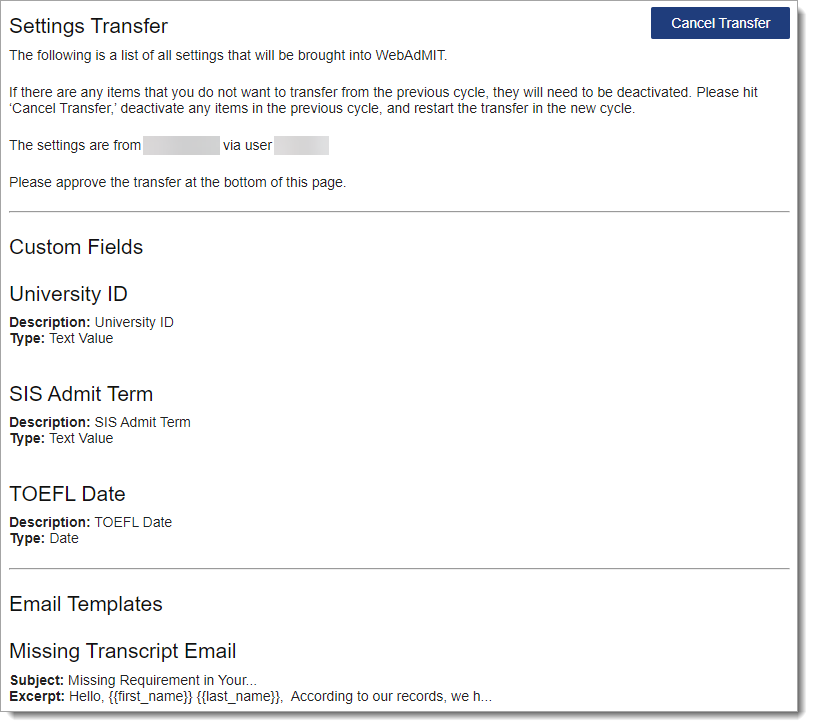
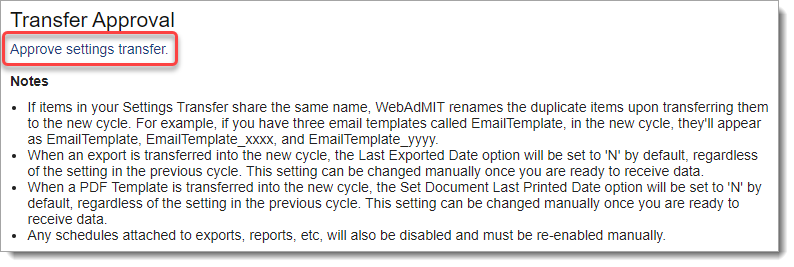
- When you are finished, approve the transfer.
Get Ready Checklist
Use the recommended checklist below to follow your progress through each Transfer Settings process. Download and print the PDF checklist here.
|
When |
What |
Where |
|---|---|---|
|
4-6 months before the new cycle starts |
Review your program(s) and delete any that you aren't using and don't want to be carried forward into the new cycle. |
CAS Configuration Portal |
|
2-3 months before the new cycle starts |
Look for an email alerting you that the CAS Configuration Portal has opened. |
CAS Configuration Portal |
|
2 months before the new cycle starts |
Review all templates created by you and other users and delete/deactivate any that you are not using and do not want to be carried forward into the new cycle. |
WebAdMIT for AMCAS |
|
1-2 months before the new cycle starts |
Review your program(s) and make any changes as needed. Submit your program(s) for review and alert a member of your account team. |
CAS Configuration Portal |
|
1 month before the new cycle starts |
Decide who will initiate the transfer for your organization. Ensure that they:
This person can edit all users' accounts to ensure they are placed in the appropriate Work Groups and have the appropriate program(s) added to their account. |
WebAdMIT for AMCAS |
|
Day of the new cycle start |
Look out for an email alerting you that the CAS application and WebAdMIT for AMCAS have opened. |
WebAdMIT for AMCAS |
|
First week after the new cycle starts |
Look for the Transfer Settings from Previous Setup panel on the Dashboard. Alert the individual who will be transferring your settings that this is available. |
WebAdMIT for AMCAS |
|
After the transfer has completed |
Check all features to ensure they carried forward correctly, and make edits as needed. |
WebAdMIT for AMCAS |
FAQs
I approved the Transfer Settings, but I don't want some of my templates to carry over. What do I do?
Once you click Approve settings transfer, you can't change which templates will carry over. You can deactivate or delete templates once they appear in your new cycle or rebuild templates that were not originally included in the transfer.
Why didn't my program custom prerequisites or Applicant Gateway fields carry over in my list and export templates?
These fields are tied to the program in the CAS Configuration Portal or Applicant Gateway and are therefore cycle-specific. You will need to add the new program prerequisites you created in the CAS Configuration Portal or Applicant Gateway questions for the new cycle to your templates.
Why do I have to edit templates in the new cycle?
Transfer Settings is designed to help you save time and effort in the new cycle, but it is not a perfect copy of your settings from the previous year. Moreover, admissions processes change from cycle to cycle, and templates that you used in the previous cycle might not reflect your new needs. For this reason, all templates should be reviewed to ensure that the correct fields and criteria are included. Examples of features to review include:
- Dates and attachments in email templates
- Program-specific fields in lists and exports
- Work Groups, lists, and panels settings in PDF Manager templates
- Operators and criteria values in lists
- Order of templates in Local Statuses, lists, Custom Fields, and email templates
- Order of questions in assignments and interviews
Another user at my institution initiated the Transfer Settings. Can I undo/redo that?
No, Transfer Settings can only be used by a single user once per cycle for each organization. Transfer Settings can't be undone or reset either.
I have access to the new cycle but can't see any applicants. What should I do?
To view applicants in WebAdMIT for AMCAS, you must be placed in a Work Group and have programs selected under Program Assignments. You can check if your account is correctly set up under Account in the top right of the Dashboard. If your account needs to be edited, either contact your Institution Manager or the Client Support Specialist team.