Using the Viewbook Templates and Builder
Overview
The Viewbook is a back end term for a student's personalized URL, or PURL. You can direct a student to their PURL to get customized information based on collected data from your Inqiury Form, Custom or SEM Forms, or Imported data. Students with a stage of Inquiry or above can access their PURL once their account is created in EMP via a Form or Import.
Creating Viewbook Templates
Viewbook templates provide a scaffold for PURL pages and use widgets to define areas where content can be added later when you build out the page. Templates can be used for multiple PURL pages, but using a fresh template for each PURL page is recommended.
To create a Viewbook Template:
- Click Content in the top navigation bar and select Viewbook Templates from the drop-down.
- Click New Template.
- Name your template and select a layout.
- Note: the layout cannot be changed after the template has been created.
- Click the Edit Icon next to the new template in the template list.
- Add the Widgets you will want on the PURL page.
- Note: widgets can be added or deleted to the template as needed. Widgets without content will not appear to a student on their PURL.

Adding Widgets
After selecting a template, add widgets to the template that will pull in information displayed on the PURL page. Widget options include:
| Widget Name | Description |
| Facebook Connect | Displays a feed of recent Facebook posts. |
| Embeds an X (formerly Twitter) feed. | |
| Static Text | Displays fixed text for general information that does not frequently change. |
| Static Image | Adds an image or clickable link that directs user to another page within the PURL or to an external site. |
| RSS | Displays the latest articles from a specified website. |
| Asset Changer Theme One | Enables students to explore different assets (e.g., program of interest, sports, etc.) of interest using a drop-down menu, with a picture displayed on the right side. |
| Asset Changer Theme Two | Enables students to explore different assets (e.g., program of interest, sports, etc.) of interest using a drop-down menu, with a picture displayed on the left side. |
| Rep Info | Displays the assigned representative's photo, name, title, phone number, email. |
| Static Video | Embeds a Vimeo or YouTube video by pasting the video URL. |
| Social Network Links | Adds a cluster of social media buttons for Facebook, Instrgram and X (Twitter). |
| Facebook Like | Adds a thumbs up button connected to a Facebook displaying the number of likes associated with the account. |
| Asset Text | Pulls in asset-specific text but does not allow students to toggle between different assets. For example, if you don't want a soccer recruit to look at track information, they can't choose the different sports asset from a drop-down menu. |
| Asset Image | Adds a picture that automatically updates based on the student's selected asset. |
| Asset Video | Displays videos related to the selected asset. |
| Static Content Theme One | Displays fixed content on the right side. |
| Static Content Theme Two | Displays fixed content on the left side. |
| Checklist | Adds an interactive checklist. |
| Form | Embeds a selected form, such as a text opt-in or a custom form, to gather additional information beyond the inquiry form (e.g. extra PURL pages the student wants to explore.) |
| Integrates Instagram content from a specified account. |
Configuring Widgets
Once you've selected your widget, configure the following options:
- Show on mobile devices: select if the widget should be visible on mobile devices. If unchecked, it only appears on desktop and laptop computers.
- Padding: adds white space around the widget for better readability.
- Arrows: move or reorder the widget within the column.
- Trash can: deletes the widget.

Using the Viewbook Builder
Creating a New Page
Once you've created your Viewbook Template and set up your Widgets, apply the template to a page to start building its content. To build a new page:
- Click Content in the top navigation bar and select Viewbook from the drop-down.
- Click Pages and select one of the following options:
- Add Page, then complete the details.
- Add External Link, then complete the details.
- Note: this page type hosts the provided URL and directs a student to that page as a clickable link.
- Add Page Group, then complete the details.
- Note: this option does not create a new page, but allows you to organize and nest pages together. For example, if you have 20 different sports pages, you can group them under a "Sports" category, collapsing them for a cleaner layout. This helps streamline the Viewbook and makes page management easier.
- Click Manage to add your content to the page.
- Click the Gear icon to:
- Make the page require a log in.
- Edit the page details such as the name of the page or an external link.
- Delete the page.
- Click the checkboxes to add the page to the desktop and mobile PURL.

To remove a page from the PURL, uncheck Add to navigation and Add to mobile navigation.
Adding Content to Your PURL Page
Click Manage to be directed to the Page Preview. From here you can:
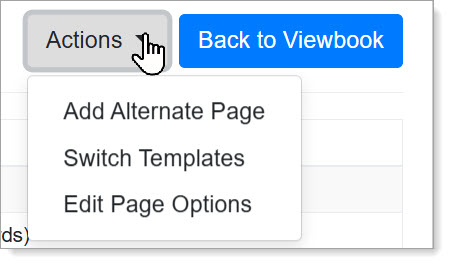
- Click the edit pencil in your widgets to add images, text, URLs, forms, etc.
- Add alternate pages to create various versions of the same page.
- Switch templates to use a different template.
- Edit page options to update labels or select different assets or groups associated with the page.
Creating Alternate Pages
When creating asset pages in EMP, there may be instances where you want a specific audience of students to see a similar page with different content. For example, international students might need to see different information on the PURL homepage than domestic students, such as a unique checklist or custom form to complete. When you create an alternate page, all the current content is copied for you to edit or add content to fit a specific audience.
- To create an Alternate Page, click Actions, then Add Alternate Page.
- Then, complete the details. The template selected for the primary asset page also applies to the alternate page.
- Note: you must add a group to an alternate page in order to save.
- Once you create the alternate page, use the page switcher to navigate between pages.

Switching Templates
To change the template you originally selected when building your asset page, navigate to Actions. Then, use the Switch Templates action to navigate to Viewbook Templates, and click Choose to select the template you want to use for the asset page.
Important note: switching templates will delete all the content on a page.
Editing Page Options
To update the page title, change assets, or update groups associated with the asset page, navigate to Actions and select Edit Page Options.