Configuring Review and Scoring Forms
What are Evaluation Forms?
Evaluation Forms are used to capture reviewer feedback. Once you create a form:
- Link it to a phase.
- Once linked, you can assign applications for review so reviewers can complete the form.
Important note: evaluation forms are linked directly to phases, not applicants.
Creating Evaluation Forms
- From the Settings menu, open the Application Review section, then select Evaluation Forms. Here you can review which forms currently exist. Click any form to view it.

- To delete or copy forms, use the checkboxes.

- To create a new form, click the + icon. Then, enter a name and click Create Form.

- Forms are divided into different sections. Enter a name in the Section Title. Additionally, enter an Introduction with instructions or information for reviewers. Then, click Add Question.

- Enter your question and add any help text for the reviewer. Then, choose your question type, select if it's required, and configure any response options. If desired, you can add conditional response options. When you're done, click Add.

Question types include:- Text: a text response – use this option for questions requiring a short response.
- Paragraph Text: a paragraph-length reply.
- Selecting text options also requires setting the Max Length (characters) for a response.
- Multiple Choice: enter each option individually in the Answer Option area, or add several answer options at once by clicking Paste Options and pasting the desired options in the text box. Each option must be separated by line breaks. Check the Allow Write In option to allow reviewers to write in their own response.
- Drop Down: works the same as the multiple choice option, except answer options are presented in a drop-down menu.
- Checkboxes: works the same as the multiple choice and drop down options, except multiple answer options can be selected.
- File Attachment: requests that reviewers upload a file in response to the question.
- Date: allows reviewers to enter a date in response to the question.
- CEEB Code Lookup: allows reviewers to respond with a school name.
- Email Address: allows reviewers to respond with an email address.
- Phone Number: allows reviewers to respond with a phone number.
- Web URL: allows reviewers to respond with a URL.
- Number: a numeric response.
- Scale: allows reviewers to rate the applicant on a scale of your choice – scales can be set up to 10.
- Scale Group: use this option when you want to present a group of items to be rated.
- Table: allows reviewers to enter information into a table. This question type is currently unavailable in the Review Portal.
- Address: allows reviewers to respond with an address.
- Name: allows reviewers to respond with a name.
- Concealed: allows for the reviewer's response to be encrypted. Only users with the appropriate permissions can decrypt and view the responses
- Continue adding questions and sections, as needed. Including several sections is useful for organizing longer forms. If desired, you can also make questions or sections conditional.
- To test the form and view it as a reviewer would, click Try it.

- When you’re done configuring the form, click Save Changes.
Configuring Forms with Conditional Questions
In some cases, you may want to create evaluation forms containing questions that are only visible under certain circumstances. For example, if one of the questions asks if the applicant has any gaps in their clinical experience, you may want to create a conditional question to collect more details about those gaps. This conditional question would only appear if the answer is "Yes" to the question that asks if the applicant has any clinical experience gaps.

To create a conditional question:
- You'll first need at least one question that serves as the condition for your conditional question. In the example above, the question Does the applicant have any gaps in clinical experience? serves as the condition that determines whether the question Does the applicant provide a reason for the gap? appears.
- Next, add your conditional question. While configuring the conditional question, click Open Condition Builder on the right.

- From the Condition Builder, click Choose Field to select the field that you're using as a condition. Then, configure your condition. If necessary, click +condition to use more than one condition. If you've added more than one question in the Condition Builder, remember to select All of or Any of to indicate whether all (or just one) of the conditions need to be true for the conditional question to appear.
- Click Update to save your condition.
- Back on the Create Question page, once you're done configuring your question, click Add. Click Save Changes to save your form.
Note: if your forms have multiple sections, you can also make entire sections conditional. To do so, click the three dots icon at the top of the section, click Open Condition Builder, and follow the steps described above to configure your conditions.
Configuring Forms with Conditional Answer Options
When adding multiple-choice questions to a form, you can configure conditional answer options. For example, you may have a question that asks the reviewer about their recommendation (e.g., Interview, Waitlist, Hold, Reject). Perhaps, based on institutional policies, an applicant should not be invited to interview if they do not have an acceptable USMLE result. Using conditional answer options, you can remove the "Interview" option from the recommendation question if the answer to a question about their USMLE result indicates they do not qualify for an interview.
Conditional answer options can be added to questions with a Question Type of multiple-choice, dropdown, or checkboxes.

To make an answer option conditional:
- You'll first need one or more separate questions that will serve as the condition for your answer options. In the example described above, the question that asks about USMLE results serves as the condition. Once that is in place, you can edit an existing question (or add a new one) to configure the conditional answer options.
- While configuring your answer options, click +Condition to make an option conditional.
- From the Condition Builder, click Choose Field to select the field that you're using as a condition. Then, configure your condition. If necessary, click +condition to use more than one condition. If you've added more than one question in the Condition Builder, remember to select All of or Any of to indicate whether all (or just one) of the conditions need to be true for the conditional answer option to appear.
- Click Update to save your condition.
- If other answer options should be conditional, repeat the steps above to add more conditions. Note that for each question, there should be at least one answer option that doesn't have conditions attached.
- Click Update to save your question, and Save Changes to save your form.
Assigning Forms to Reviewers
Once you create a form, you have multiple options to assign it to reviewers.
When you assign an application to a reviewer, they can open the application and use the Review Tab to complete any review forms. Note that a review form only appears here if the applicant is in a phase currently associated with a review.

Accessing Completed Reviews
Once a review is completed, you can access it in the Program Portal in the sidebar.


Analyzing Ratings: Sums, Means, and Medians
If you have multiple reviewers completing an evaluation form, you may wish to calculate the sum, mean, or median of their ratings. To do this, you'll use Phase Calculated Fields. Consider the following examples:
- Example 1: if your form includes a question where reviewers provide a recommendation (e.g., Interview, Wait List, Reject), you can create a phase calculated field that counts how many reviewers selected Interview.
- Example 2: if your form asks reviewers to rate an applicant's fit with your program on a scale of 1–10, and you want to combine these ratings into a final score, you can set up a phase-calculated field to sum the ratings.
- Example 3: if your form includes a scale group question that collects ratings for multiple criteria, you can use a phase-calculated field to sum all the ratings in that group.
Example of scale group question:

Creating Phase Calculated Fields
To create a Phase Calculated Field:
- Create an evaluation form that contains the fields you wish to use in your calculation.
- Create a new phase or edit the phase where the form should be used.
- Add your form in the Review Form area, then click + Add under Calculated Fields.

- Click Add Calculated Field on the window that appears.
- Use the Select Field drop-down to choose a field to use in your calculation. The fields shown in the drop-down are those that are in your selected evaluation form.
- Use the Label field to write a label for the calculated field – this is how it appears in other areas of the Program Portal (e.g., when adding the field to the Application Summary or when using it as a filter). Use the Key field to write a key – this is how the data is stored in the background of the software.
- Use the last drop-down to select what type of calculation you wish to use. If you're working with a numeric field, you can calculate its sum, average, or median. If you're working with multiple choice fields, you can calculate the total number of times any option was selected by a reviewer.
- If desired, click Add Calculated Field to create another Calculated Field.
- When you're done adding fields, click Update.
- Click Update again to save your changes to the Phase.
Examples of Phase Calculated Fields
Using the three examples introduced above, here's how you'd configure the fields:
- Example 1: if your form includes a question where reviewers provide a recommendation (e.g., Interview, Wait List, Reject), you can create a phase calculated field that counts how many reviewers selected Interview.

- Example 2: if your form asks reviewers to rate an applicant's fit with your program on a scale of 1–10, and you want to combine these ratings into a final score, you can set up a phase-calculated field to sum the ratings.

- Example 3: if your form includes a scale group question that collects ratings for multiple criteria, you can use a phase-calculated field to sum all the ratings in that group.
When you use a scale group in your form, the system recognizes that a table of ratings exists. As a result, when adding a phase-calculated field, the system provides two options for handling the data within the group: sum or average. In this example, we're summing all the ratings in the scale group, then averaging these sums when multiple reviewers provide their ratings.

Working with Phase Calculated Fields
Once you create a phase calculated field, you can use it in several ways. For example, you can:
- Add the field to your Applications Grid for quick access and review.


Note: you can also add the field to the Application Summary or Sidebar.
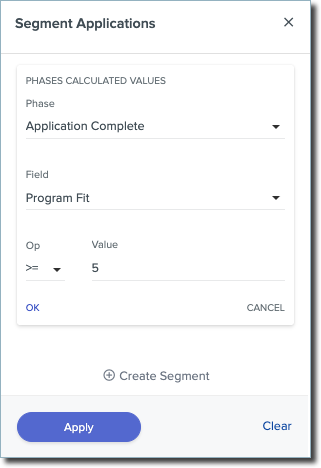
- Create a Segment with the field so you can find scores that are greater than or less than a specific value. When you add your segment criteria, choose Phase Calculated Field, then select the Phase, Calculated Field, Operator, and Value. In the example below, we're looking for applicants with a Program Fit rating of greater than or equal to 5.
- Include scores in exports.