Getting Started as an Administrator
This page provides a brief summary of how to complete some of the primary administrator tasks in SlideRoom. Review the linked sections in the Help Center to learn more.
Navigating the Administrator Dashboard
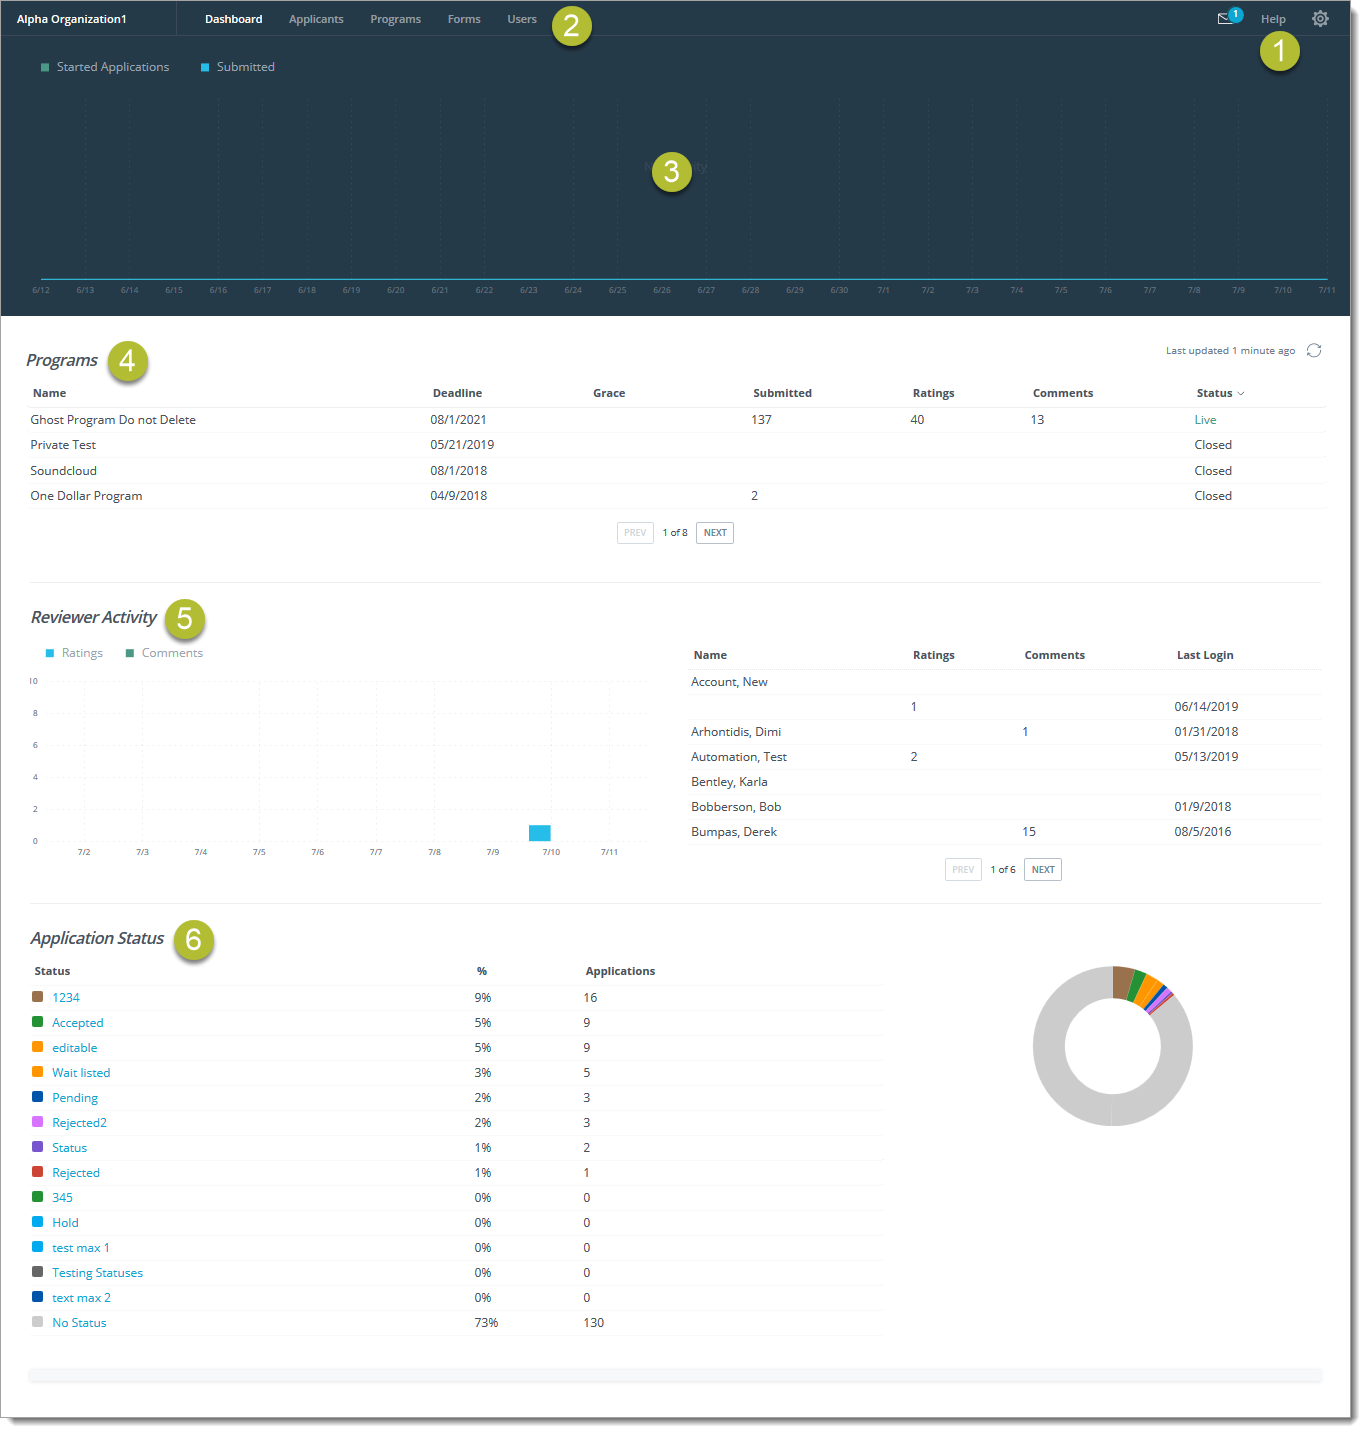
- Email, Help, Settings: the icons at the top right take you to your email history, the help guide, and SlideRoom settings.
- Navigation Bar: use this bar to navigate to different sections of the software. Administrators in SlideRoom have access to the following tabs:
- Dashboard: gives you a snapshot of what's happening with your applicant pool. Provides statistics and charts about your programs, reviewers, and application statuses.
- Applicants: lets you review your entire applicant pool, search for applicants, create filters, and perform batch actions.
- Programs: lets you review your available programs, edit them, and add new programs.
- Forms: lets you review your application and reference forms, edit them, and create new forms.
- Users: lets you review all of your users, edit their roles, delete them, or add new users. You can also email, export, or give assignments to the users of your choice.
- Activity Chart: this chart lets you see how many applicants started or submitted an application over the past month.
- Programs Snapshot: this section displays a summary of each of your programs.
- Reviewer Activity: this section shows you how much activity your reviewers have engaged in.
- Application Status Snapshot: this section displays each of your Application Statuses to reveal where your applicants stand in your process.
Editing Your Account Information
After signing up for a SlideRoom account, your information appears on your Account Details page. SlideRoom allows you to edit your existing details. This is useful if you want to specify other contacts for the account.
To edit your account information:
- Navigate to the Account Settings page by clicking the gear icon at the top right, then clicking Account Settings.
- Click Edit Account Information.
- From here, you can edit your contact names, email and mailing addresses, billing information, etc.
Adding Users
You can grant access to your applicant data in SlideRoom by adding new users and assigning them permissions.

To add a new user:
- Click the Users tab at the top of your Administrator Dashboard.
- Click +NEW USER.
- On the panel that appears, enter their name, email, and phone number.
- Choose the user's Role and click SAVE. A Role is a set of permissions established for different types of users. You can create new Roles by going to Account Settings and clicking on Reviewer Permissions, then +New Role.
- SlideRoom sends the new user an email inviting them to log in. You can resend the email by returning to the Users tab, clicking on the desired user, and clicking RESEND INVITE EMAIL.
- From the Users page, click +Add Program to grant access to a current or archived program.
- Click +Add View to grant the user access to one of your Saved Views.
When the new user logs in, they'll see a reviewer dashboard with all the applications they have access to. To avoid having the user see only an empty dashboard, it's a good idea to wait until you have applications to be reviewed before adding the user.
Adding Roles
A Role is a set of permissions established for different types of users. Creating roles allows you to quickly assign your desired permissions to the users of your choice.
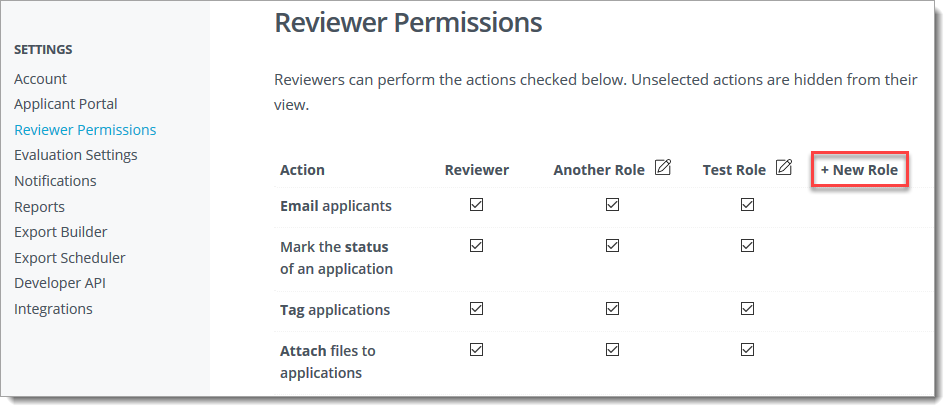
To add a new Role:
- From the Administrator Dashboard, click the gear icon, and then click Account Settings.
- From the menu on the left, click Reviewer Permissions.
- The Reviewer Permissions page displays your existing Roles and shows which permissions are granted to each Role. Click +New Role to add another Role.
- Enter a name for your new Role and click SAVE.
- Check and uncheck permissions for the Role as you see fit.
This Role is now available to assign to any of your users.
Editing Your Applicant Portal
Your Applicant Portal is how applicants learn more about you, so it's important to make sure it looks right. SlideRoom sets up your Applicant Portal for you by uploading your logo and providing some welcome text. To edit the existing information:
- Click the gear icon in the top-right corner.
- Click Account Settings.
- Click Applicant Portal.
- Use the visual editor to make your desired changes including replacing the logo and changing the color of your header.
- Save your changes.
For more information, review Customizing Your Applicant Portal.
Creating Your First Form
Application Forms are used to collect information from your applicants. Forms are separate from the creation of your submission program because a form can be used across multiple programs. SlideRoom offers a drag-and-drop form builder that allows you to easily create questions as desired.

To access your forms, click the Forms tab at the top of your dashboard. From here, you can view a list of your existing forms and information about each one. Using this page, you can also switch between viewing application forms (those completed by applicants) and reference forms (those completed by recommenders).
To create a new form:
- Click New Form at the top-right and choose Application Form.
- Give your form a title. Keep in mind, the title you provide is what your applicants will see.
- You can also provide some help text, instructions, or any kind of additional information in the field below the title.
- Click Continue when you're ready to start building.
- Question type options appear on the left, and your actual questions are on the right. Drag any question type to the right to create a new question in your form.
- When you add new questions, your form saves automatically. When you're done, click the Forms back arrow at the top-left corner of your screen.
Note that the Export ID for a question is a unique identifier that allows you to export the applicant responses to this form. This is important if you have form questions across different forms with the same question name. With the Export ID, SlideRoom can differentiate between questions that might have the same title.
For more information, review Creating Forms.
Building Your First Program
In SlideRoom, a program is any application opportunity. This includes admission to an educational program, an employment opportunity, or a call for entry. To access your programs, click the Programs tab at the top of your dashboard.
Your previously created programs appear here. On this page, you'll see the program's name, start date, deadline, fee, and status.
To create a new program:
- Click New Program at the top right.
- Complete the Program Settings section.
- Give the program a name. If this is a recurring program, it may be helpful to indicate the application cycle within the name (e.g., Fall 2021 or Spring 2022).
- Enter a start date and deadline. The grace period is the amount of additional time past your deadline you wish to give applicants who have started their application. Applicants cannot start an application after the deadline has passed. Note that deadlines are enforced at 11:59 PM (your local time) of your deadline date.
- Set up your Program Requirements. This is divided into five parts: Forms, References, Media, Attachments, and Submission Info.
- Configure your Evaluation Settings.
- Use the Rating Set section if you already have a rubric to use in evaluating applicants. You can skip this and return to it later if needed.
- Assign reviewers to your program by clicking Add Reviewer.
- Click Publish to make your program live, or scheduled to go live on your start date.
For more information, review the Managing your programs.
Creating Your First Rating Set
Rating Sets are the criteria you want your reviewers to use in evaluating applicants. The criteria can be measured against a numerical scale or by voting (Yes/No). To set up a rating set:
- Click the gear icon at the top-right of your dashboard, then click Account Settings.
- On the left, click Evaluation Settings.
- Click Add Rating Set.
- Name your Rating Set, set the Evaluation Scale (if applicable), and specify how you'd like SlideRoom to calculate the combined rating for a submission. You can choose average, weighted average, or a cumulative score (adding individual criteria scores). If you're setting up Yes/No voting criterion, you can do so in conjunction with the numerical scale, or as a stand-alone criterion.
- Apply your Rating Set to your program. To do this:
- Click the Programs tab at the top of your dashboard.
- Click the name of the program.
- Click the Evaluation Settings Tab.
- Click Edit Evaluation Settings.
- Use the Rating Set drop-down to associate your desired Rating Set to this program.
- Save your Rating Set.
Once you associate your Rating Set with your Program, your reviewers can begin evaluating applicants. For more information review Creating Rating Sets.