Creating and Editing Print Jobs in TX Print
Creating a new TX Print job
The Print Job option enables you to merge Letters, Envelopes or Labels into downloadable PDFs. Users also have the option to log an Activity record for each student in the Print job, which will include a URL link to the letter.
Before you create a new Print Job, you must first create a Letter template and Labels or Envelopes templates (optional) as well as a report.
- From TX Print, click the Print Job icon [
].
- Click the + in the top right.
- Enter the following:
- Name
- Description
- Log Contact Activity Record will add a URL to view/download the letter on the Student’s activity record. For additional details, see: What happens when I choose to Log Contact Activity for a Print Job?. This option will ONLY display if you’ve selected a Letter Template.
- If you choose to Log Contact Activity, you will then be prompted on whether this is a Decision Letter. If checked, this will link the related Application to the Activity record. This will also validate that you have both the Application ID and Application Decision fields included in your report.
- If the selected report does not include both the Application ID and Application Decision fields, you will be unable to toggle the Is this a Decision Letter? Option and will receive the following warning:
The "Decision Letter Logging" feature is disabled because you have not specified which columns in the selected Salesforce report correspond to "Application ID" and "Application Decision". If you want to log it as a decision letter, please click below to configure the column mapping. - Click Configure to update the Report Mappings or Reload if you’ve updated your mappings and wish to refresh the window. If you are not creating a Decision Letter; ignore the message and continue.
- Letter Template
- Select either Labels or Envelopes
- Label/Envelope Template
- Report allows you to select the Report used to generate the mailings.
- Choose whether you want to deduplicate report records every time this job runs.
- Schedule Jobs allows you to schedule your print jobs automatically over a period of time. Click the Schedule Jobs button to set up your scheduling preferences: Frequency, Duration, Time and Time Zone.
Notes on Print Jobs
- Print Jobs created by a user using TargetX Authentication cannot be logged into Salesforce.
- You can use a different report than the one you used in your Template BUT the report used for the Print Job must include all the merged fields used in the selected Templates.
- You can search for a Report or Template by typing the Name into the field to limit the list of options.
- You can choose any combination of templates for your Print Job: Letter Template, Envelope Template or Label Template.
Notes on Scheduled Jobs
- We recommend scheduling your jobs to run no more than 3 months at a time to allow for any rescheduling as needed.
- Once a contact qualifies for the mailing once, they will fall out of subsequent mailings. For example, if Sally Student appears in the Acceptance Letter print job on Monday, she won't appear in it again when it runs on Tuesday, Wednesday, Thursday, and so on.
- If you are scheduling a one-time mailing for a single date in the future, be sure that you disable the Run Job Now setting.
- Click Create.
- You will be returned to the Print Jobs List and the print job you created will display with a Status of Processing. You can Cancel the process by clicking the
, and selecting Cancel.
- Scheduled jobs will display with the Schedule icon [
] in the Print Jobs list.
- You can update the Job Owner once a job has been saved.
- When the Process is complete, the status will change to Complete. Processing time will depend on the size of the print job.
- Click > to view the Job Details, then
- Scheduled jobs will display
- Scheduled jobs also include a Run Now button which allows users to run the job 'on demand' if needed.
- Scheduled jobs will display
What causes the Operation Failed error?
The Operation Failed error is typically due to the selected report not including the Contact ID field. An error message will display if this is the case. You will need to update your report and attempt your print job again.
For job size limits, see Recommended job size limits for TX Print.
Deactivating Print Jobs in TX Print
To deactivate a Print Job:
- Log in to TX Print.
- Click on the Print Jobs icon [
]
- Click the > for the job you wish to deactivate.
- Click the toggle for Print Job Active to Off:

- A Warning message will display confirming the change:

- Close the Job Details window.
- When a job is moved to Inactive, it is moved to the Inactive Jobs list, and any associated schedule is automatically disabled:

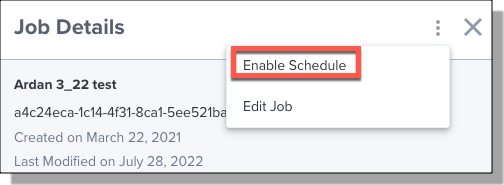
Note: When a Print Job is reactivated, it will return to the main Print Jobs list. You must re-enable the schedule. From the Job Details window, click the ellipses, then Enable Schedule to re-enable the original schedule, or select Edit Job to edit the Job Schedule:
- Any generated PDFs for inactive Print Job are still available for download.
- Job Runs data is still available after a job is moved to Inactive.
Editing Print Jobs in TX Print
You can edit your print jobs to make changes without having to rebuild the entire job.
- Navigate to TX Print.
- Click on Print Jobs.
- Click on the > for the TX Print Job you wish to edit.
- Click on the ellipses in the Job Details window:

- Click Edit Job.
- You can now edit any of the fields. For details on TX Print Jobs, see Creating a new TX Print Job.
- Name
- Description
- Letter Template
- Envelope Template
- Label Template
- Report
- Deduplicate toggle
- Schedule
- Run job now
Editing the Job Schedule
Once you've selected to Edit the job, follow these steps:
- Scroll to the Jobs Scheduled section and click the >.
- Make your changes to the Frequency, Start Date, etc.
- Select the < at the top of the window.
- Confirm your changes display in the Edit Print Job window.
- Click Save.
Generating and downloading a PDF for printing in TX Print
PDF’s are generated using Print Jobs. TX Print supports Print Jobs with up to 15,000 records in a report:
- Create a Letter template, Label template or Envelope template.
- Create a Report.
- Select Print Jobs
- Click the + in the top right.
- Enter the following:
- Name
- Description
- Select at least one of the following:
- Letter Template
- Envelope Template
- Label Template
- Select a Report.
- Choose whether you want to deduplicate report records every time this job runs.
Note: Template and Report fields are searchable; start typing to narrow the list.
- If you want to schedule the Print Job to run automatically over time, click the Schedule Jobs button.
- If you’ve selected a Letter Template, you can Update Activity History (toggle).
- Click Create.
- You will be returned to the Print Job List, and the Print Job you created will display with a Status of Processing. You can cancel the process by clicking the
-
Scheduled jobs will display with the Schedule icon [
-
- When the process is complete, the Status will change to Complete.
Notes:
- TX Print first generates the PDFs for printing Letters, Envelopes, and Labels, then updates the Activity History asynchronously. Depending on the size of the job, updating Activity could take several minutes to a couple of hours.
- TX Print supports Print Jobs with up to 15,000 records in a report.
- Click
To view a history of your TX Print Letters
- Select Print Jobs.
- Click the Runs tab.
You can view the Last Run, Status, and related Run Details or download the print job.
Limiting job sizes for TX Print
Recommended job size limits for TX Print are as follows:
- 2 thousand contacts 5 page max
- 3 thousand contacts 3 page max
- 4 thousand contacts 1 page max
The processing times for the above job sizes are estimated to take around 30 minutes, depending on the actual size of your template. Jobs that are larger than these will likely not process and should be divided into smaller jobs.