TargetX Communication Planner Quick Start Guide for Admins
Overview
The Communication Planner consolidates Email and SMS campaigns into a single tool, enabling you to define Tracks and Steps tailored to your organization's requirements. Salesforce serves as the interface and repository for campaign data and images, while actual campaign execution and related processes remain outside its scope.
 Campaign Builder is the primary organizational level in the Communication Planner, where you define Tracks, Steps, and Elements.
![]() Quick Messages allow you to deliver content to a specific group of recipients as a one-time event.
Quick Messages allow you to deliver content to a specific group of recipients as a one-time event.
![]() SMS Inbox allows you to create and view SMS messages.
SMS Inbox allows you to create and view SMS messages.
![]() Reports display Charts and Reports on your Campaign statistics.
Reports display Charts and Reports on your Campaign statistics.
![]() Activity Center lets you view your Quick Messages, Campaigns, Tracks, Elements, Status, and Sent details, as well as a list of Email Recipients.
Activity Center lets you view your Quick Messages, Campaigns, Tracks, Elements, Status, and Sent details, as well as a list of Email Recipients.
![]() Template Builder is a tool for creating content/messaging for Email Templates. All campaigns and templates, including accompanying images, are securely stored within your Salesforce instance.
Template Builder is a tool for creating content/messaging for Email Templates. All campaigns and templates, including accompanying images, are securely stored within your Salesforce instance.
![]() Folders enable you to organize your content for campaigns and templates efficiently.
Folders enable you to organize your content for campaigns and templates efficiently.
Navigating Communication Planner
You can access each section of the Communication Planner in the left navigation menu. Define your Folders, create Email or SMS Templates, create Campaigns, or view Reports.
 Campaigns
The Campaign list displays your Campaigns by name, description, tags, start date, end date, folder, owner, last modified, and status. Click the arrow in the header to sort by that column (ascending or descending). The list of campaigns changes based on the selected folder, with the default view showing All Folders.

Filtering Campaigns
You can filter the Campaign list page by date range, owner, status, and tags. When filtering by date range, you can use either the start date, end date, or both to narrow your search. The table below outlines examples using different date range filters:
|
Start Date |
End Date |
Results |
|---|---|---|
|
March 1, 2026 |
<blank> |
All campaigns with a start date on or after March 1st. |
|
<blank> |
February 28, 2026 |
All campaigns with an end date before or on February 28th. |
|
March 1, 2026 |
March 30, 2026 |
Campaigns set to start and end within March 2026. |
Tags are defined in Campaign details. To filter by a tag, click the + under Filter by Tags and begin typing the tag to use. Click the tag to add it under the Campaign Tag(s) label:

Once you’ve added your filter criteria, select Apply to enforce the filter and return to the Campaign list. Use the Clear Filters button to remove all your filter criteria and Apply. The Campaign History tab displays a summary of your Campaign’s details and a Version History.
For details on creating Campaigns in the Communication Planner, see Creating Campaigns.
 Quick Messages
The Quick Messages tab allows you to deliver content to a specific group of recipients as a one-time event. They can be created and scheduled quickly, offering a streamlined way to communicate without needing a full campaign setup. Quick messages are ideal for campus alerts, announcements, reminders, special event invitations, and more.
Quick Message Tab
The Quick Message tab is on the Communication Planner's left navigation panel. From here, you can view existing messages, create new messages, and toggle between email and SMS quick messages. For details on creating Quick Messages, see Creating Quick Messages.

 SMS Inbox
SMS Inbox displays your SMS Inboxes and communications with Contacts. Note: historic conversations from TX SMS will not display in SMS Inbox.
SMS Inbox Tab
All inboxes you can access appear by default; however, you can also choose a specific inbox from the picklist. A visual notification will display in the left pane for inboxes with unread messages.

In the left sidebar, you can view all SMS message threads linked to your contacts. Use the tabs to filter between Unread and All Messages. When unread messages are present, the Unread tab opens automatically; otherwise, the All Messages tab appears by default.
The central panel displays the selected SMS conversation, with tags showing whether each message was sent from a Campaign or a Quick Message. To access message options, click the ellipsis on a message and select Mark as Unread or Hide Message. Any user can hide a message, but only Admins can unhide messages.

The avatar in the top-right opens a student information panel with the student’s email, phone, mailing address, Record ID, and a link to their full profile. The student’s stage appears directly beneath the contact’s name.

The Inbox initially loads the 50 most recent messages, and older messages appear as you scroll. When searching, choose Name, Conversation, or Student ID. The field used for Student ID is defined in SMS General Settings.
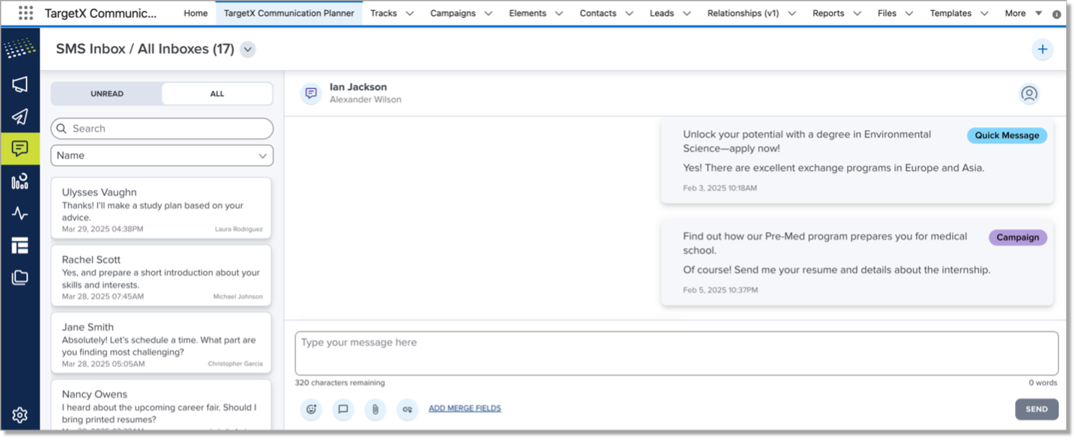
Select + to start a new message. Choose the inbox, select the sender phone number, and search for the contact you want to message. If a conversation thread already exists for that contact in the selected inbox with the same sender phone number, you’ll see a message stating, “A conversation with this recipient already exists in the selected inbox using the same sender phone number,” and you should search for the existing thread to continue.
For more information on using the SMS Inbox, see SMS Inbox Overview.
 Reports
The Reports area displays analytics on your Campaigns. View by count (#) or percentage (%) and select the buttons at the top to filter by different time ranges. The chart displays the overall data for your Campaigns by sent, unique opens, unique clicks, bounce, and opt-outs. Hover over a timeframe to view detailed data:

Beneath the chart, you can view analytics for individual Campaigns.
- Sent: the number of emails sent for the Campaign.
- Unique opens: this is the number/percentage of unique opens for a given email out of the total number of emails delivered.
- Unique Clicks: this is the number/percentage of unique clicks for a given email out of the total number of emails delivered.
- Opt-Outs: the number/percentage of unsubscribed recipients out of total emails delivered.
- Bounce: the number/percentage of emails bounced out of total emails sent.
Note: the Reports table and graphs update in 10 to 15 minute intervals.
 Activity Center
The Activity Center is your operational Dashboard for tracking and troubleshooting running jobs. You can view your sent campaigns, tracks, track type, element type, and name, along with the status and send details. If a job fails, hover over the status icon for more information. Toggle the tabs at the top of the window to view Quick Messages or Campaigns.

For Drip Tracks, an icon [![]() ] displays at the end of the row. Clicking the icon displays details on the Drip Tracks sent:
] displays at the end of the row. Clicking the icon displays details on the Drip Tracks sent:

View error messages by clicking on the Fail Status. Any relevant error codes will display along with a message and an option to copy the error to the clipboard. You can also view the status of individual Email Recipients by clicking the number in the Sent column for an Activity row. The list of recipients will display along with the type, email, and individual email message status.

The table below outlines the various Statuses in the Activity Center:
|
Activity Center Status |
Description |
|---|---|
| Failed |
This status means something went wrong with the sending. Customers on package 2505 and later can hover on the status for more information. If the error is unknown the error message will include instructions on opening a support ticker for technical investigation. This status means something went wrong with the sending. Customers on package 2505 and later can hover on the status for more information.
|
| New | This status will populate momentarily when the scheduled sending job is starting. |
| Processing | This status indicates the processing of scheduled communication from the CRM to the sending service. |
| Sent |
This status indicates that the send attempt was sent from the CRM to the sending service successfully. |
| Sent: Zero Eligible Recipients | This status indicates the send was processed successfully, and there are recipients on the report, but none were eligible to receive the activity. This is either because they have not progressed to this step, are not included in the email group (if configured), or are not eligible to receive the element based on engagement filtering. |
| Sent: Zero Recipients | This status indicates the send was processed successfully, but the recipient report in the CRM did not contain any records. |
|
Recipient list Status |
Description |
|---|---|
| Delivered |
Delivery of confirmation is confirmed by the sending service.
|
| Failed | The recipient was processed for sending, but something else caused the delivery to fail. See the error message visible when hovering over the status. |
| Sent | The recipient was processed for sending, but delivery could not be confirmed by the sending service. |
 Templates
The Template section offers a choice between Email and SMS templates. Select the option in the left pane to display the list of templates previously created. Within the list view, you can edit, copy, archive, or delete existing templates or click the + button to create a new one. Use the folder picklist to select the folder you want to view; ‘All Folders’ will default.

When you create a new template and enter the details, you'll specify the Folder for storing your template and designate the Parent Object to be utilized, either Contact or Lead. The Parent object is referenced when incorporating merge fields into your template.
Note: you cannot change the Parent Object after you save the template.
Selecting Continue launches the Template Builder, which has numerous options for designing your templates:
- Reusable content streamlines communication by allowing quick access to previously created materials. This saves time and maintains consistency across various platforms and messages.
- Synced rows enable you to create reusable content for standard email template components. For instance, you can set up a Synced Row with your institution’s logo and header. All templates utilizing that Synced Row will automatically reflect the changes whenever the logo or header is updated.
- Saved rows enable quick retrieval of essential information, such as critical messages or contact details, without repetitive data entry. This feature enhances productivity and ensures accuracy in communication initiatives.
- Cloning templates simplify the creation of new communication plans by providing a framework that can be easily replicated and customized as needed. This promotes consistency in branding and messaging while saving time and effort in planning and execution.
- Comments facilitate seamless collaboration among team members by ensuring everyone can access the most up-to-date information. This promotes transparency, reduces errors, and enhances overall efficiency in communication plan execution.
- The ChatGPT editor helps you quickly add content to your Email Template using a built-in ChatGPT integration. For example, use the ChatGPT editor to write an email encouraging students to consider living in university housing or write an email encouraging students to attend their student success check-in.


For details on creating Email Templates in the Communication Planner, see Creating Folders and Templates.
 Folders
The Folder list displays the name, date last modified, owner, and the area for which the folder is available, such as campaigns, email templates, or SMS templates. You can edit or archive existing folders from the list view or select + to create a New folder.
You can indicate that a folder is available for different types of communications. For example, a ‘First Year’ folder can include campaigns, email templates, and SMS templates, or you can create a folder only for one type, such as email templates, depending on your needs. If a folder is already used for a particular element, you can’t uncheck it in it. For example, in the image below, you cannot uncheck campaigns because the folder currently has four campaigns in the folder.

Note: archiving a folder will archive everything within the folder. For more information on folders, see Managing Folders.
Administration of TargetX Communication Planner
|
Administrative Topic/Link |
This topic contains information on: |
|---|---|
|
Transitioning to TargetX Communication Planner |
|
|
Configuring Communication Planner Permissions |
|
|
Adding users to the File Image Library |
|
|
Configuring Communication Planner Settings |
|
|
Creating Email Test Lists |